Cirkit Designer
Your all-in-one circuit design IDE
Home /
Project Documentation
Arduino UNO 4-Digit 7-Segment Display Counter

Circuit Documentation
Summary
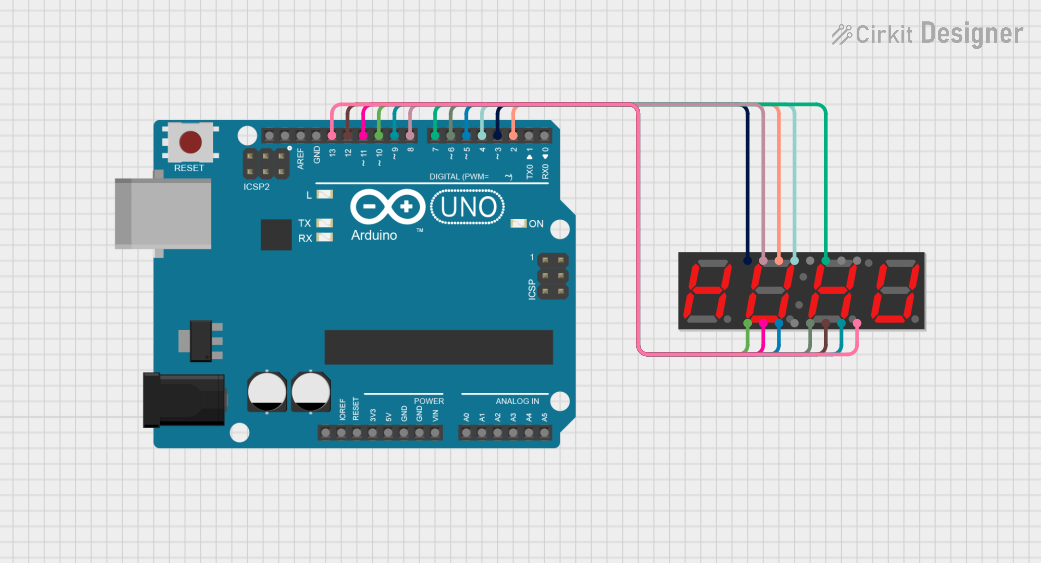
This circuit consists of an Arduino UNO microcontroller connected to a 4-digit 7-segment display. The Arduino UNO controls the display to show numbers sequentially on each digit. The display is driven by the digital pins of the Arduino, with each segment and digit being controlled individually.
Component List
Arduino UNO
- Description: A microcontroller board based on the ATmega328P.
- Pins: UNUSED, IOREF, Reset, 3.3V, 5V, GND, Vin, A0, A1, A2, A3, A4, A5, SCL, SDA, AREF, D13, D12, D11, D10, D9, D8, D7, D6, D5, D4, D3, D2, D1, D0
7-Segment Display (4 Digit) YOUNGSUN
- Description: A 4-digit 7-segment display used for displaying numerical information.
- Pins: DIG1, DIG2, D, COL-A, E, DIG3, DIG4, DP, APOS-C, A, C, COL-C, APOS-A, F, G, B
Wiring Details
Arduino UNO
- D13: Connected to DIG4 of the 7-Segment Display
- D12: Connected to DIG3 of the 7-Segment Display
- D11: Connected to DIG2 of the 7-Segment Display
- D10: Connected to DIG1 of the 7-Segment Display
- D9: Connected to DP of the 7-Segment Display
- D8: Connected to G of the 7-Segment Display
- D7: Connected to F of the 7-Segment Display
- D6: Connected to E of the 7-Segment Display
- D5: Connected to D of the 7-Segment Display
- D4: Connected to C of the 7-Segment Display
- D3: Connected to B of the 7-Segment Display
- D2: Connected to A of the 7-Segment Display
7-Segment Display (4 Digit) YOUNGSUN
- DIG4: Connected to D13 of the Arduino UNO
- DIG3: Connected to D12 of the Arduino UNO
- DIG2: Connected to D11 of the Arduino UNO
- DIG1: Connected to D10 of the Arduino UNO
- DP: Connected to D9 of the Arduino UNO
- G: Connected to D8 of the Arduino UNO
- F: Connected to D7 of the Arduino UNO
- E: Connected to D6 of the Arduino UNO
- D: Connected to D5 of the Arduino UNO
- C: Connected to D4 of the Arduino UNO
- B: Connected to D3 of the Arduino UNO
- A: Connected to D2 of the Arduino UNO
Code Documentation
Arduino UNO Code
// Khai báo các chân segment
#define SEG_A 2
#define SEG_B 3
#define SEG_C 4
#define SEG_D 5
#define SEG_E 6
#define SEG_F 7
#define SEG_G 8
#define SEG_DP 9

// Khai báo các chân digit (katot chung)
#define DIGIT_1 10
#define DIGIT_2 11
#define DIGIT_3 12
#define DIGIT_4 13

// Mảng lưu cấu hình cho các số từ 0 đến 9 (gồm a, b, c, d, e, f, g)
const byte digits[] = {
  0b00111111, // 0
  0b00000110, // 1
  0b01011011, // 2
  0b01001111, // 3
  0b01100110, // 4
  0b01101101, // 5
  0b01111101, // 6
  0b00000111, // 7
  0b01111111, // 8
  0b01101111  // 9
};

// Chân của các segment
const byte segmentPins[] = {SEG_A, SEG_B, SEG_C, SEG_D, SEG_E, SEG_F, SEG_G};

// Chân của các digit
const byte digitPins[] = {DIGIT_1, DIGIT_2, DIGIT_3, DIGIT_4};

// Hàm thiết lập ban đầu
void setup() {
  // Cài đặt các chân segment là OUTPUT
  for (byte i = 0; i < 7; i++) {
    pinMode(segmentPins[i], OUTPUT);
  }

  // Cài đặt các chân digit là OUTPUT
  for (byte i = 0; i < 4; i++) {
    pinMode(digitPins[i], OUTPUT);
  }
}

// Hàm hiển thị một số trên một digit
void displayDigit(int num, int digit) {
  // Tắt tất cả các digit
  for (byte i = 0; i < 4; i++) {
    digitalWrite(digitPins[i], HIGH);
  }

  // Bật digit cần hiển thị
  digitalWrite(digitPins[digit], LOW);

  // Hiển thị số bằng cách điều khiển các segment
  byte segments = digits[num];
  for (byte i = 0; i < 7; i++) {
    digitalWrite(segmentPins[i], (segments >> i) & 0x01);
  }
}

// Hàm lặp
void loop() {
  // Hiển thị các số lần lượt trên 4 chữ số
  displayDigit(1, 0); // Hiển thị số 1 trên digit 1
  delay(5);

  displayDigit(2, 1); // Hiển thị số 2 trên digit 2
  delay(5);

  displayDigit(3, 2); // Hiển thị số 3 trên digit 3
  delay(5);

  displayDigit(4, 3); // Hiển thị số 4 trên digit 4
  delay(5);
}
This code initializes the pins connected to the segments and digits of the 7-segment display as outputs. It then sequentially displays the numbers 1, 2, 3, and 4 on the four digits of the display. The displayDigit function is responsible for turning on the appropriate segments to display a given number on a specified digit.