
Arduino UNO Controlled Light Sensor and Servo Motor Interface
View and Edit Project In Cirkit Designer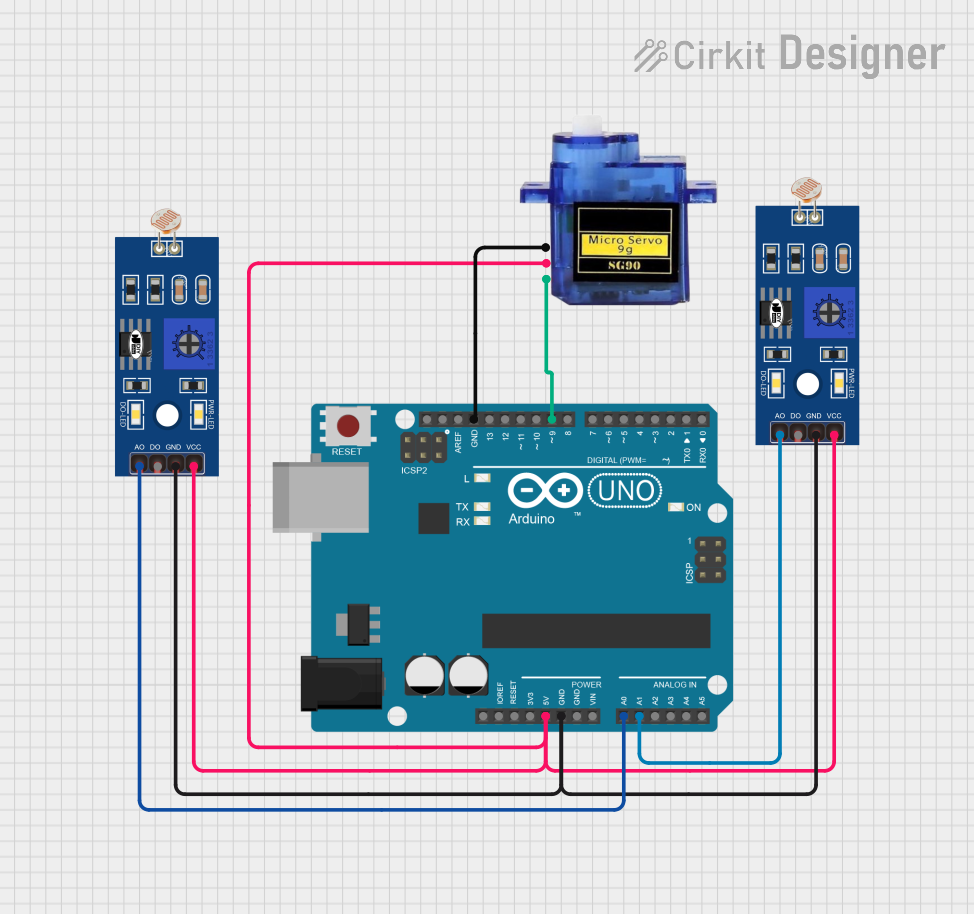
Circuit Documentation
Summary of the Circuit
This circuit is designed to interface an Arduino UNO with two Light Dependent Resistors (LDRs) and a Micro servo 9G. The Arduino UNO serves as the central processing unit, reading light intensity data from the LDRs and controlling the position of the servo motor based on the program logic defined in the embedded code. The LDRs are used as sensors to detect the level of ambient light, and the servo motor is an actuator that can be positioned at various angles.
Component List
Arduino UNO
- Description: A microcontroller board based on the ATmega328P.
- Pins: UNUSED, IOREF, Reset, 3.3V, 5V, GND, Vin, A0-A5, SCL, SDA, AREF, D0-D13.
LDR (Light Dependent Resistor)
- Description: A sensor that changes resistance with light intensity.
- Pins: A0, D0, GND, VCC.
Micro servo 9G
- Description: A small and lightweight servo motor suitable for small projects.
- Pins: GND, +5V, PWM.
Wiring Details
Arduino UNO
- 5V: Supplies power to the Micro servo 9G and both LDRs.
- GND: Common ground for the Micro servo 9G and both LDRs.
- A0: Connected to the first LDR's A0 pin.
- A1: Connected to the second LDR's A0 pin.
- D9: Connected to the PWM pin of the Micro servo 9G.
LDR
- VCC: Connected to the 5V output from the Arduino UNO.
- GND: Connected to the ground on the Arduino UNO.
- A0: One LDR's A0 pin is connected to the A0 pin on the Arduino UNO, and the other LDR's A0 pin is connected to the A1 pin on the Arduino UNO.
Micro servo 9G
- +5V: Powered by the 5V output from the Arduino UNO.
- GND: Shares a common ground with the Arduino UNO.
- PWM: Receives PWM signals from the D9 pin on the Arduino UNO.
Documented Code
Arduino UNO Code (sketch.ino)
void setup() {
  // put your setup code here, to run once:

}

void loop() {
  // put your main code here, to run repeatedly:

}
The provided code is a template with empty setup() and loop() functions. The setup() function is intended for initialization code that runs once, such as pin mode settings. The loop() function is for the main logic that runs continuously. Actual implementation details need to be added based on the desired behavior of the circuit.
Additional Files
- documentation.txt: This file is mentioned but no content is provided. It is likely intended for additional notes or manual documentation.