
Circuit Documentation
Summary
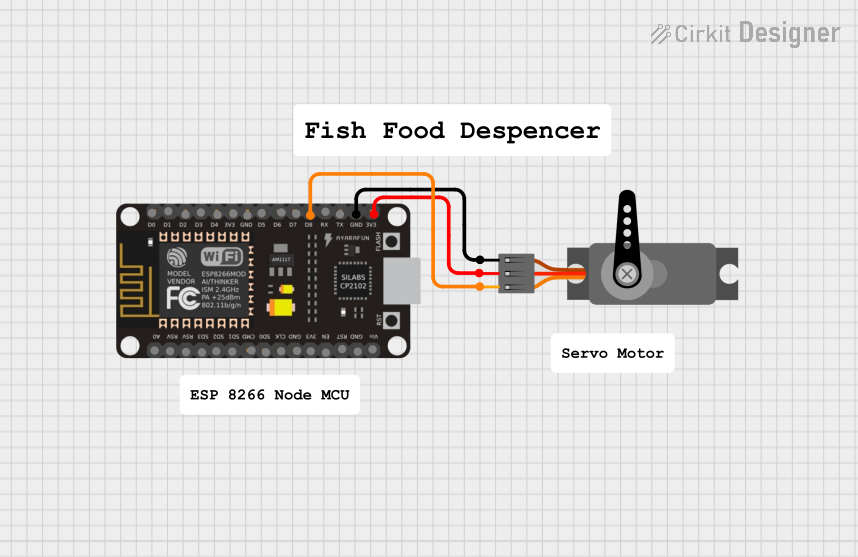
This circuit is designed to control a servo motor using an ESP8266 NodeMCU microcontroller via Wi-Fi. The ESP8266 NodeMCU connects to a Wi-Fi network and listens for commands to control the position of the servo motor. The servo motor is connected to the D8 pin of the NodeMCU.
Component List
ESP8266 NodeMCU
- Description: A low-cost Wi-Fi microcontroller with GPIO, PWM, I2C, and ADC capabilities.
- Pins: D0, D1, D2, D3, D4, 3V3, GND, D5, D6, D7, D8, RX, TX, A0, RSV, SD3, SD2, SD1, CMD, SD0, CLK, EN, RST, VIN
Servo
- Description: A servo motor that can be controlled to rotate to a specific angle.
- Pins: GND, VCC, PWM
Comment
- Description: Placeholder for comments or notes in the circuit design.
- Pins: None
Wiring Details
ESP8266 NodeMCU
- D8: Connected to PWM of the Servo
- GND: Connected to GND of the Servo
- 3V3: Connected to VCC of the Servo
Servo
- PWM: Connected to D8 of the ESP8266 NodeMCU
- GND: Connected to GND of the ESP8266 NodeMCU
- VCC: Connected to 3V3 of the ESP8266 NodeMCU
Code Documentation
/*
 * Wi-Fi Controlled Servo Motor with ESP8266 NodeMCU
 * This code sets up an ESP8266 NodeMCU to control a servo motor via Wi-Fi.
 * The servo motor is connected to pin D8 of the NodeMCU.
 * The NodeMCU will connect to a Wi-Fi network and listen for commands to
 * control the servo motor's position.
 */

#include <ESP8266WiFi.h>
#include <Servo.h>

// Wi-Fi credentials
const char* ssid = "your_SSID";
const char* password = "your_PASSWORD";

// Servo object
Servo myServo;

// Pin definitions
const int servoPin = D8;

void setup() {
  // Initialize serial communication
  Serial.begin(115200);
  delay(10);

  // Connect to Wi-Fi
  Serial.println();
  Serial.print("Connecting to ");
  Serial.println(ssid);
  WiFi.begin(ssid, password);

  while (WiFi.status() != WL_CONNECTED) {
    delay(500);
    Serial.print(".");
  }

  Serial.println("");
  Serial.println("WiFi connected");
  Serial.println("IP address: ");
  Serial.println(WiFi.localIP());

  // Attach the servo to the pin
  myServo.attach(servoPin);
}

void loop() {
  // Placeholder for code to receive and process Wi-Fi commands
  // Example: myServo.write(angle); where angle is the desired position
}
This code sets up the ESP8266 NodeMCU to connect to a Wi-Fi network and control a servo motor connected to pin D8. The setup function initializes serial communication, connects to the Wi-Fi network, and attaches the servo motor to the specified pin. The loop function is a placeholder for future code to receive and process Wi-Fi commands to control the servo motor's position.