Cirkit Designer
Your all-in-one circuit design IDE
Home /
Project Documentation
Arduino UNO WiFi-Powered Robotic System with Ultrasonic Sensor and Motor Control
Circuit Documentation
Summary
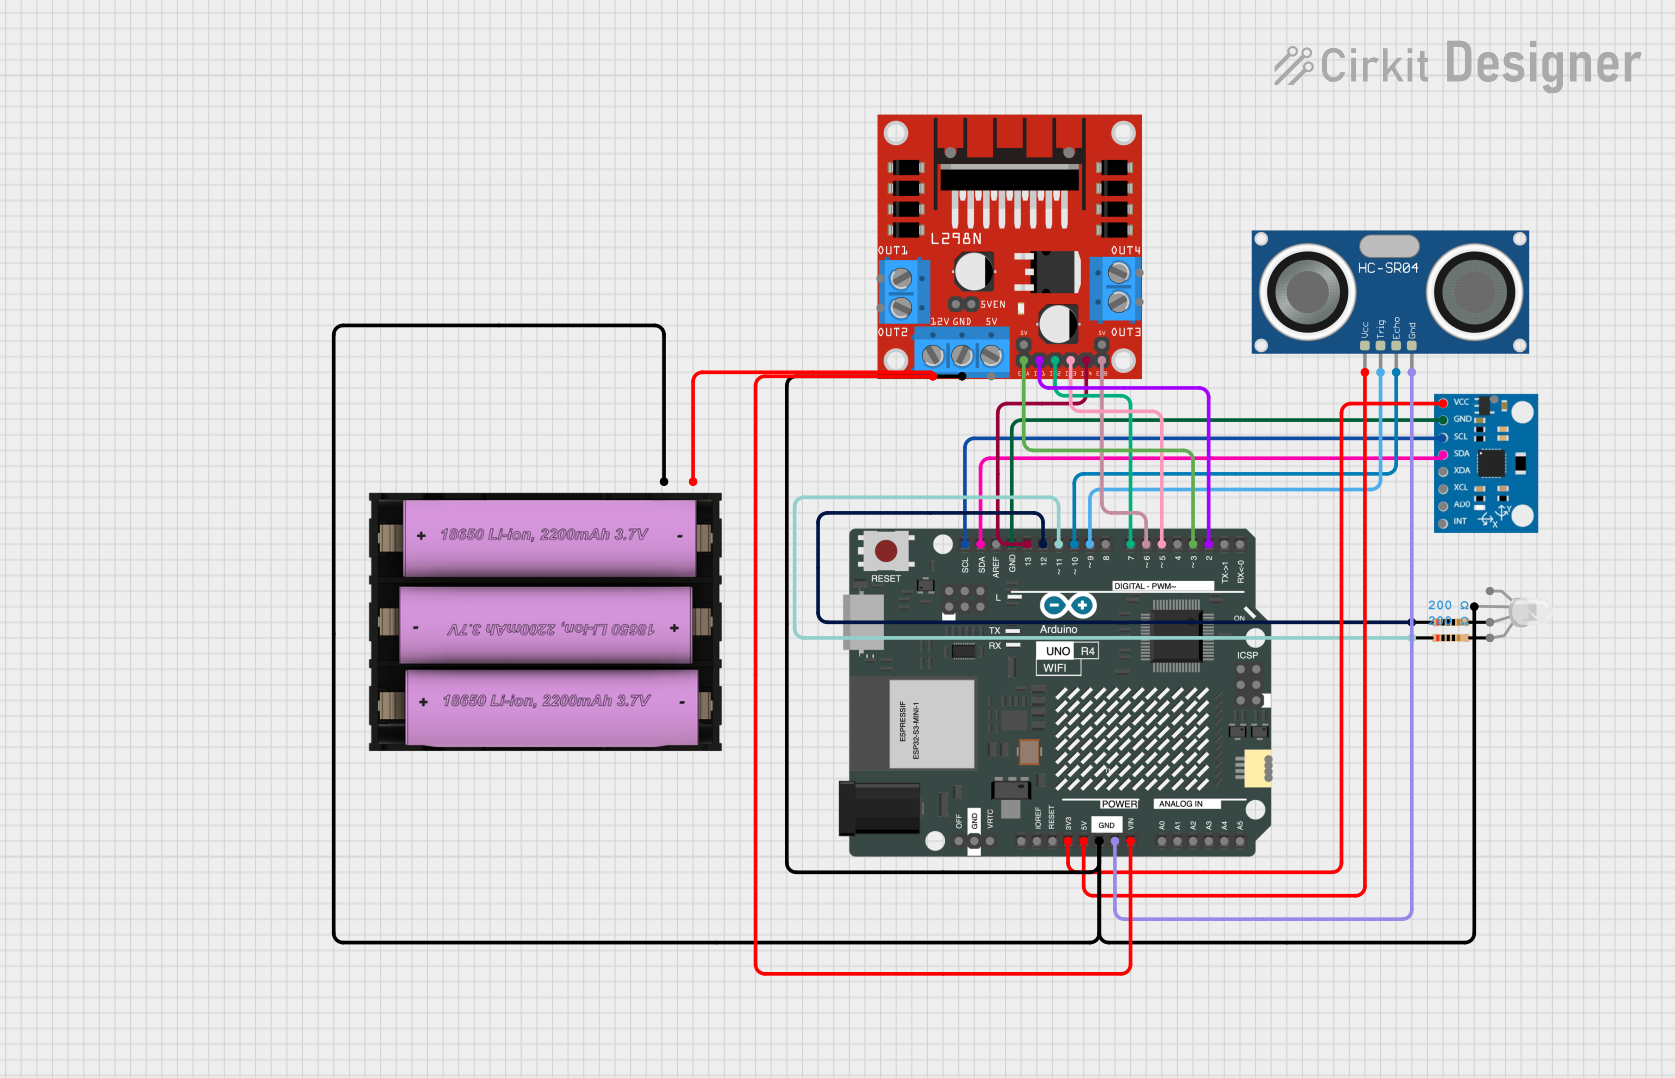
This document provides a detailed overview of a circuit that includes an Arduino UNO R4 WiFi, an L298N DC motor driver, an RGB LED, an HC-SR04 Ultrasonic Sensor, an MPU6050 sensor, a 7V battery, and resistors. The circuit is designed to control motors, sense distance, and measure orientation, with the Arduino UNO R4 WiFi serving as the central microcontroller.
Component List
Arduino UNO R4 WiFi
- Description: A microcontroller board based on the ATmega328P, featuring WiFi capabilities.
- Pins: OFF, GND, VRTC, IIC0_SCL, IIC0_SDA, 3V3, GPIO 41, GPIO 0, GPIO 42, GPIO 43, GPIO 44, BOOT, IOREF, RESET, 5V, VIN, A0, A1, A2, A3, A4, A5, RSPCKA, CIPO, COPI, D0/RX, D1/TX, D2, D3, D4, D5, D6, D7, D8, D9, D10, D11, D12, D13, AREF, SDA, SCL
L298N DC Motor Driver
- Description: A dual H-Bridge motor driver that allows control of the speed and direction of two DC motors.
- Pins: OUT1, OUT2, 12V, GND, 5V, OUT3, OUT4, 5V-ENA-JMP-I, 5V-ENA-JMP-O, +5V-J1, +5V-J2, ENA, IN1, IN2, IN3, IN4, ENB
RGB LED (Wokwi compatible)
- Description: A common anode RGB LED.
- Pins: R, COM, G, B
HC-SR04 Ultrasonic Sensor
- Description: A sensor used to measure distance by using ultrasonic waves.
- Pins: VCC, TRIG, ECHO, GND
MPU6050
- Description: A 6-axis motion tracking device that combines a 3-axis gyroscope and a 3-axis accelerometer.
- Pins: vcc, gnd, scl, sda, xda, xcl, AD0, int, 3.3v
Set Battery (7V)
- Description: A 7V battery used to power the circuit.
- Pins: +, -
Resistor (200 Ohms)
- Description: A resistor with a resistance of 200 Ohms.
- Pins: pin1, pin2
Wiring Details
Arduino UNO R4 WiFi
- 3V3 connected to vcc of MPU6050
- 5V connected to VCC of HC-SR04 Ultrasonic Sensor
- GND connected to:
- - of Set Battery (7V)
- COM of RGB LED
- GND of L298N DC Motor Driver
- GND of HC-SR04 Ultrasonic Sensor
- gnd of MPU6050
- VIN connected to + of Set Battery (7V)
- D2 connected to IN1 of L298N DC Motor Driver
- D3 connected to ENA of L298N DC Motor Driver
- D5 connected to IN3 of L298N DC Motor Driver
- D6 connected to ENB of L298N DC Motor Driver
- D7 connected to IN2 of L298N DC Motor Driver
- D9 connected to TRIG of HC-SR04 Ultrasonic Sensor
- D10 connected to ECHO of HC-SR04 Ultrasonic Sensor
- D11 connected to pin1 of Resistor (200 Ohms)
- D12 connected to pin1 of Resistor (200 Ohms)
- D13 connected to IN4 of L298N DC Motor Driver
- SDA connected to sda of MPU6050
- SCL connected to scl of MPU6050
L298N DC Motor Driver
- 12V connected to VIN of Arduino UNO R4 WiFi
- GND connected to GND of Arduino UNO R4 WiFi
- IN1 connected to D2 of Arduino UNO R4 WiFi
- ENA connected to D3 of Arduino UNO R4 WiFi
- IN3 connected to D5 of Arduino UNO R4 WiFi
- ENB connected to D6 of Arduino UNO R4 WiFi
- IN2 connected to D7 of Arduino UNO R4 WiFi
- IN4 connected to D13 of Arduino UNO R4 WiFi
RGB LED (Wokwi compatible)
- COM connected to GND of Arduino UNO R4 WiFi
HC-SR04 Ultrasonic Sensor
- VCC connected to 5V of Arduino UNO R4 WiFi
- GND connected to GND of Arduino UNO R4 WiFi
- TRIG connected to D9 of Arduino UNO R4 WiFi
- ECHO connected to D10 of Arduino UNO R4 WiFi
MPU6050
- vcc connected to 3V3 of Arduino UNO R4 WiFi
- gnd connected to GND of Arduino UNO R4 WiFi
- sda connected to SDA of Arduino UNO R4 WiFi
- scl connected to SCL of Arduino UNO R4 WiFi
Set Battery (7V)
- + connected to VIN of Arduino UNO R4 WiFi
- - connected to GND of Arduino UNO R4 WiFi
Resistor (200 Ohms)
- pin1 connected to D11 of Arduino UNO R4 WiFi
- pin1 connected to D12 of Arduino UNO R4 WiFi
Documented Code
Arduino UNO R4 WiFi Code
void setup() {
  // put your setup code here, to run once:

}

void loop() {
  // put your main code here, to run repeatedly:

}
This code is a basic template for the Arduino UNO R4 WiFi. The setup() function is where you initialize your components, and the loop() function is where you place the main code that runs repeatedly.