
Arduino UNO-Based Smart Light Control with Touch Sensors and Relays
View and Edit Project In Cirkit Designer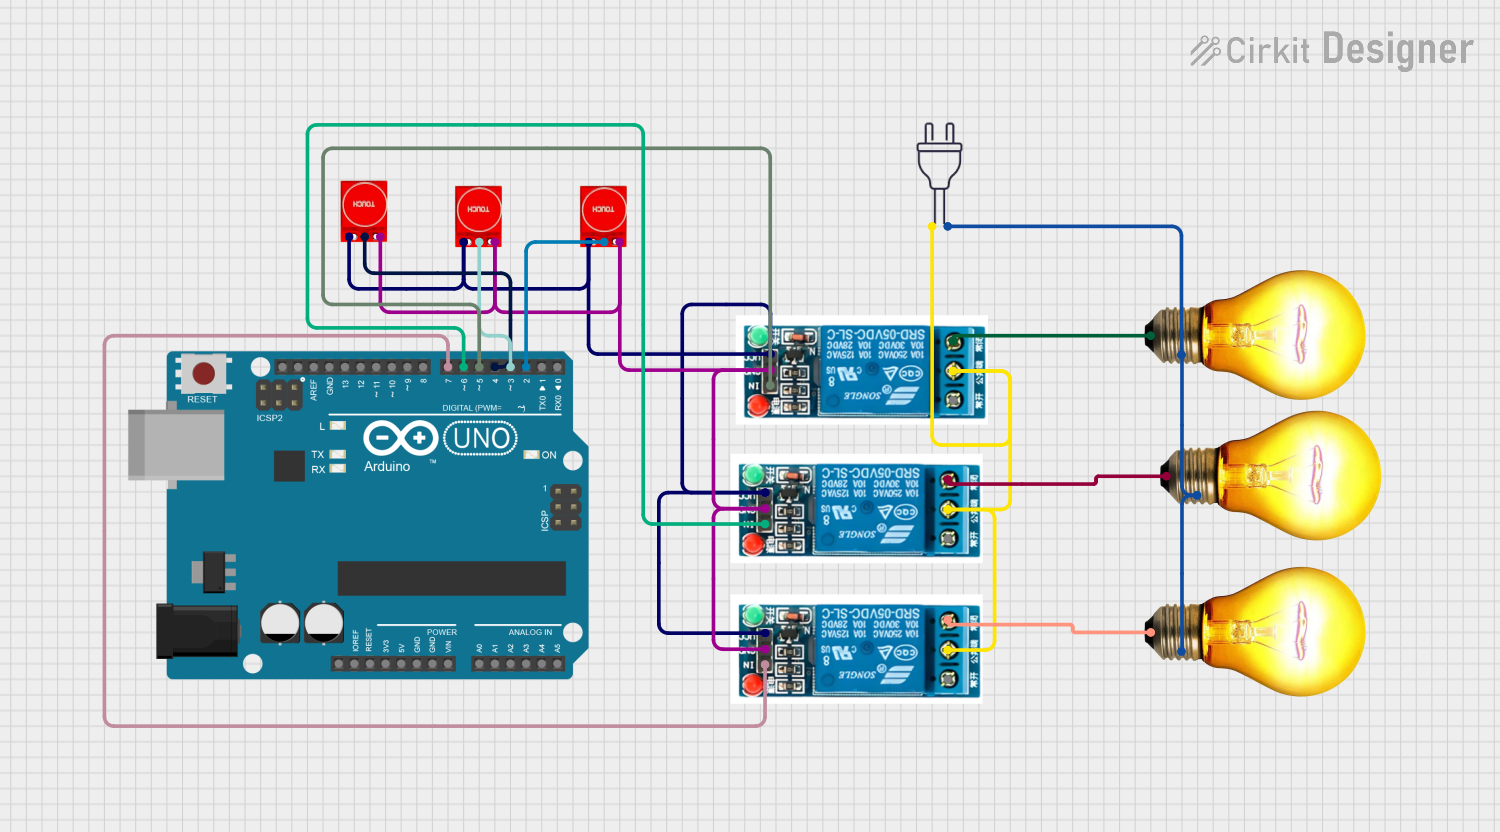
Circuit Documentation
Summary
This circuit involves an Arduino UNO microcontroller, three 5V relays, three AC bulbs, and three touch sensors. The Arduino UNO controls the relays, which in turn control the AC bulbs. The touch sensors are used to trigger the relays via the Arduino.
Component List
Arduino UNO
- Description: A microcontroller board based on the ATmega328P.
- Pins: UNUSED, IOREF, Reset, 3.3V, 5V, GND, Vin, A0, A1, A2, A3, A4, A5, SCL, SDA, AREF, D13, D12, D11, D10, D9, D8, D7, D6, D5, D4, D3, D2, D1, D0
5V Relay
- Description: An electromechanical switch used to control high voltage devices.
- Pins: Normally Open, Common terminal, Normally Closed, In, GND, VCC
Power 220V
- Description: A power source providing 220V AC.
- Pins: hot wire, neutral wire
AC Bulb
- Description: A standard AC light bulb.
- Pins: P, N
Touch Sensor TTP233
- Description: A touch sensor module used to detect touch inputs.
- Pins: GND, I/O, VCC
Wiring Details
Arduino UNO
- D7: Connected to In of 5V Relay
- D6: Connected to In of 5V Relay
- D5: Connected to In of 5V Relay
- D4: Connected to I/O of Touch Sensor TTP233
- D3: Connected to I/O of Touch Sensor TTP233
- D2: Connected to I/O of Touch Sensor TTP233
5V Relay
- In: Connected to D7 of Arduino UNO
- In: Connected to D6 of Arduino UNO
- In: Connected to D5 of Arduino UNO
- Common terminal: Connected to hot wire of Power 220V
- Normally Closed: Connected to P of AC Bulb
- GND: Connected to GND of Touch Sensor TTP233
- VCC: Connected to VCC of Touch Sensor TTP233
Power 220V
- hot wire: Connected to Common terminal of 5V Relay
- neutral wire: Connected to N of AC Bulb
AC Bulb
- P: Connected to Normally Closed of 5V Relay
- N: Connected to neutral wire of Power 220V
Touch Sensor TTP233
- GND: Connected to GND of 5V Relay
- I/O: Connected to D4 of Arduino UNO
- VCC: Connected to VCC of 5V Relay
Code Documentation
Arduino UNO Code
void setup() {
  // put your setup code here, to run once:

}

void loop() {
  // put your main code here, to run repeatedly:

}
This code is a basic template for the Arduino UNO. The setup() function is used to initialize any settings, and the loop() function contains the main code that runs repeatedly. In this case, the code is currently empty and needs to be filled in with the logic to control the relays based on the touch sensor inputs.