Arduino-Controlled Servo and Motor System with Bluetooth Audio Interface

Circuit Documentation
Summary
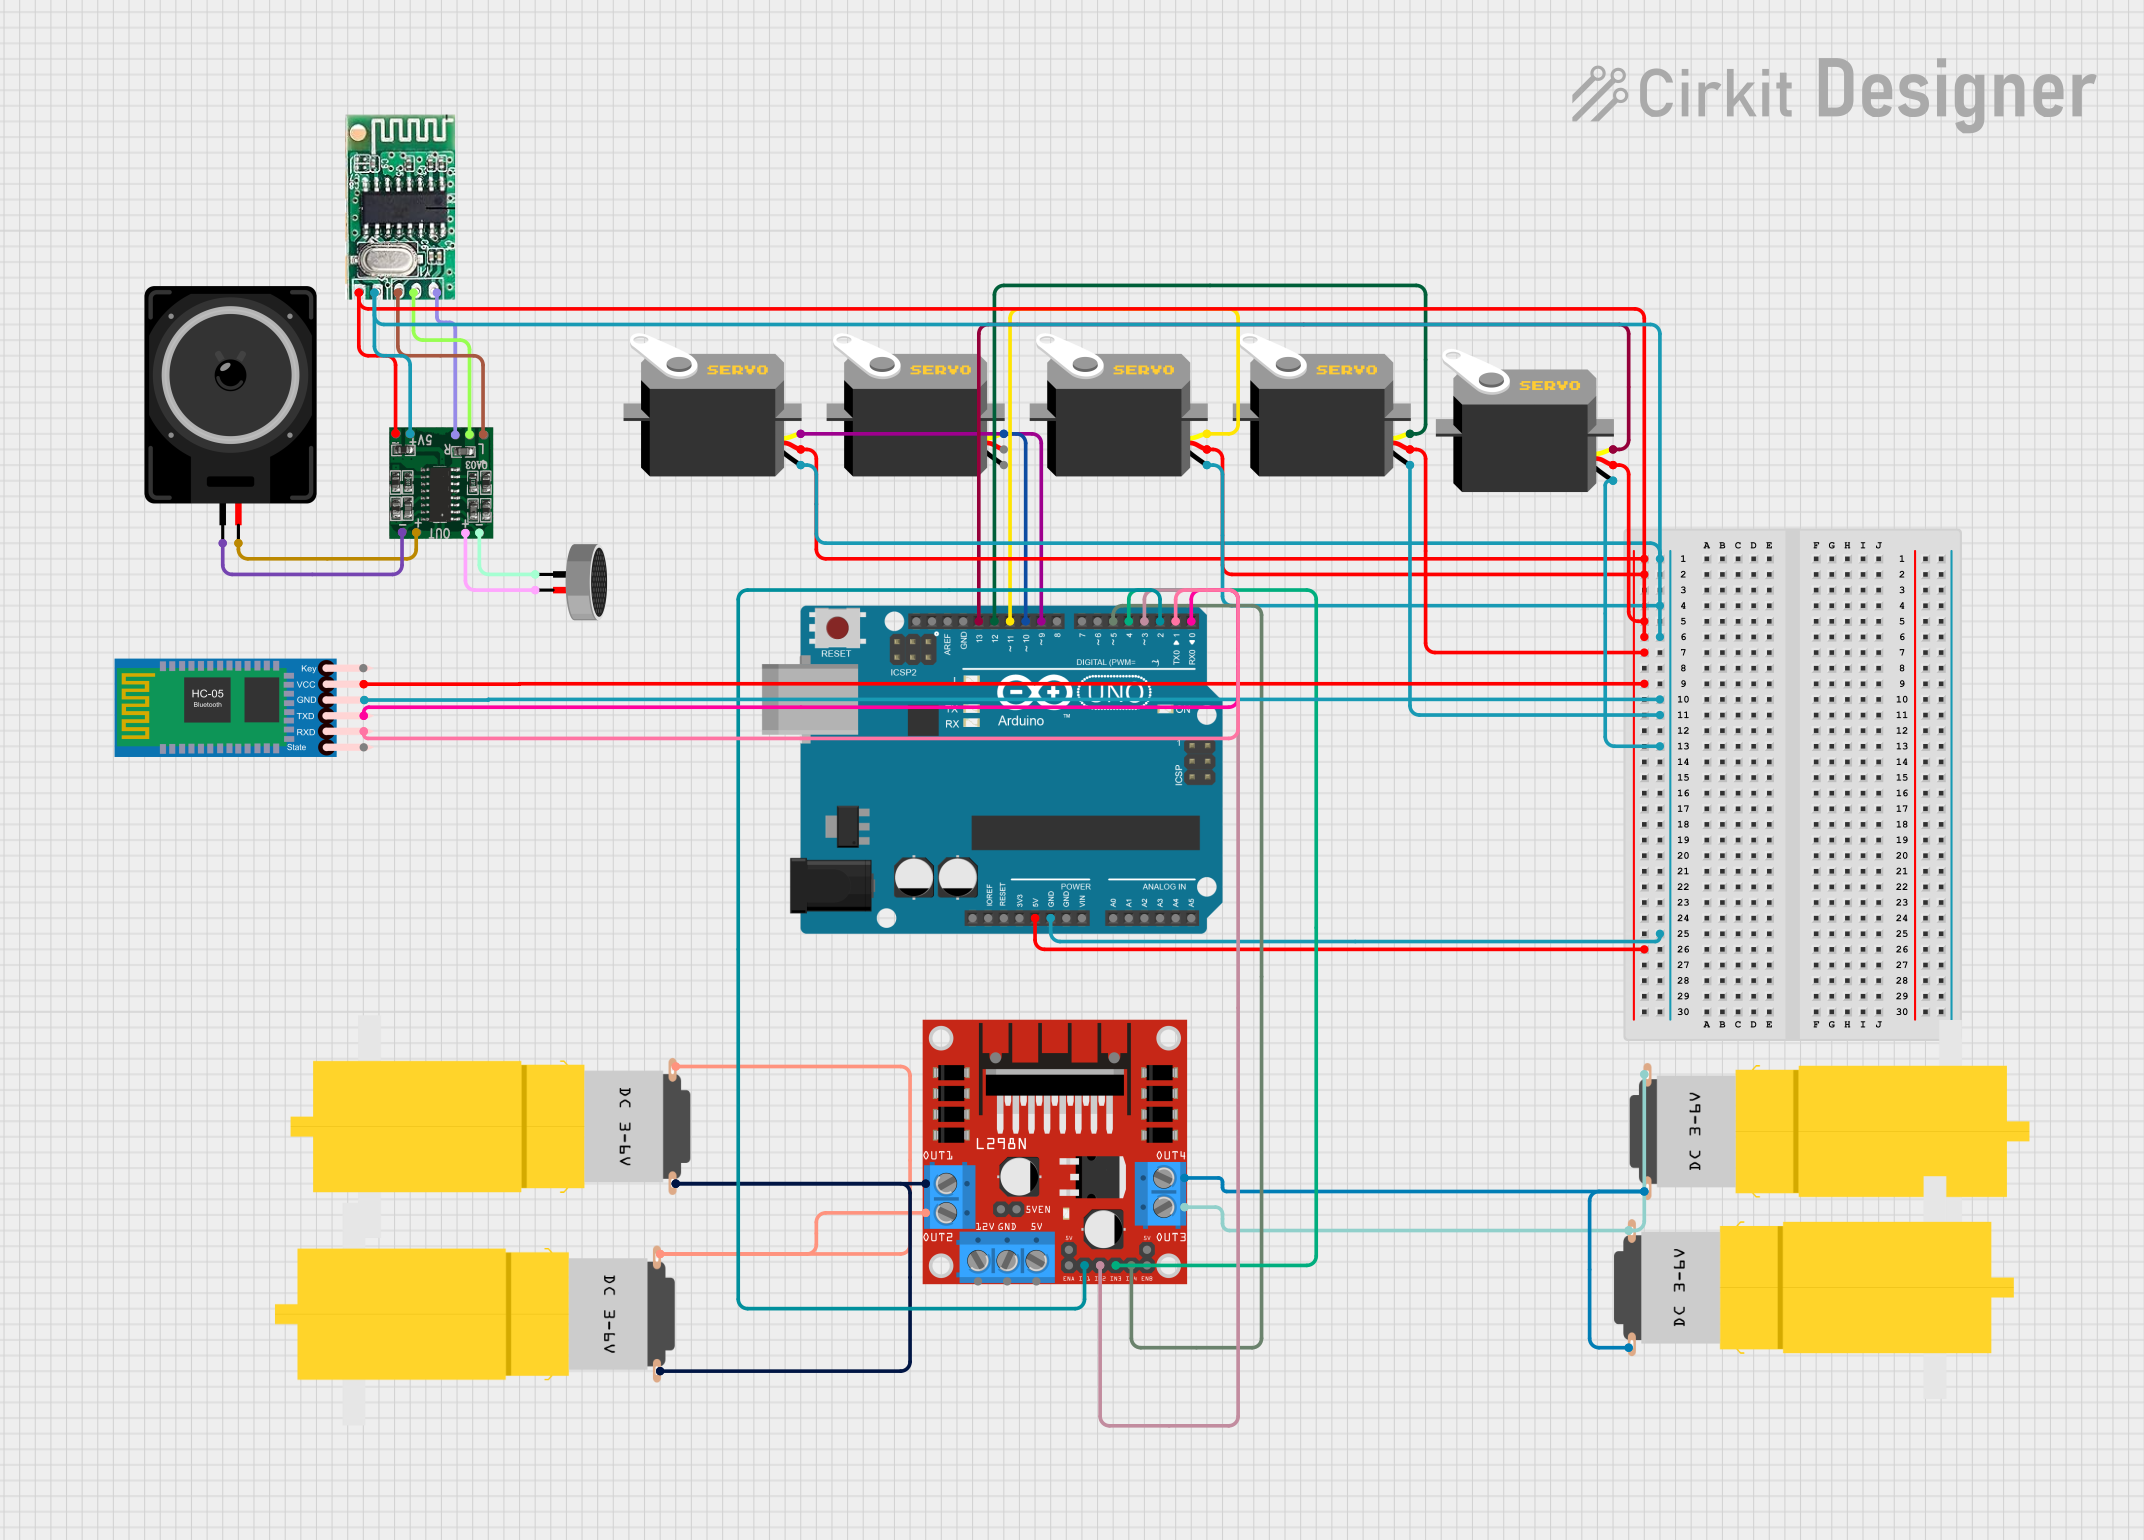
This circuit is designed to control multiple servo motors and DC motors using an Arduino UNO microcontroller. It includes a Bluetooth module for wireless communication and a Bluetooth audio receiver connected to an amplifier and a loudspeaker for audio output. The circuit also features a condenser microphone interfaced with the amplifier. The power distribution is managed through the Arduino UNO, which supplies 5V to various components.
Component List
Arduino UNO
- Microcontroller board based on the ATmega328P
- It has 14 digital input/output pins, 6 analog inputs, a 16 MHz quartz crystal, a USB connection, a power jack, an ICSP header, and a reset button.
Servo (x6)
- A rotary actuator or linear actuator that allows for precise control of angular or linear position, velocity, and acceleration.
- It consists of a suitable motor coupled to a sensor for position feedback.
Motor Amarillo Motorreductor Hobby (x4)
- A yellow DC gear motor commonly used for hobby projects.
- It operates on a nominal voltage and provides a reduction gear train for increased torque.
L298N DC Motor Driver
- A high-power motor driver module that can drive up to two DC motors.
- It has two H-bridges and can be used to control the speed and direction of the motors.
HC-05 Bluetooth Module
- A Bluetooth module that allows for wireless communication between devices.
- It can be used in master or slave configuration.
5V Bluetooth Audio Receiver
- A Bluetooth receiver module designed for audio streaming.
- It typically includes connections for left and right audio channels and power supply.
PAM8403
- A small digital amplifier chip that provides efficient amplification of audio signals.
- It is capable of driving a pair of speakers with good sound quality and low power consumption.
Loudspeaker
- An electroacoustic transducer that converts an electrical audio signal into a corresponding sound.
Condenser Microphone
- A type of microphone that uses a capacitor to convert acoustical energy into electrical energy.
Wiring Details
Arduino UNO
- 5V supplies power to:
- All six Servos (VCC pins)
- PAM8403 (GND/IN- pin)
- 5V Bluetooth Audio Receiver (G pin)
- HC-05 Bluetooth Module (VCC pin)
- GND is connected to:
- All six Servos (GND pins)
- PAM8403 (5vIN+ pin)
- 5V Bluetooth Audio Receiver (5V pin)
- HC-05 Bluetooth Module (GND pin)
- Digital Pins:
- D13 to Servo (Pulse pin)
- D12 to Servo (Pulse pin)
- D11 to Servo (Pulse pin)
- D10 to Servo (Pulse pin)
- D9 to Servo (Pulse pin)
- D5 to L298N DC Motor Driver (IN4 pin)
- D4 to L298N DC Motor Driver (IN3 pin)
- D3 to L298N DC Motor Driver (IN2 pin)
- D2 to L298N DC Motor Driver (IN1 pin)
- D1 to HC-05 Bluetooth Module (RXD pin)
- D0 to HC-05 Bluetooth Module (TXD pin)
Servos
- VCC connected to Arduino UNO 5V
- GND connected to Arduino UNO GND
- Pulse connected to respective Arduino UNO Digital Pins (D13, D12, D11, D10, D9)
Motor Amarillo Motorreductor Hobby
- Two motors connected to L298N DC Motor Driver (OUT1, OUT2)
- Two motors connected to L298N DC Motor Driver (OUT3, OUT4)
L298N DC Motor Driver
- IN1, IN2, IN3, IN4 controlled by Arduino UNO Digital Pins (D2, D3, D4, D5)
- OUT1, OUT2, OUT3, OUT4 connected to Motor Amarillo Motorreductor Hobby motors
HC-05 Bluetooth Module
- VCC connected to Arduino UNO 5V
- GND connected to Arduino UNO GND
- TXD connected to Arduino UNO D0
- RXD connected to Arduino UNO D1
5V Bluetooth Audio Receiver
- 5V and G connected to Arduino UNO 5V and GND respectively
- R and L connected to PAM8403 R-INPUT and L-INPUT respectively
PAM8403
- 5vIN+ and GND/IN- connected to Arduino UNO 5V and GND respectively
- R-INPUT and L-INPUT connected to 5V Bluetooth Audio Receiver R and L
- R+, R-, L+, L- connected to Loudspeaker and Condenser Microphone
Loudspeaker
- Connected to PAM8403 R+ and R-
Condenser Microphone
- Connected to PAM8403 L+ and L-
Documented Code
void setup() {
  // put your setup code here, to run once:

}

void loop() {
  // put your main code here, to run repeatedly:

}
Filename: sketch.ino
The provided code is a template for an Arduino sketch. The setup() function is called once when the sketch starts and can be used to initialize settings. The loop() function runs repeatedly, allowing the microcontroller to perform operations based on the program logic. The actual implementation details need to be filled in based on the specific requirements of the circuit's operation.