Arduino UNO-Based Smart Humidifier with Ultrasonic Sensor and Solar Power
Circuit Documentation
Summary
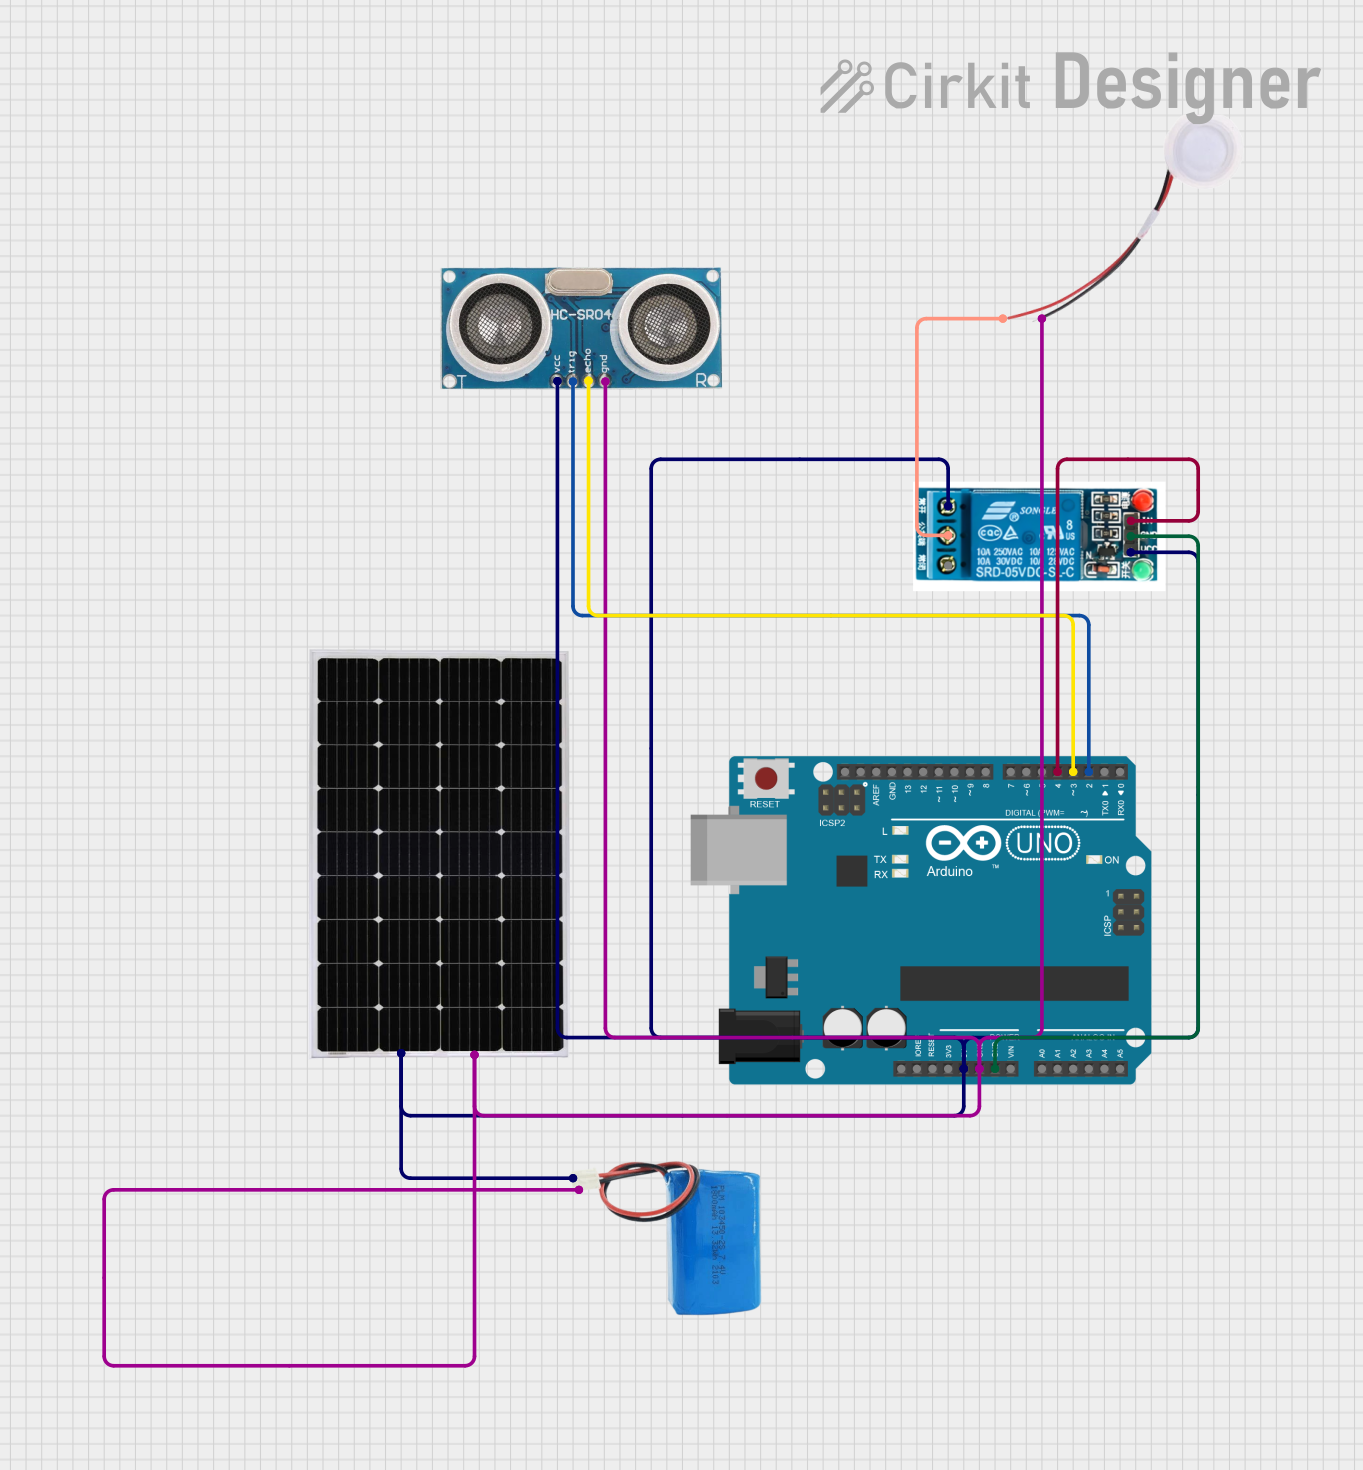
This circuit integrates an Arduino UNO microcontroller, a 5V relay, a humidifier, a solar panel, an ultrasonic sensor, and a 5V battery. The Arduino UNO controls the relay and reads data from the ultrasonic sensor. The relay is used to control the power to the humidifier. The entire circuit is powered by a 5V battery and a solar panel.
Component List
Arduino UNO
- Description: A microcontroller board based on the ATmega328P.
- Pins: UNUSED, IOREF, Reset, 3.3V, 5V, GND, Vin, A0, A1, A2, A3, A4, A5, SCL, SDA, AREF, D13, D12, D11, D10, D9, D8, D7, D6, D5, D4, D3, D2, D1, D0
5V Relay
- Description: An electromechanical switch used to control high voltage devices.
- Pins: Normally Open, Common terminal, Normally Closed, In, GND, VCC
Humidifier
- Description: A device that increases humidity in the air.
- Pins: GND, 5V
Solar Panel
- Description: A device that converts sunlight into electrical energy.
- Pins: +, -
Ultrasonic Sensor
- Description: A sensor that measures distance by using ultrasonic waves.
- Pins: +VCC, Trigger, Echo, GND
5V Battery
- Description: A battery that provides a 5V power supply.
- Pins: positive, negative
Wiring Details
Arduino UNO
5V is connected to:
- 5V Relay (VCC)
- Ultrasonic Sensor (+VCC)
- Solar Panel (+)
- 5V Battery (positive)
GND is connected to:
- 5V Relay (GND)
- Humidifier (GND)
- Ultrasonic Sensor (GND)
- Solar Panel (-)
- 5V Battery (negative)
D4 is connected to:
- 5V Relay (In)
D3 is connected to:
- Ultrasonic Sensor (Echo)
D2 is connected to:
- Ultrasonic Sensor (Trigger)
5V Relay
Normally Open is connected to:
- 5V Battery (positive)
- Ultrasonic Sensor (+VCC)
- Solar Panel (+)
- Arduino UNO (5V)
Common terminal is connected to:
- Humidifier (5V)
GND is connected to:
- Arduino UNO (GND)
In is connected to:
- Arduino UNO (D4)
Humidifier
GND is connected to:
- 5V Battery (negative)
- Arduino UNO (GND)
- Ultrasonic Sensor (GND)
- Solar Panel (-)
5V is connected to:
- 5V Relay (Common terminal)
Solar Panel
+ is connected to:
- 5V Battery (positive)
- Ultrasonic Sensor (+VCC)
- 5V Relay (Normally Open)
- Arduino UNO (5V)
- is connected to:
- 5V Battery (negative)
- Humidifier (GND)
- Ultrasonic Sensor (GND)
- Arduino UNO (GND)
Ultrasonic Sensor
+VCC is connected to:
- 5V Battery (positive)
- Solar Panel (+)
- 5V Relay (Normally Open)
- Arduino UNO (5V)
GND is connected to:
- 5V Battery (negative)
- Humidifier (GND)
- Solar Panel (-)
- Arduino UNO (GND)
Echo is connected to:
- Arduino UNO (D3)
Trigger is connected to:
- Arduino UNO (D2)
5V Battery
positive is connected to:
- Ultrasonic Sensor (+VCC)
- Solar Panel (+)
- 5V Relay (Normally Open)
- Arduino UNO (5V)
negative is connected to:
- Humidifier (GND)
- Ultrasonic Sensor (GND)
- Solar Panel (-)
- Arduino UNO (GND)
Code Documentation
Arduino UNO Code
void setup() {
  // put your setup code here, to run once:

}

void loop() {
  // put your main code here, to run repeatedly:

}
This code is a basic template for the Arduino UNO. The setup() function is where you initialize your variables, pin modes, start using libraries, etc. The loop() function is where you write the code that you want to run repeatedly.