
Arduino-Based Smart Soil Moisture and Air Quality Monitoring System with LED Indicators and Motor Control
View and Edit Project In Cirkit Designer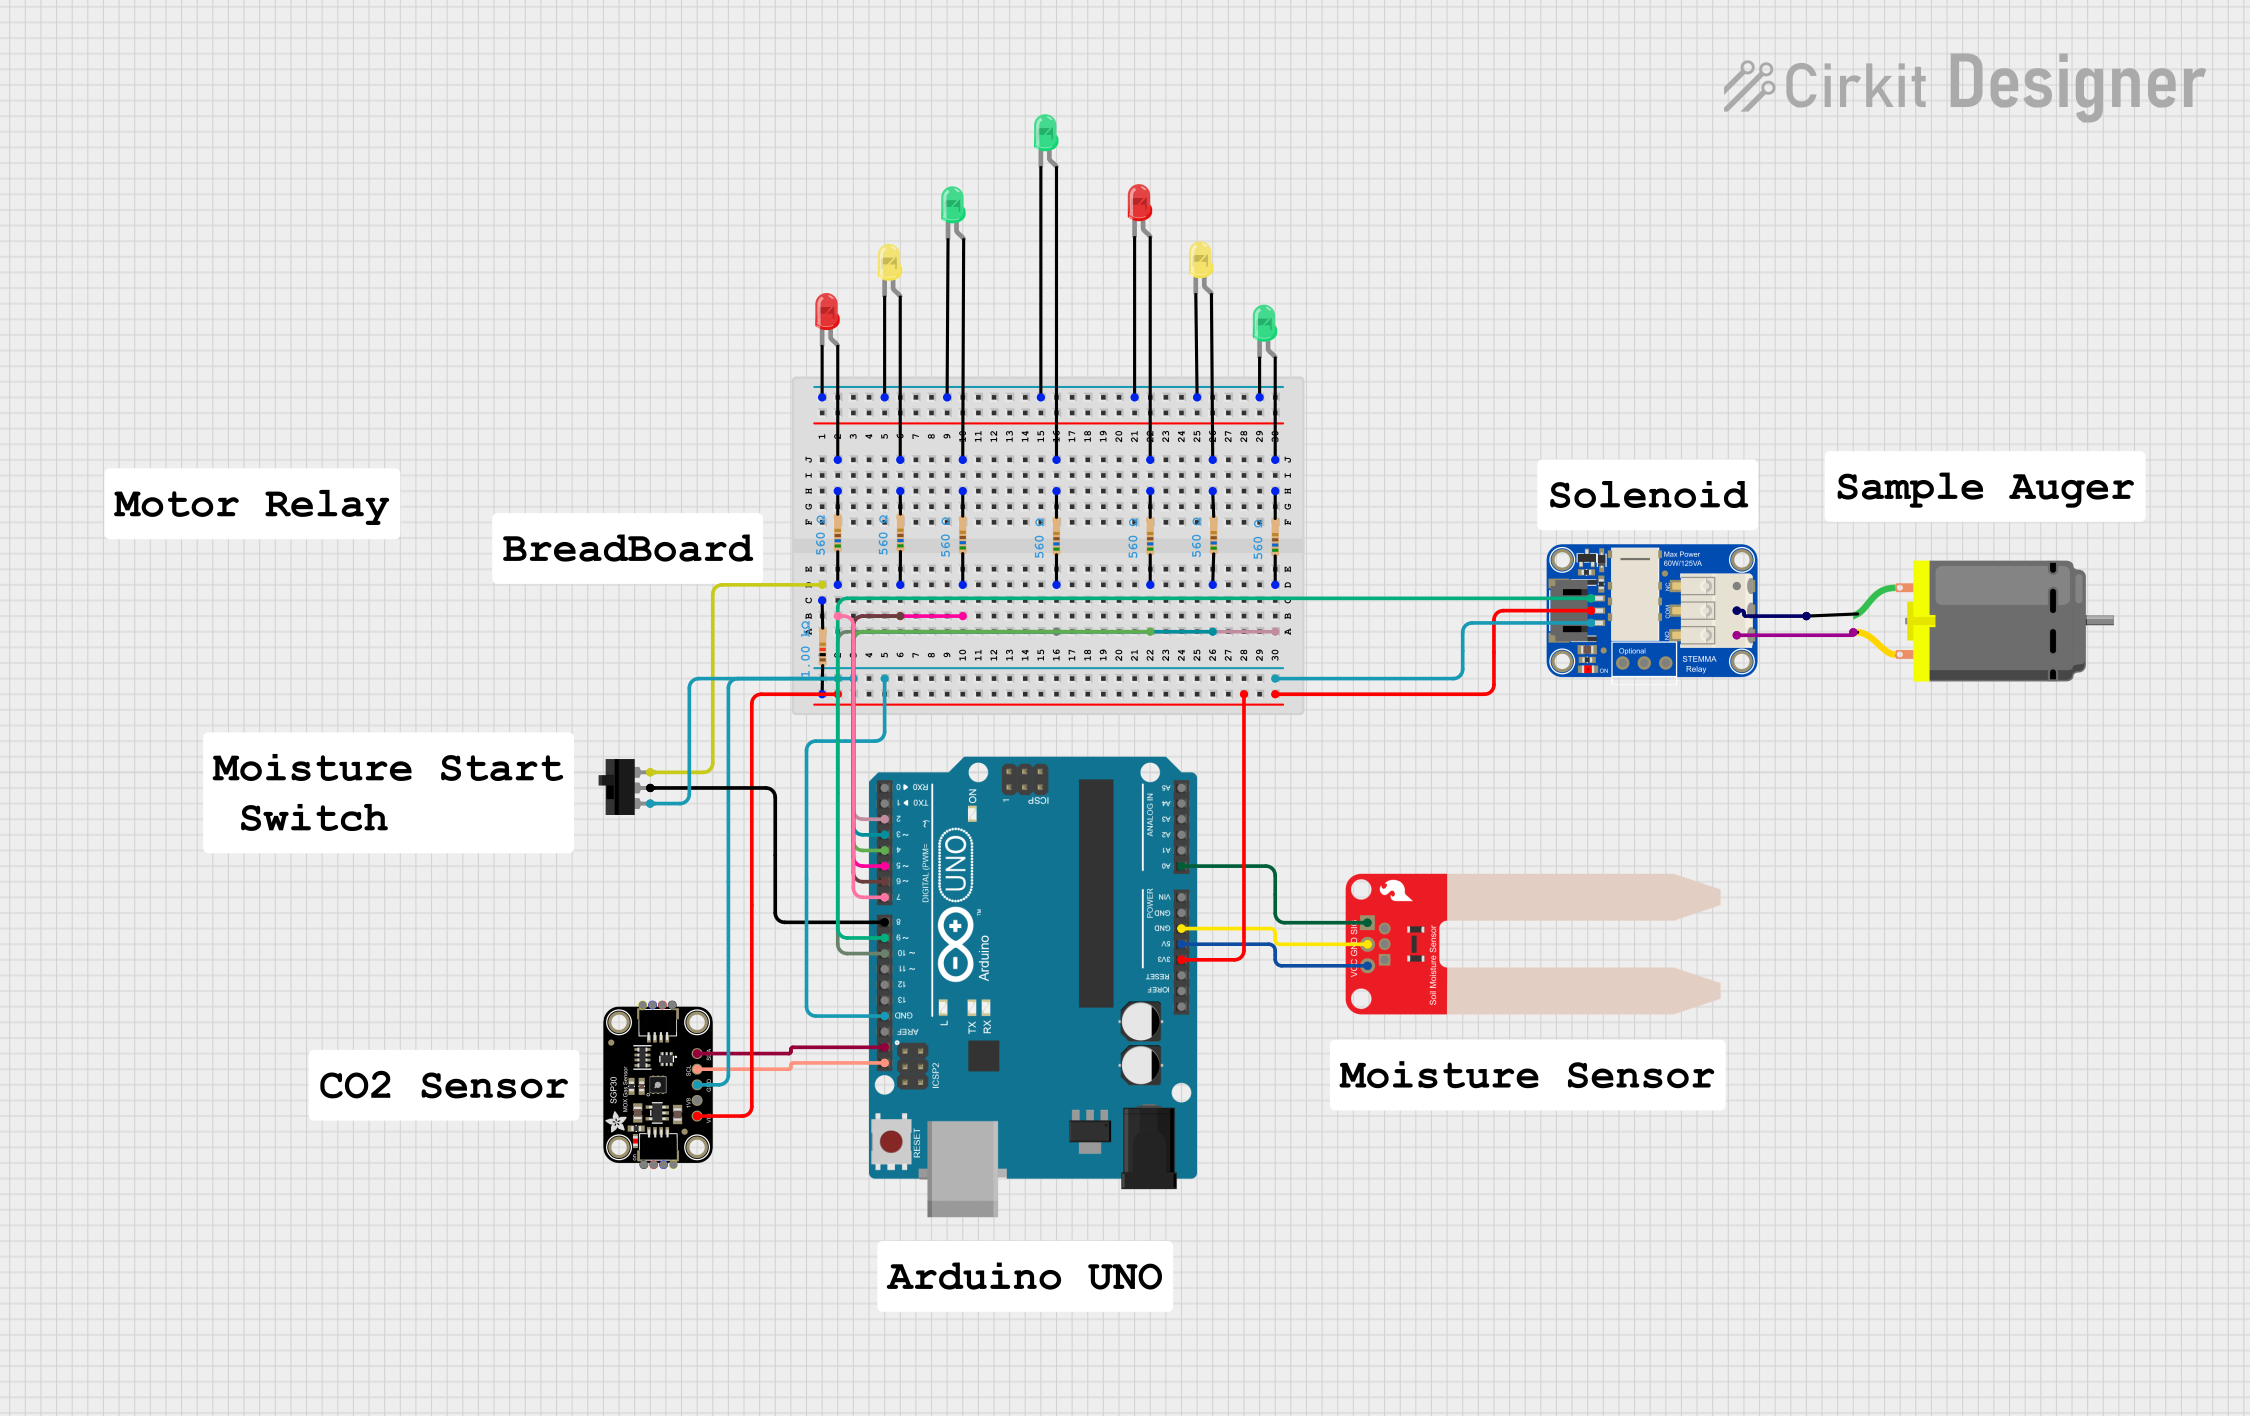
Circuit Documentation
Summary
This circuit is designed to monitor soil moisture and air quality, and control a DC motor based on the readings. It uses an Arduino UNO as the main microcontroller, interfacing with various sensors and actuators including a soil moisture sensor, an air quality sensor (SGP30), a relay breakout board, LEDs, and a DC motor. The system also includes a toggle switch for user input.
Component List
Adafruit SGP30
- Description: Air quality sensor
- Pins: VCC, 3.3V, GND, SCL, SDA
SparkFun Soil Moisture Sensor
- Description: Soil moisture sensor
- Pins: VCC, GND, SIG
Adafruit STEMMA Non-Latching Relay Breakout
- Description: Relay breakout board
- Pins: 1, 2, 3, GND, VIN, SIGNAL, NC, COM, NO
Toggle Switch
- Description: User input switch
- Pins: L1, COM, L2
Arduino UNO
- Description: Microcontroller
- Pins: UNUSED, IOREF, Reset, 3.3V, 5V, GND, Vin, A0, A1, A2, A3, A4, A5, SCL, SDA, AREF, D13, D12, D11, D10, D9, D8, D7, D6, D5, D4, D3, D2, D1, D0
DC Motor
- Description: DC motor
- Pins: pin 1, pin 2
Resistors
- Description: Various resistors
- Pins: pin1, pin2
- Properties: 1000 Ohms, 560 Ohms
LED: Two Pin (red)
- Description: Red LED
- Pins: cathode, anode
LED: Two Pin (yellow)
- Description: Yellow LED
- Pins: cathode, anode
LED: Two Pin (green)
- Description: Green LED
- Pins: cathode, anode
Wiring Details
Adafruit SGP30
- VCC: Connected to 3.3V on Arduino UNO and pin1 of a 1000 Ohm resistor
- GND: Connected to GND on Arduino UNO and L1 on Toggle Switch
- SCL: Connected to SCL on Arduino UNO
- SDA: Connected to SDA on Arduino UNO
SparkFun Soil Moisture Sensor
- VCC: Connected to 5V on Arduino UNO
- GND: Connected to GND on Arduino UNO
- SIG: Connected to A0 on Arduino UNO
Adafruit STEMMA Non-Latching Relay Breakout
- VIN: Connected to 3.3V on Arduino UNO and pin1 of a 1000 Ohm resistor
- GND: Connected to GND on Arduino UNO and L1 on Toggle Switch
- SIGNAL: Connected to D9 on Arduino UNO
- COM: Connected to pin 1 of DC Motor
- NO: Connected to pin 2 of DC Motor
Toggle Switch
- L1: Connected to GND on Arduino UNO and GND of Adafruit SGP30 and Adafruit STEMMA Non-Latching Relay Breakout
- COM: Connected to D8 on Arduino UNO
- L2: Connected to pin2 of a 1000 Ohm resistor
Arduino UNO
- 3.3V: Connected to VCC of Adafruit SGP30 and VIN of Adafruit STEMMA Non-Latching Relay Breakout
- 5V: Connected to VCC of SparkFun Soil Moisture Sensor
- GND: Connected to GND of SparkFun Soil Moisture Sensor, Adafruit SGP30, and Adafruit STEMMA Non-Latching Relay Breakout
- A0: Connected to SIG of SparkFun Soil Moisture Sensor
- SCL: Connected to SCL of Adafruit SGP30
- SDA: Connected to SDA of Adafruit SGP30
- D2: Connected to pin1 of a 560 Ohm resistor
- D3: Connected to pin1 of a 560 Ohm resistor
- D4: Connected to pin1 of a 560 Ohm resistor
- D5: Connected to pin1 of a 560 Ohm resistor
- D6: Connected to pin1 of a 560 Ohm resistor
- D7: Connected to pin1 of a 560 Ohm resistor
- D8: Connected to COM of Toggle Switch
- D9: Connected to SIGNAL of Adafruit STEMMA Non-Latching Relay Breakout
- D10: Connected to pin1 of a 560 Ohm resistor
DC Motor
- pin 1: Connected to COM of Adafruit STEMMA Non-Latching Relay Breakout
- pin 2: Connected to NO of Adafruit STEMMA Non-Latching Relay Breakout
Resistors
- 1000 Ohms: pin1 connected to 3.3V on Arduino UNO, pin2 connected to L2 on Toggle Switch
- 560 Ohms: pin1 connected to D2, D3, D4, D5, D6, D7, D10 on Arduino UNO, pin2 connected to anode of respective LEDs
LEDs
- Red LED 1: cathode connected to common cathode net, anode connected to pin2 of a 560 Ohm resistor
- Yellow LED 1: cathode connected to common cathode net, anode connected to pin2 of a 560 Ohm resistor
- Green LED 1: cathode connected to common cathode net, anode connected to pin2 of a 560 Ohm resistor
- Red LED 2: cathode connected to common cathode net, anode connected to pin2 of a 560 Ohm resistor
- Yellow LED 2: cathode connected to common cathode net, anode connected to pin2 of a 560 Ohm resistor
- Green LED 2: cathode connected to common cathode net, anode connected to pin2 of a 560 Ohm resistor
Documented Code
//****************************************************************************************************************
const int Grn1 = 2; const int Yel1 = 3; const int Red1 = 4; // Use digital I/O pin 2,3,4
const int Grn2 = 5; const int Yel2 = 6; const int Red2 = 7; // Use digital I/O pin 5,6,7

const int Switch = 8; // Use digital I/O pin 8
const int Motor = 9; // Use digital I/O pin 9

int SysState = 0; // Initial value for reading the button status

int H2O = 0; //value for storing moisture value
int H2OPin = A0;//Declare a variable for the soil moisture sensor

//This is a function used to get the soil moisture content
int readH2O(){
  delay(10);//wait 10 milliseconds
  H2O = analogRead(H2OPin);//Read the SIG value form sensor
  return H2O;//send current moisture value
}

#include "SparkFun_SGP30_Arduino_Library.h" // Click here to get the library: http://librarymanager/All#SparkFun_SGP30
#include <Wire.h>
SGP30 mySensor; //create an object of the SGP30 class

//******************************************************************************************************************
void setup() {
  // put your setup code here, to run once
  Serial.begin(9600);   // open serial over USB

  pinMode(Grn1, OUTPUT); pinMode(Yel1, OUTPUT); pinMode(Red1, OUTPUT); // Sets Green, Yellow, and Red Light 1 as Output
  pinMode(Grn2, OUTPUT); pinMode(Yel2, OUTPUT); pinMode(Red2, OUTPUT); // Sets Green, Yellow, and Red Light 2 as Output

  pinMode(Motor, OUTPUT); // Sets Motor as Output
  pinMode(Switch, INPUT); // Sets Start button as Input

  // Sets value for inital light outputs to off (LOW)
  digitalWrite(Grn1,LOW); digitalWrite(Yel1,LOW); digitalWrite(Red1,LOW);
  digitalWrite(Grn2,LOW); digitalWrite(Yel2,LOW); digitalWrite(Red2,LOW);

  Wire.begin();
  //Initialize sensor
  if (mySensor.begin() == false) {
    Serial.println("No SGP30 Detected. Check connections.");
    while (1);
  }
  //Initializes sensor for air quality readings
  //measureAirQuality should be called in one second increments after a call to initAirQuality
  mySensor.initAirQuality();
}
//******************************************************************************************************************
void loop() {
  // Main code here, to run repeatedly

  delay(1000);//take a reading every half second
  Sys