
Arduino UNO Controlled Ultrasonic Distance Sensor with LED Indicator
View and Edit Project In Cirkit Designer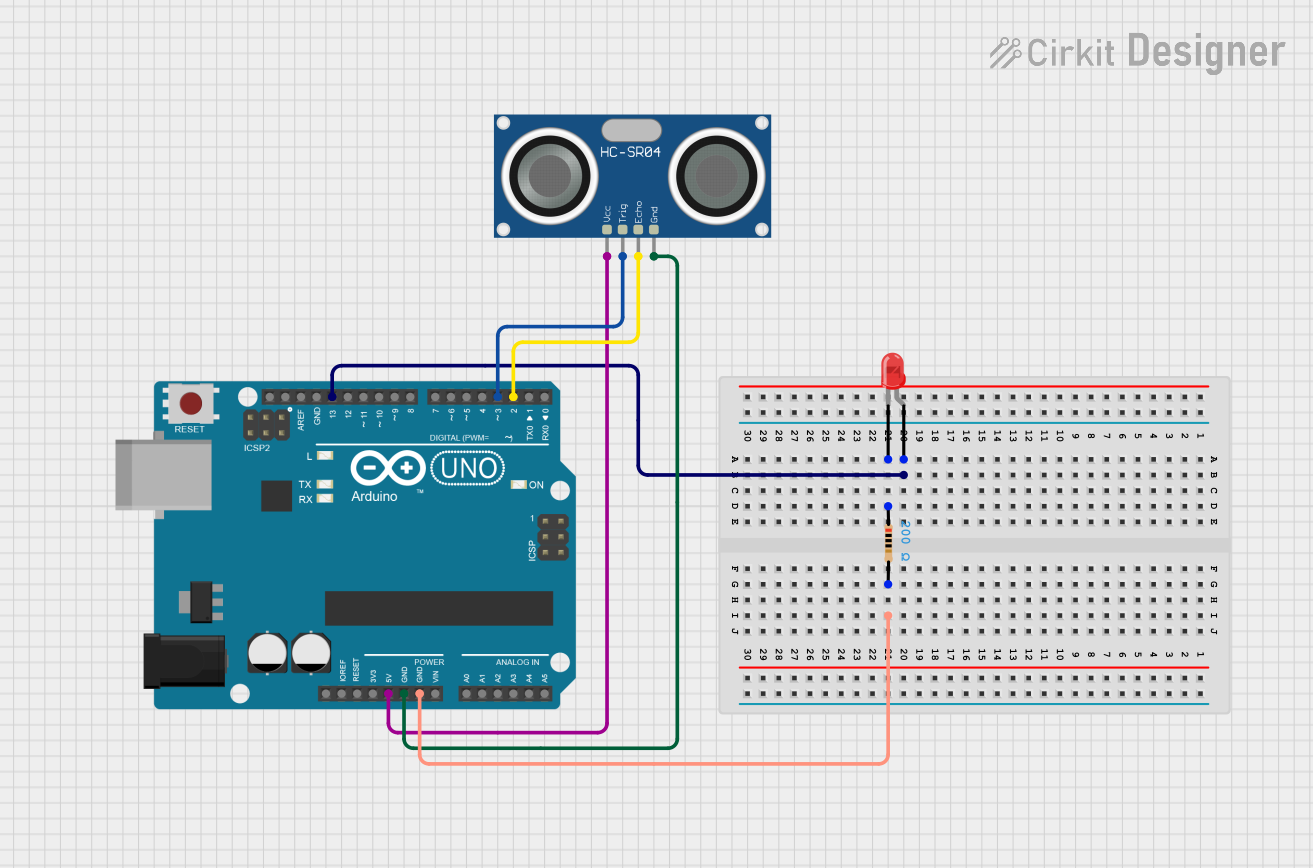
Circuit Documentation
Summary
This circuit integrates an Arduino UNO microcontroller with an HC-SR04 Ultrasonic Sensor and a red two-pin LED. The primary function of this circuit is to measure distance using the ultrasonic sensor and visually indicate the measured distance through the blinking rate of the LED. The LED blinks faster as the distance measured by the sensor decreases.
Component List
Arduino UNO
- Description: A microcontroller board based on the ATmega328P.
- Pins: UNUSED, IOREF, Reset, 3.3V, 5V, GND, Vin, A0-A5, SCL, SDA, AREF, D0-D13
- Purpose: Acts as the central processing unit for the circuit, controlling the LED and reading data from the ultrasonic sensor.
LED: Two Pin (red)
- Description: A basic red light-emitting diode.
- Pins: Anode, Cathode
- Purpose: Provides a visual indication of the distance measured by the ultrasonic sensor.
HC-SR04 Ultrasonic Sensor
- Description: An ultrasonic distance sensor capable of measuring distances from 2cm to 400cm.
- Pins: VCC, TRIG, ECHO, GND
- Purpose: Measures the distance to an object by emitting ultrasonic waves and timing their return.
Resistor
- Description: A passive two-terminal electrical component that implements electrical resistance.
- Pins: Pin1, Pin2
- Properties: Resistance value of 200 Ohms
- Purpose: Limits the current flowing through the LED to prevent damage.
Wiring Details
Arduino UNO
- D13: Connected to the anode of the LED.
- GND: Connected to pin2 of the Resistor and GND of the HC-SR04 Ultrasonic Sensor.
- 5V: Supplies power to the VCC of the HC-SR04 Ultrasonic Sensor.
- D3: Connected to the TRIG pin of the HC-SR04 Ultrasonic Sensor.
- D2: Connected to the ECHO pin of the HC-SR04 Ultrasonic Sensor.
LED: Two Pin (red)
- Anode: Connected to D13 on the Arduino UNO.
- Cathode: Connected to pin1 of the Resistor.
HC-SR04 Ultrasonic Sensor
- VCC: Powered by the 5V pin on the Arduino UNO.
- TRIG: Connected to D3 on the Arduino UNO.
- ECHO: Connected to D2 on the Arduino UNO.
- GND: Connected to the GND pin on the Arduino UNO.
Resistor
- Pin1: Connected to the cathode of the LED.
- Pin2: Connected to the GND pin on the Arduino UNO.
Documented Code
/*
 * This Arduino sketch controls an LED connected to pin D13. The LED will blink
 * based on the distance measured by the HC-SR04 ultrasonic sensor. The sensor
 * is connected to pins D2 (ECHO) and D3 (TRIG). The LED will blink faster as
 * the measured distance decreases.
 */

const int trigPin = 3; // TRIG pin of HC-SR04
const int echoPin = 2; // ECHO pin of HC-SR04
const int ledPin = 13; // LED connected to pin D13

void setup() {
  pinMode(trigPin, OUTPUT); // Set TRIG pin as output
  pinMode(echoPin, INPUT);  // Set ECHO pin as input
  pinMode(ledPin, OUTPUT);  // Set LED pin as output
  Serial.begin(9600);       // Initialize serial communication
}

void loop() {
  long duration, distance;
  digitalWrite(trigPin, LOW); // Clear the TRIG pin
  delayMicroseconds(2);
  digitalWrite(trigPin, HIGH); // Set the TRIG pin high for 10us
  delayMicroseconds(10);
  digitalWrite(trigPin, LOW);
  duration = pulseIn(echoPin, HIGH); // Read the ECHO pin
  distance = (duration / 2) / 29.1;  // Calculate distance in cm
  Serial.print("Distance: ");
  Serial.print(distance);
  Serial.println(" cm");
  int blinkDelay = map(distance, 0, 200, 100, 1000); // Map distance to delay
  blinkDelay = constrain(blinkDelay, 100, 1000); // Constrain delay
  digitalWrite(ledPin, HIGH); // Turn LED on
  delay(blinkDelay);
  digitalWrite(ledPin, LOW);  // Turn LED off
  delay(blinkDelay);
}
This code is designed to be uploaded to the Arduino UNO microcontroller. It initializes the pins connected to the HC-SR04 Ultrasonic Sensor and the LED, then enters a loop where it triggers the sensor to measure distance and blinks the LED with a delay inversely proportional to the measured distance. Serial communication is also established for debugging purposes, allowing the measured distance to be output to the serial monitor.