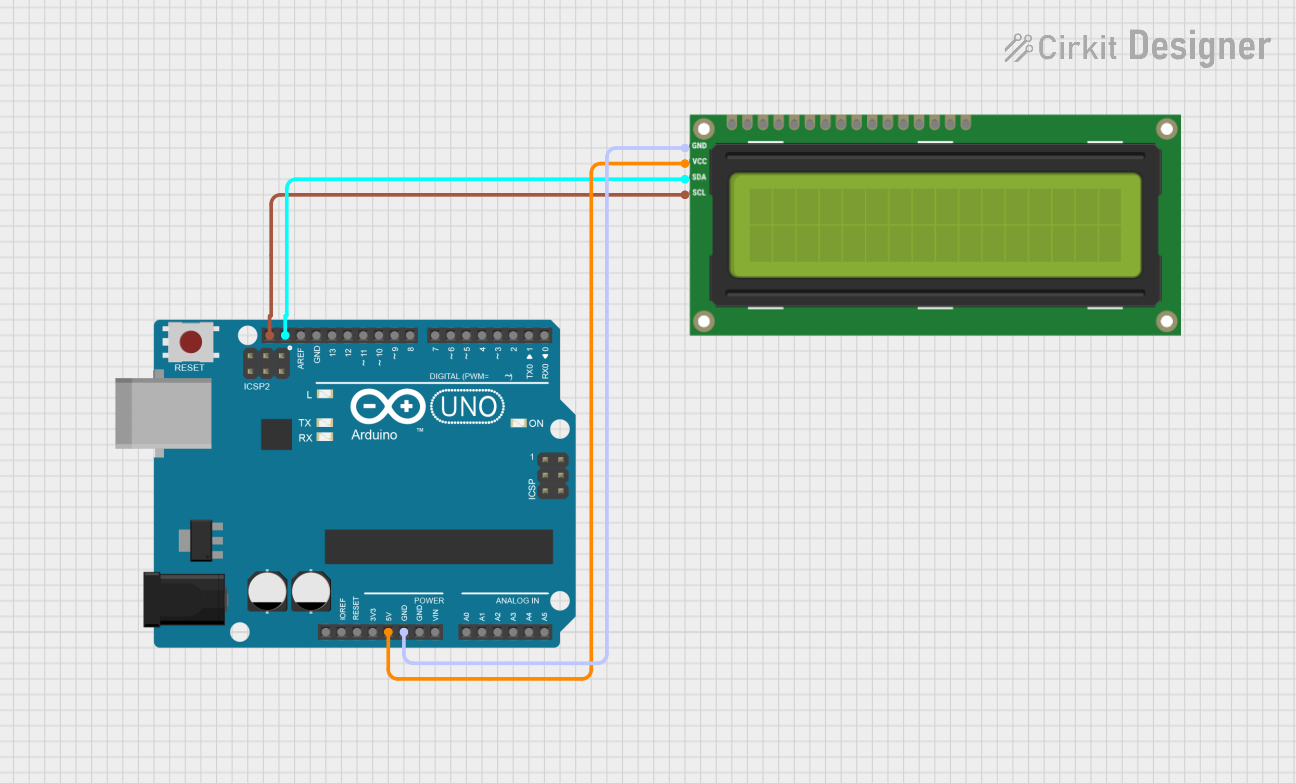
Arduino UNO Controlled I2C LCD Display

Circuit Documentation
Summary of the Circuit
This circuit is designed to establish I2C communication between an Arduino UNO microcontroller and a 16x2 LCD screen. The LCD is interfaced with the Arduino using the I2C protocol, which minimizes the number of pins required for communication, using only two data lines (SCL and SDA). The Arduino is programmed to initialize the I2C communication, control the LCD, and display a message on it. The circuit is powered by the 5V output from the Arduino, which is also connected to the VCC pin of the LCD to provide the necessary operating voltage.
Component List
I2C LCD 16x2 Screen
- Description: A 16x2 character LCD display that uses the I2C bus for communication.
- Pins: SCL, SDA, VCC (5V), GND, VDD, VO, RS, RW, E, D0, D1, D2, D3, D4, D5, D6, D7, BLA, BLK
Arduino UNO
- Description: A microcontroller board based on the ATmega328P, widely used for building digital devices and interactive objects that can sense and control objects in the physical world.
- Pins: UNUSED, IOREF, Reset, 3.3V, 5V, GND, Vin, A0, A1, A2, A3, A4, A5, SCL, SDA, AREF, D13, D12, D11, D10, D9, D8, D7, D6, D5, D4, D3, D2, D1, D0
Wiring Details
I2C LCD 16x2 Screen
- SCL: Connected to SCL on Arduino UNO
- SDA: Connected to SDA on Arduino UNO
- VCC (5V): Connected to 5V on Arduino UNO
- GND: Connected to GND on Arduino UNO
Arduino UNO
- SCL: Connected to SCL on I2C LCD 16x2 Screen
- SDA: Connected to SDA on I2C LCD 16x2 Screen
- 5V: Provides power to VCC (5V) on I2C LCD 16x2 Screen
- GND: Common ground with I2C LCD 16x2 Screen
Documented Code
/*
 * This Arduino Sketch initializes I2C communication and displays a message
 * on a 16x2 LCD screen connected via I2C.
 */

#include <Wire.h>
#include <LiquidCrystal_I2C.h>

// Set the LCD address to 0x27 for a 16 chars and 2 line display
LiquidCrystal_I2C lcd(0x27, 16, 2);

void setup() {
  // Initialize I2C communication
  Wire.begin();
  // Initialize the LCD
  lcd.begin();
  // Turn on the backlight
  lcd.backlight();
  // Print a message to the LCD
  lcd.setCursor(0, 0);
  lcd.print("Hello, World!");
}

void loop() {
  // Main loop does nothing
}
Filename: sketch.ino
Description: The code initializes the I2C communication with the LCD screen and displays the message "Hello, World!" on the first line of the screen. The setup() function is called once when the program starts and is used to initialize settings. The loop() function runs continuously after setup() finishes and is left empty in this case.