
Arduino UNO Controlled Smart Car with Ultrasonic Obstacle Avoidance
View and Edit Project In Cirkit Designer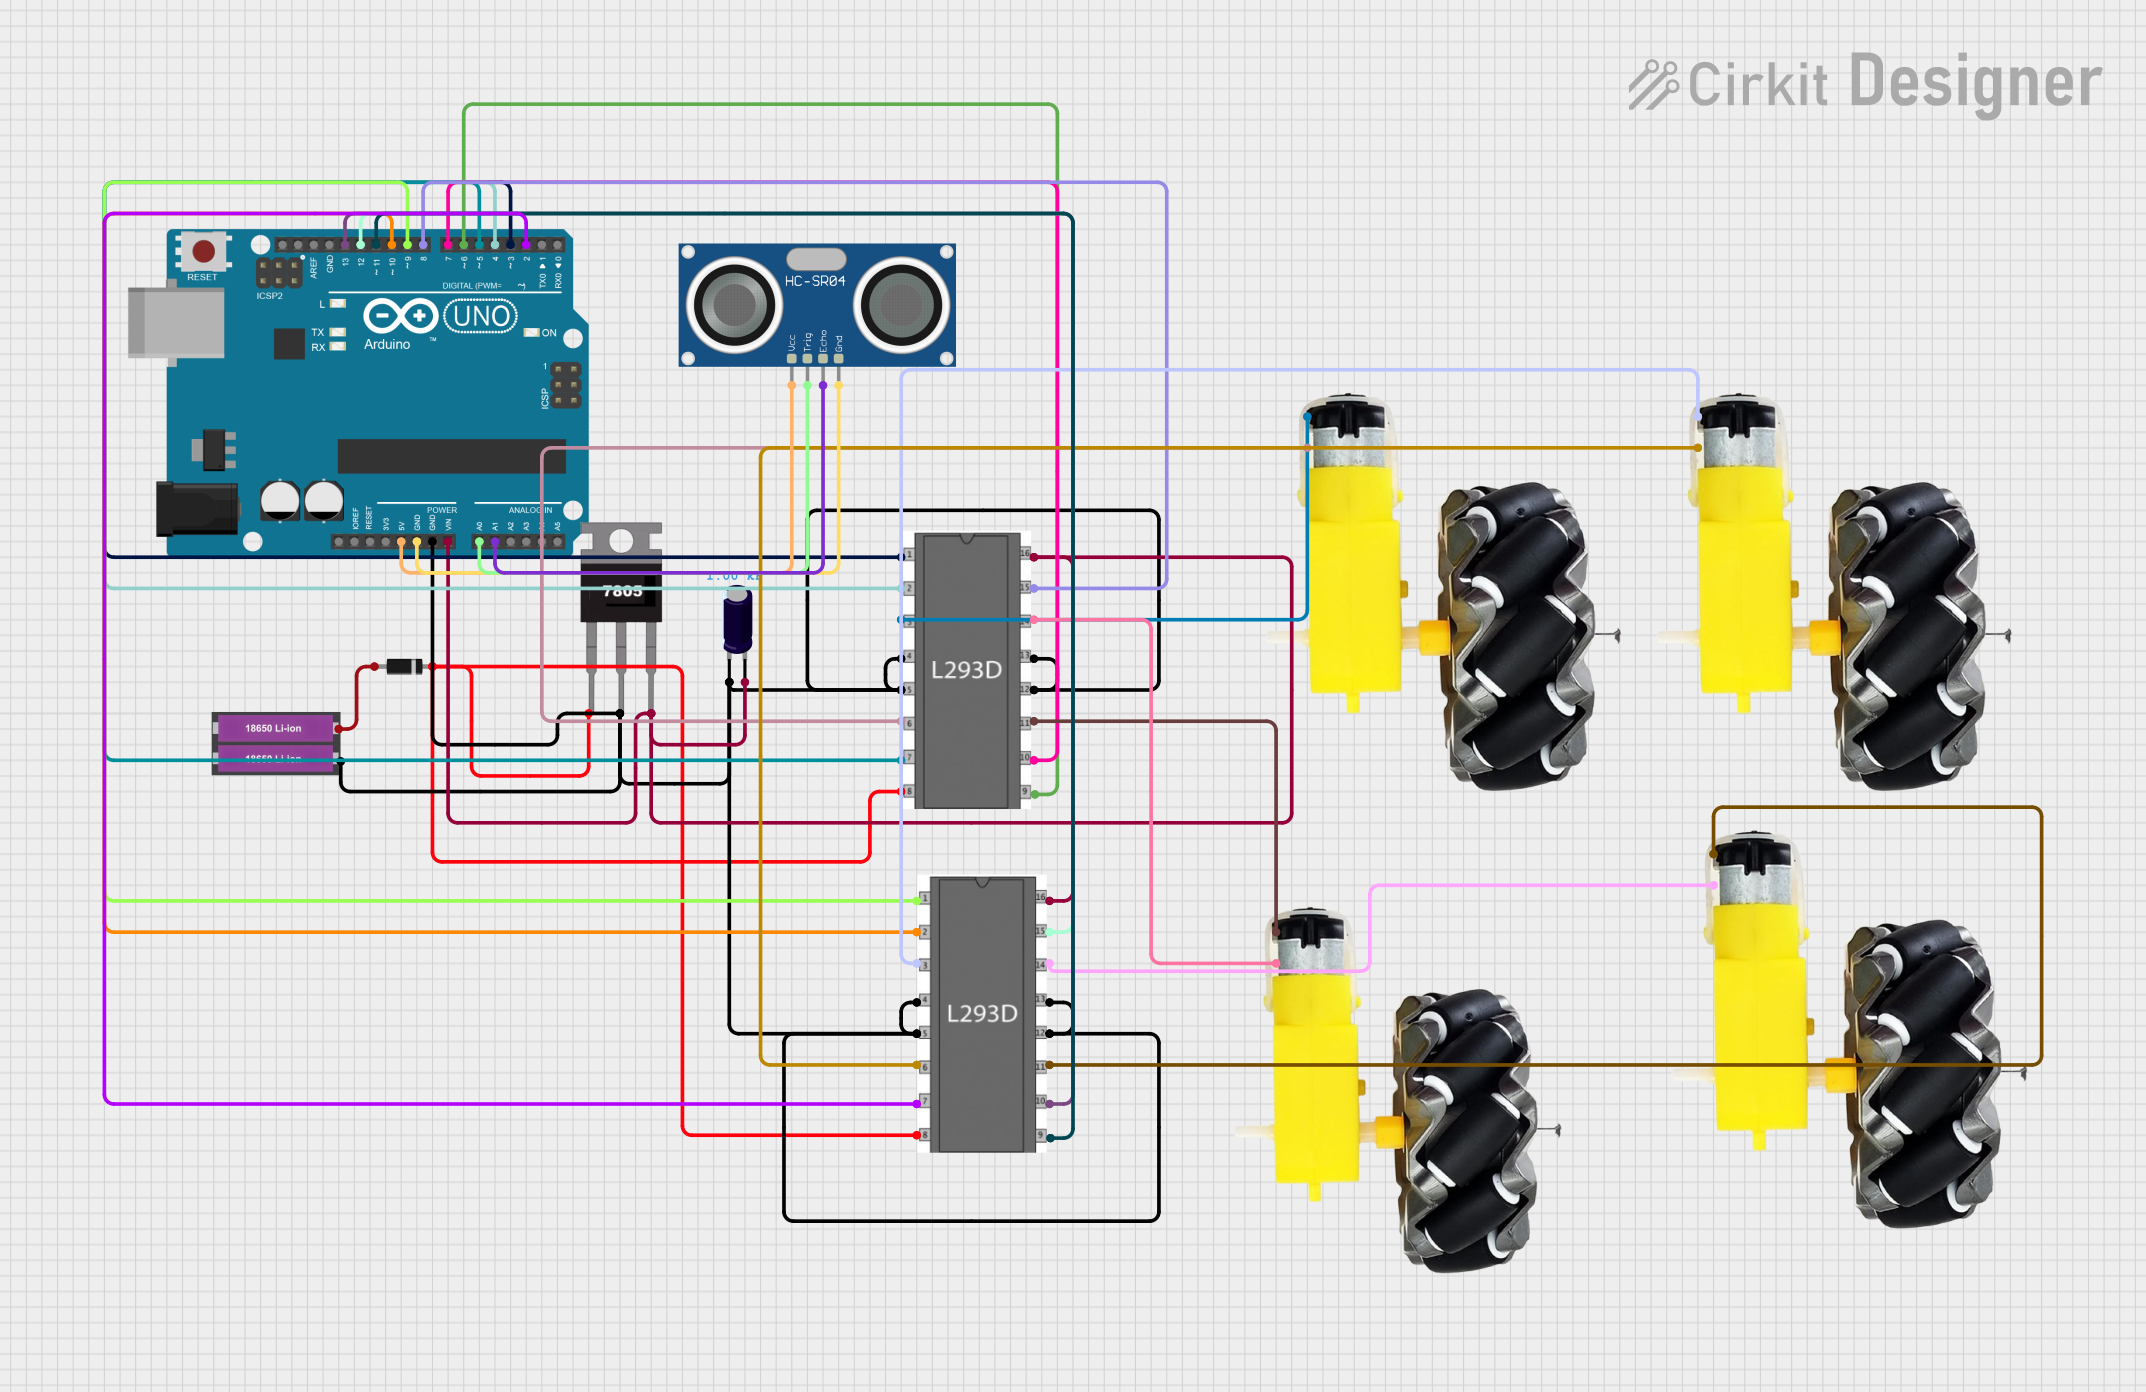
Smart Car with Ultrasonic Sensor Circuit Documentation
Summary
This circuit is designed to control a smart car equipped with two motors and an ultrasonic sensor (HC-SR04). The Arduino UNO microcontroller serves as the central processing unit, interfacing with the L293D motor drivers to control the motors' movements. The ultrasonic sensor is used to detect obstacles, and the car's motion is adjusted accordingly: it moves forward until an obstacle is detected within a certain distance, at which point it stops.
Component List
Arduino UNO: A microcontroller board based on the ATmega328P. It has digital input/output pins, analog inputs, a USB connection for programming, and power management features.
L293D Motor Driver: A dual H-bridge motor driver IC that allows for control of two DC motors or one stepper motor. It can handle moderate current and voltage levels and includes diodes for back EMF protection.
18650 Li-ion Battery x 2: A pair of rechargeable lithium-ion batteries providing power to the circuit.
7805 Voltage Regulator: A voltage regulator that outputs a stable 5V from a higher input voltage, used to power the Arduino UNO and the ultrasonic sensor.
Diode: A semiconductor device that allows current to flow in one direction only, used to prevent reverse current flow that could damage the circuit.
Electrolytic Capacitor (1000 Farads): A capacitor used to smooth out voltage fluctuations, providing a more stable power supply to the circuit.
Motor and Wheels (x4): Four DC motors with attached wheels, providing mobility to the smart car.
HC-SR04 Ultrasonic Sensor: An ultrasonic ranging module that uses sonar to determine the distance to an object by emitting a pulse and measuring the time taken for the echo to return.
Wiring Details
Arduino UNO
- 5V: Powers the HC-SR04 Ultrasonic Sensor.
- GND: Common ground for the HC-SR04 Ultrasonic Sensor, L293D motor drivers, and the 7805 voltage regulator.
- Vin: Connected to the output of the 7805 voltage regulator to receive a stable 5V supply.
- A0: Connected to the TRIG pin of the HC-SR04 Ultrasonic Sensor.
- A1: Connected to the ECHO pin of the HC-SR04 Ultrasonic Sensor.
- D2-D13: Control pins for the L293D motor drivers, used to enable the motors and control their direction.
L293D Motor Driver (x2)
- Enable 1, Enable 2: Connected to the Arduino UNO to enable/disable the motors.
- Input 1-4: Connected to the Arduino UNO to control the direction of the motors.
- Output 1-4: Connected to the motors to provide drive signals.
- GND: Common ground with the 7805 voltage regulator and the Arduino UNO.
- Vs: Connected to the positive terminal of the battery through a diode.
- Vss: Connected to the output of the 7805 voltage regulator to receive a stable 5V supply.
18650 Li-ion Battery x 2
- +: Connected to the anode of the diode to supply power to the circuit.
- -: Common ground for the circuit.
7805 Voltage Regulator
- Vin: Connected to the cathode of the diode to receive power from the battery.
- Gnd: Common ground for the circuit.
- Vout: Provides a stable 5V output to the Arduino UNO and the L293D motor drivers.
Diode
- Cathode: Connected to the Vin of the 7805 voltage regulator.
- Anode: Connected to the positive terminal of the battery.
Electrolytic Capacitor (1000 Farads)
- +: Connected to the Vout of the 7805 voltage regulator.
- -: Common ground for the circuit.
Motor and Wheels (x4)
- Vcc: Connected to the output pins of the L293D motor drivers to receive drive signals.
- GND: Connected to the output pins of the L293D motor drivers to complete the motor circuit.
HC-SR04 Ultrasonic Sensor
- VCC: Powered by the 5V pin of the Arduino UNO.
- TRIG: Connected to the A0 pin of the Arduino UNO.
- ECHO: Connected to the A1 pin of the Arduino UNO.
- GND: Common ground with the Arduino UNO.
Documented Code
/*
 * Smart Car with Ultrasonic Sensor
 * This Arduino sketch controls a smart car with two motors and an ultrasonic
 * sensor. The car moves forward until an obstacle is detected within a
 * certain distance, at which point it stops.
 */

// Pin definitions
const int motor1Enable = 9;
const int motor1Input1 = 10;
const int motor1Input2 = 2;
const int motor2Enable = 11;
const int motor2Input1 = 13;
const int motor2Input2 = 12;
const int trigPin = A0;
const int echoPin = A1;

void setup() {
  // Initialize motor control pins
  pinMode(motor1Enable, OUTPUT);
  pinMode(motor1Input1, OUTPUT);
  pinMode(motor1Input2, OUTPUT);
  pinMode(motor2Enable, OUTPUT);
  pinMode(motor2Input1, OUTPUT);
  pinMode(motor2Input2, OUTPUT);
  // Initialize ultrasonic sensor pins
  pinMode(trigPin, OUTPUT);
  pinMode(echoPin, INPUT);
  // Start serial communication
  Serial.begin(9600);
}

void loop() {
  // Measure distance
  long duration, distance;
  digitalWrite(trigPin, LOW);
  delayMicroseconds(2);
  digitalWrite(trigPin, HIGH);
  delayMicroseconds(10);
  digitalWrite(trigPin, LOW);
  duration = pulseIn(echoPin, HIGH);
  distance = (duration / 2) / 29.1;
  // Print distance to serial monitor
  Serial.print("Distance: ");
  Serial.print(distance);
  Serial.println(" cm");
  // Control motors based on distance
  if (distance < 20) {
    // Stop motors
    digitalWrite(motor1Enable, LOW);
    digitalWrite(motor2Enable, LOW);
  } else {
    // Move forward
    digitalWrite(motor1Enable, HIGH);
    digitalWrite(motor1Input1, HIGH);
    digitalWrite(motor1Input2, LOW);
    digitalWrite(motor2Enable, HIGH);
    digitalWrite(motor2Input1, HIGH);
    digitalWrite(motor2Input2, LOW);
  }
  delay(100);
}
This code is responsible for controlling the smart car's movements and processing the data from the ultrasonic sensor. It initializes the motor control and sensor pins, then enters a loop where it measures the distance to any obstacle and controls the motors accordingly. If an obstacle is detected within 20 cm, the car stops; otherwise, it moves forward.