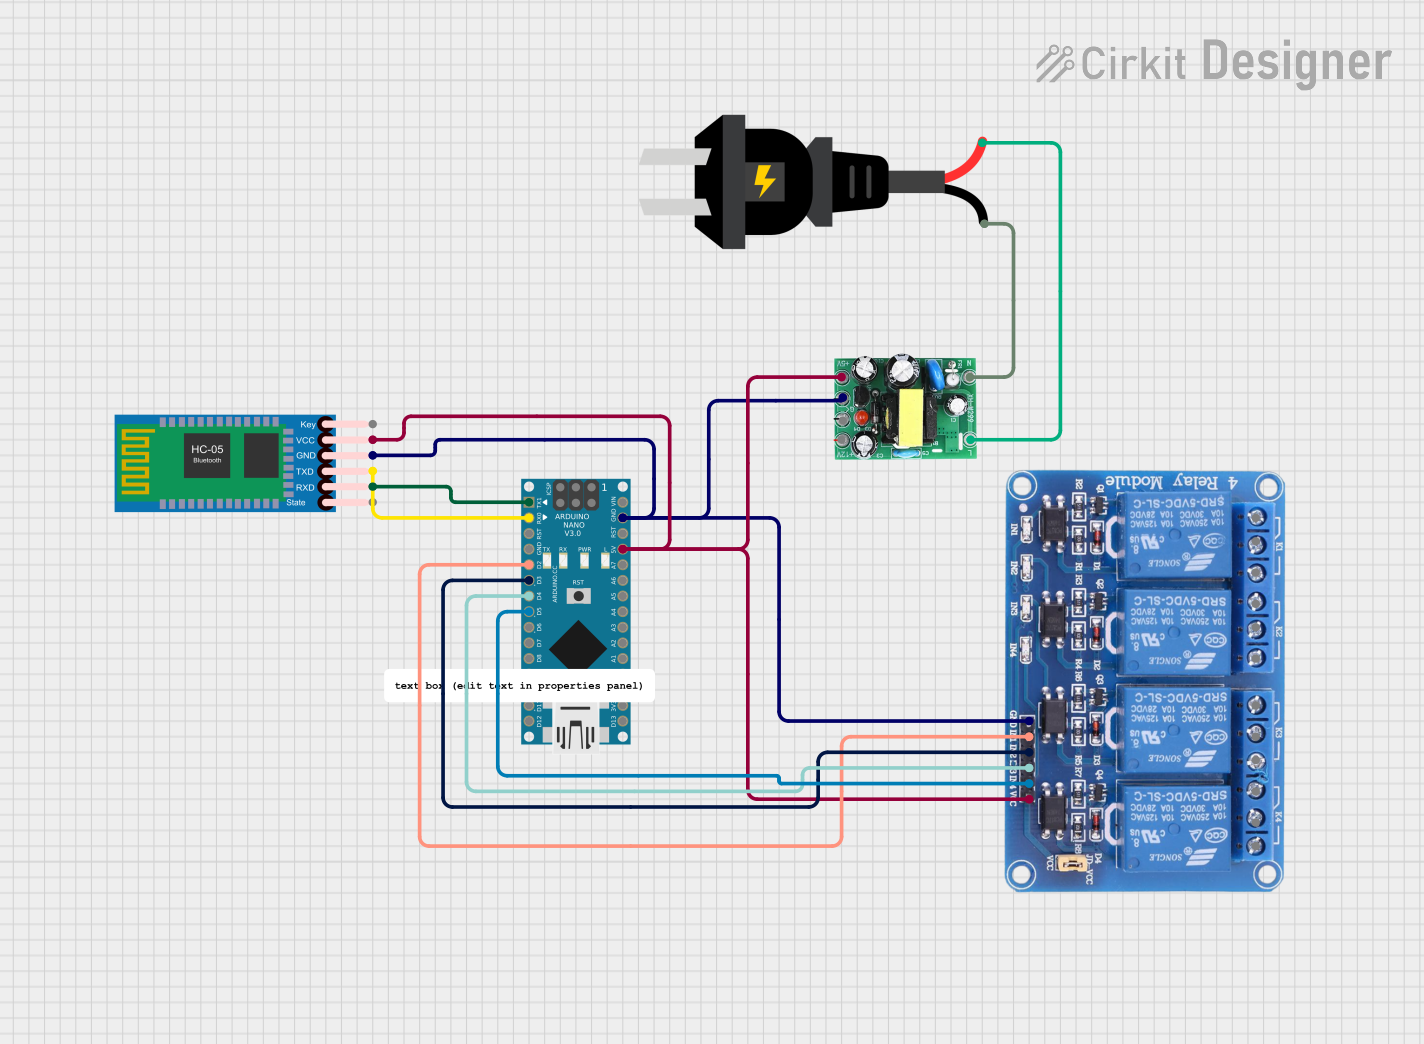
Arduino Nano Bluetooth-Controlled Relay Switch

Circuit Documentation
Summary of the Circuit
This circuit is designed to control a 4-channel relay module via Bluetooth communication using an Arduino Nano as the microcontroller. The HC-05 Bluetooth module is used to receive commands wirelessly from a Bluetooth-enabled device. The Arduino Nano processes these commands and controls the relay module accordingly, which can switch four separate circuits, potentially connected to AC or DC loads. An AC to DC converter is included to provide the necessary 5V power supply to the Arduino Nano, the relay module, and the Bluetooth module from an AC source.
Component List
Arduino Nano
- Microcontroller board based on the ATmega328P
- It has a variety of digital and analog I/O pins
- Capable of serial communication via UART
HC-05 Bluetooth Module
- Bluetooth module for wireless communication
- Operates with a supply voltage of 3.3V to 6V
- Has TXD and RXD pins for serial communication with the Arduino Nano
Relay 4 Channel 5V
- A 4-channel relay module that can control up to four separate circuits
- Each channel has a Normally Open (NO) and a Normally Closed (NC) contact
- Operates with a 5V supply and has digital input pins to control each relay
AC to DC Converter (labeled as "actodc")
- Converts AC voltage to a 5V DC output
- Provides power to the Arduino Nano, relay module, and Bluetooth module
AC Source
- Provides the AC voltage input to the AC to DC converter
Wiring Details
Arduino Nano
D1/TXconnected to HC-05 Bluetooth ModuleRXDD0/RXconnected to HC-05 Bluetooth ModuleTXDD2toD5connected to Relay 4 Channel 5VIN1toIN4respectivelyGNDconnected to the common ground net5Vconnected to the 5V power net
HC-05 Bluetooth Module
RXDconnected to Arduino NanoD1/TXTXDconnected to Arduino NanoD0/RXGNDconnected to the common ground netVCCconnected to the 5V power net
Relay 4 Channel 5V
IN1toIN4connected to Arduino NanoD2toD5respectivelyGNDconnected to the common ground netVCCconnected to the 5V power net
AC to DC Converter (actodc)
12v,-,5v,live,neutralpins are present5vconnected to the 5V power net-connected to the common ground netliveconnected to AC Source+neutralconnected to AC Source-
AC Source
+connected to AC to DC Converterlive-connected to AC to DC Converterneutral
Documented Code
#include <SoftwareSerial.h>
SoftwareSerial module_bluetooth(0, 1); // pin RX | TX

char data = 0;
void setup()
{
  Serial.begin(9600);
  pinMode(2, OUTPUT);  // Initialize PIN 2 as Output
  pinMode(3, OUTPUT);
  pinMode(4, OUTPUT);
  pinMode(5, OUTPUT);
  digitalWrite(2, HIGH); // Set HIGH initially to turn off relay (active-low)
  digitalWrite(3, HIGH);
  digitalWrite(4, HIGH);
  digitalWrite(5, HIGH);

}
void loop()
{
  if(Serial.available() > 0)
  {
    data = Serial.read(); // Read incoming data
    if(data == '1'){
      digitalWrite(2, LOW); // Turn on relay
    }
    else if(data == '2'){
      digitalWrite(2, HIGH); // Turn off relay
    }
    else if(data == '3'){
      digitalWrite(3, LOW);
    }
    else if(data == '4'){
      digitalWrite(3, HIGH);
    }
    else if(data == '5'){
      digitalWrite(4, LOW);
    }
    else if(data == '6'){
      digitalWrite(4, HIGH);
    }
    else if(data == '7'){
      digitalWrite(5, LOW);
    }
    else if(data == '8'){
      digitalWrite(5, HIGH);
    }


}
This code is designed to run on the Arduino Nano and listens for serial input. When a character is received, it checks the character and toggles the corresponding relay channel. The relays are controlled by digital pins 2 to 5. The relays are active-low, meaning that setting the pin to LOW turns the relay on, and setting it to HIGH turns it off.