
Circuit Documentation
Summary
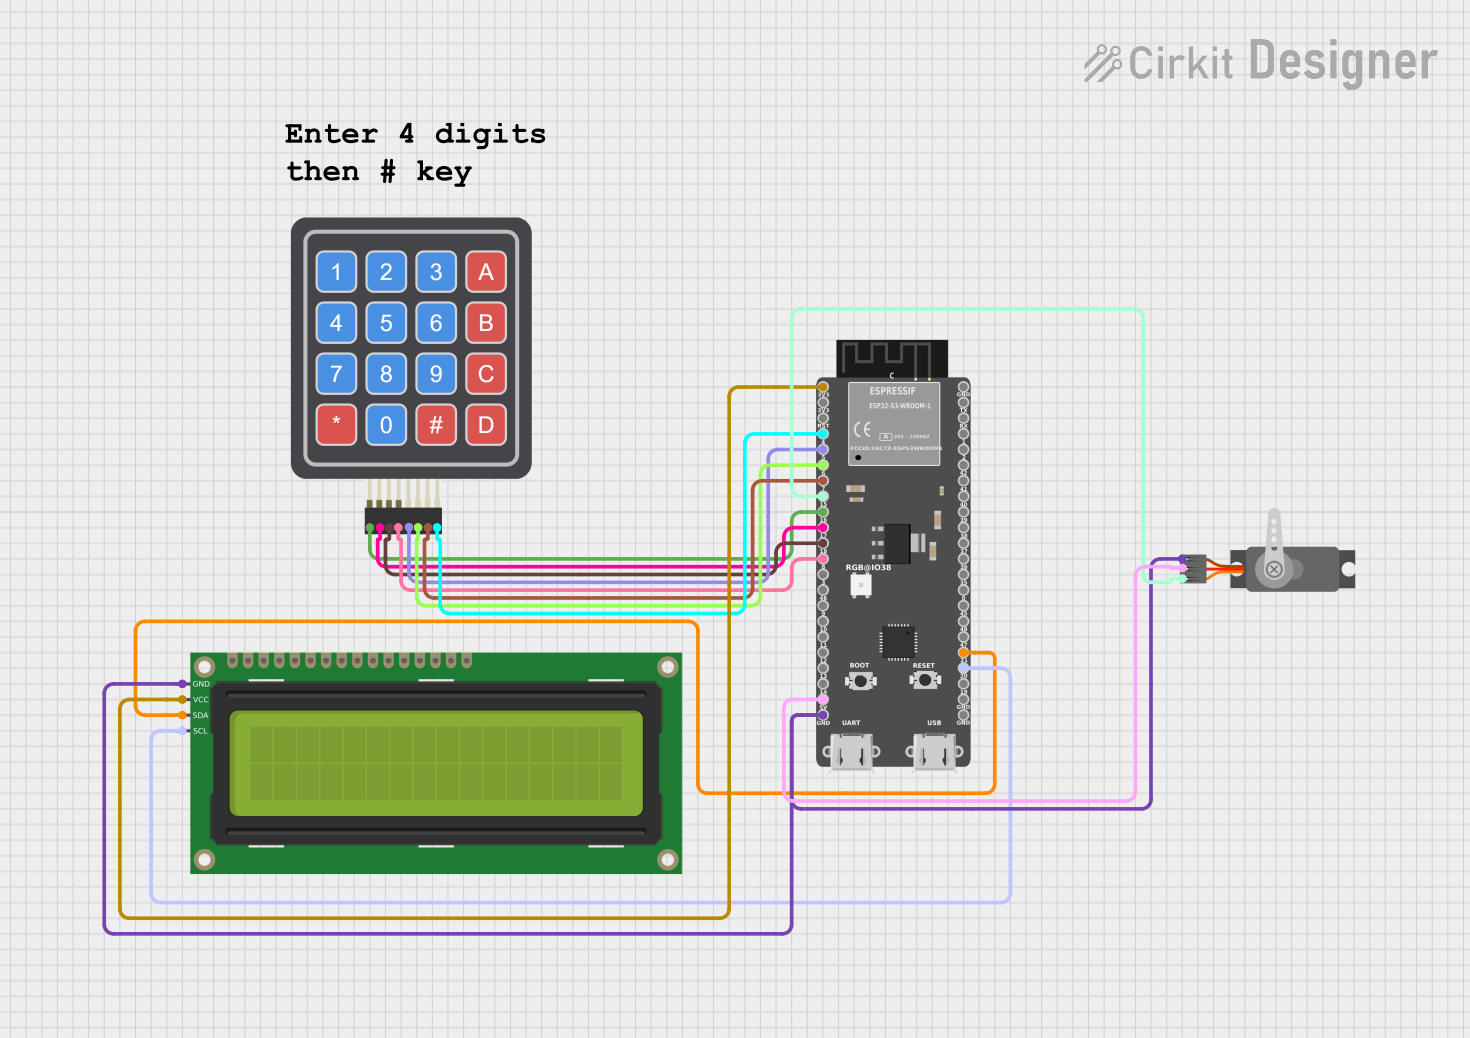
This circuit is designed to create a secure locking mechanism using a keypad, an LCD display, and a servo motor controlled by an ESP32-S3 microcontroller. The user can enter a code via the keypad to lock or unlock the mechanism, with feedback provided on the LCD display.
Component List
1. 4x4 Keypad
- Description: A matrix keypad that allows for user input.
- Purpose: Used for entering the lock/unlock code.
- Pins: R1, C4, R2, C2, R3, R4, C1, C3
2. 16x2 I2C LCD
- Description: A 16x2 character LCD that communicates via I2C.
- Purpose: Displays messages to the user, such as prompts and error messages.
- Pins: GND, VCC, SDA, SCL
3. Servo
- Description: A servo motor used to physically lock or unlock the mechanism.
- Purpose: Provides the locking and unlocking action based on user input.
- Pins: GND, VCC, PWM
4. ESP32-S3 (beta)
- Description: A powerful microcontroller with Wi-Fi and Bluetooth capabilities.
- Purpose: Controls the entire circuit, processes user input, and manages the servo and LCD.
- Pins: 3V3, RST, 4, 5, 6, 7, 15, 16, 17, 18, 8, 3, 46, 9, 10, 11, 12, 13, 14, 5V, GND, 19, 20, 21, 47, 48, 45, 0, 35, 36, 37, 38, 39, 40, 41, 42, 2, 1, RX, TX
Wiring Details
4x4 Keypad
- R1 connected to ESP32-S3 pin 16
- C4 connected to ESP32-S3 pin 4
- R2 connected to ESP32-S3 pin 17
- C2 connected to ESP32-S3 pin 6
- R3 connected to ESP32-S3 pin 18
- R4 connected to ESP32-S3 pin 8
- C1 connected to ESP32-S3 pin 5
- C3 connected to ESP32-S3 pin 7
16x2 I2C LCD
- GND connected to ESP32-S3 GND
- VCC connected to ESP32-S3 3V3
- SDA connected to ESP32-S3 pin 21
- SCL connected to ESP32-S3 pin 20
Servo
- GND connected to ESP32-S3 GND
- VCC connected to ESP32-S3 5V
- PWM connected to ESP32-S3 pin 15
Documented Code
#include <Wire.h>
#include <LiquidCrystal_I2C.h>
#include <Keypad.h>
#include <ESP32Servo.h>

// ========= Pin configuration (ESP32-S3) =========
#define I2C_SDA 21
#define I2C_SCL 20

// Keypad pins: order must be {R1, R2, R3, R4} and {C1, C2, C3, C4}
const byte ROWS = 4;
const byte COLS = 4;
byte rowPins[ROWS] = {16, 17, 18, 8}; // R1, R2, R3, R4
byte colPins[COLS] = {5, 6, 7, 4};    // C1, C2, C3, C4

// Servo
const int servoPin = 15;              // Any PWM-capable GPIO

// ========= LCD =========
LiquidCrystal_I2C lcd(0x27, 16, 2);

// ========= Keypad map =========
char keys[ROWS][COLS] = {
  {'1', '2', '3', 'A'},
  {'4', '5', '6', 'B'},
  {'7', '8', '9', 'C'},
  {'*', '0', '#', 'D'}
};
Keypad keypad = Keypad(makeKeymap(keys), rowPins, colPins, ROWS, COLS);

// ========= Servo =========
Servo lockServo;

// ========= State =========
String enteredCode = "";
String storedCode  = "";
bool isLocked = false;

void setup() {
  // I2C init on chosen pins
  Wire.begin(I2C_SDA, I2C_SCL);

  // LCD init
  lcd.init();       // LiquidCrystal_I2C typically uses init() on ESP32
  lcd.backlight();

  // Servo init (set safe pulse range for most hobby servos)
  // 500–2500 us gives full sweep for many servos; adjust if needed
  ESP32PWM::allocateTimer(0);
  ESP32PWM::allocateTimer(1);
  ESP32PWM::allocateTimer(2);
  ESP32PWM::allocateTimer(3);
  lockServo.setPeriodHertz(50); // 50 Hz for servos
  lockServo.attach(servoPin, 500, 2500);
  lockServo.write(0); // unlocked position

  // Initial LCD prompt
  lcd.setCursor(0, 0);
  lcd.print("Code to Lock:");
}

void loop() {
  char key = keypad.getKey();

  if (key) {
    if (key == '#') {
      if (!isLocked) {
        if (enteredCode.length() == 4) {
          storedCode = enteredCode;
          lockSafe();
        } else {
          displayError("Enter 4 digits", 0);
        }
      } else {
        if (enteredCode == storedCode) {
          unlockSafe();
        } else {
          displayError("Wrong Code", 1);
        }
      }
      enteredCode = "";
      // Clear masked digits on line 1
      lcd.setCursor(0, 1);
      lcd.print("                ");
    } else if (key >= '0' && key <= '9') {
      if (enteredCode.length() < 4) {
        enteredCode += key;
        lcd.setCursor(enteredCode.length() - 1, 1);
        lcd.print('*');
      }
    }
  }
}

void lockSafe() {
  isLocked = true;
  lcd.clear();
  lcd.setCursor(0, 0);
  lcd.print("Locking Safe...");

  for (int pos = 0; pos <= 180; pos += 1) {
    lockServo.write(pos);
    delay(15);
  }

  lcd.clear();
  lcd.setCursor(0, 0);
  lcd.print("Safe Locked");
  delay(2000);
  lcd.clear();
  lcd.setCursor(0, 0);
  lcd.print("Code to Unlock");
}

void unlockSafe() {
  isLocked = false;
  lcd.clear();
  lcd.setCursor(0, 0);
  lcd.print("Unlocking Safe...");

  for (int pos = 180; pos >= 0; pos -= 1) {
    lockServo.write(pos);
    delay(15);
  }

  lcd.clear();
  lcd.setCursor(0, 0);
  lcd.print("Safe Unlocked");
  delay(2000);
  lcd.clear();
  lcd.setCursor(0, 0);
  lcd.print("Code to Lock:");
}

void displayError(String message, int code) {
  lcd.clear();
  lcd.setCursor(0, 0);
  lcd.print(message);
  delay(3000);
  lcd.clear();
  lcd.setCursor(0, 0);
  if (code == 0) {
    lcd.print("Code to Lock:");
  } else {
    lcd.print("Code to Unlock");
  }
}
This documentation provides a comprehensive overview of the circuit, detailing each component, its purpose, wiring connections, and the embedded code that drives the functionality of the system.