
ESP32 Wire Length Measurement System with Rotary Encoder and LCD Display
View and Edit Project In Cirkit Designer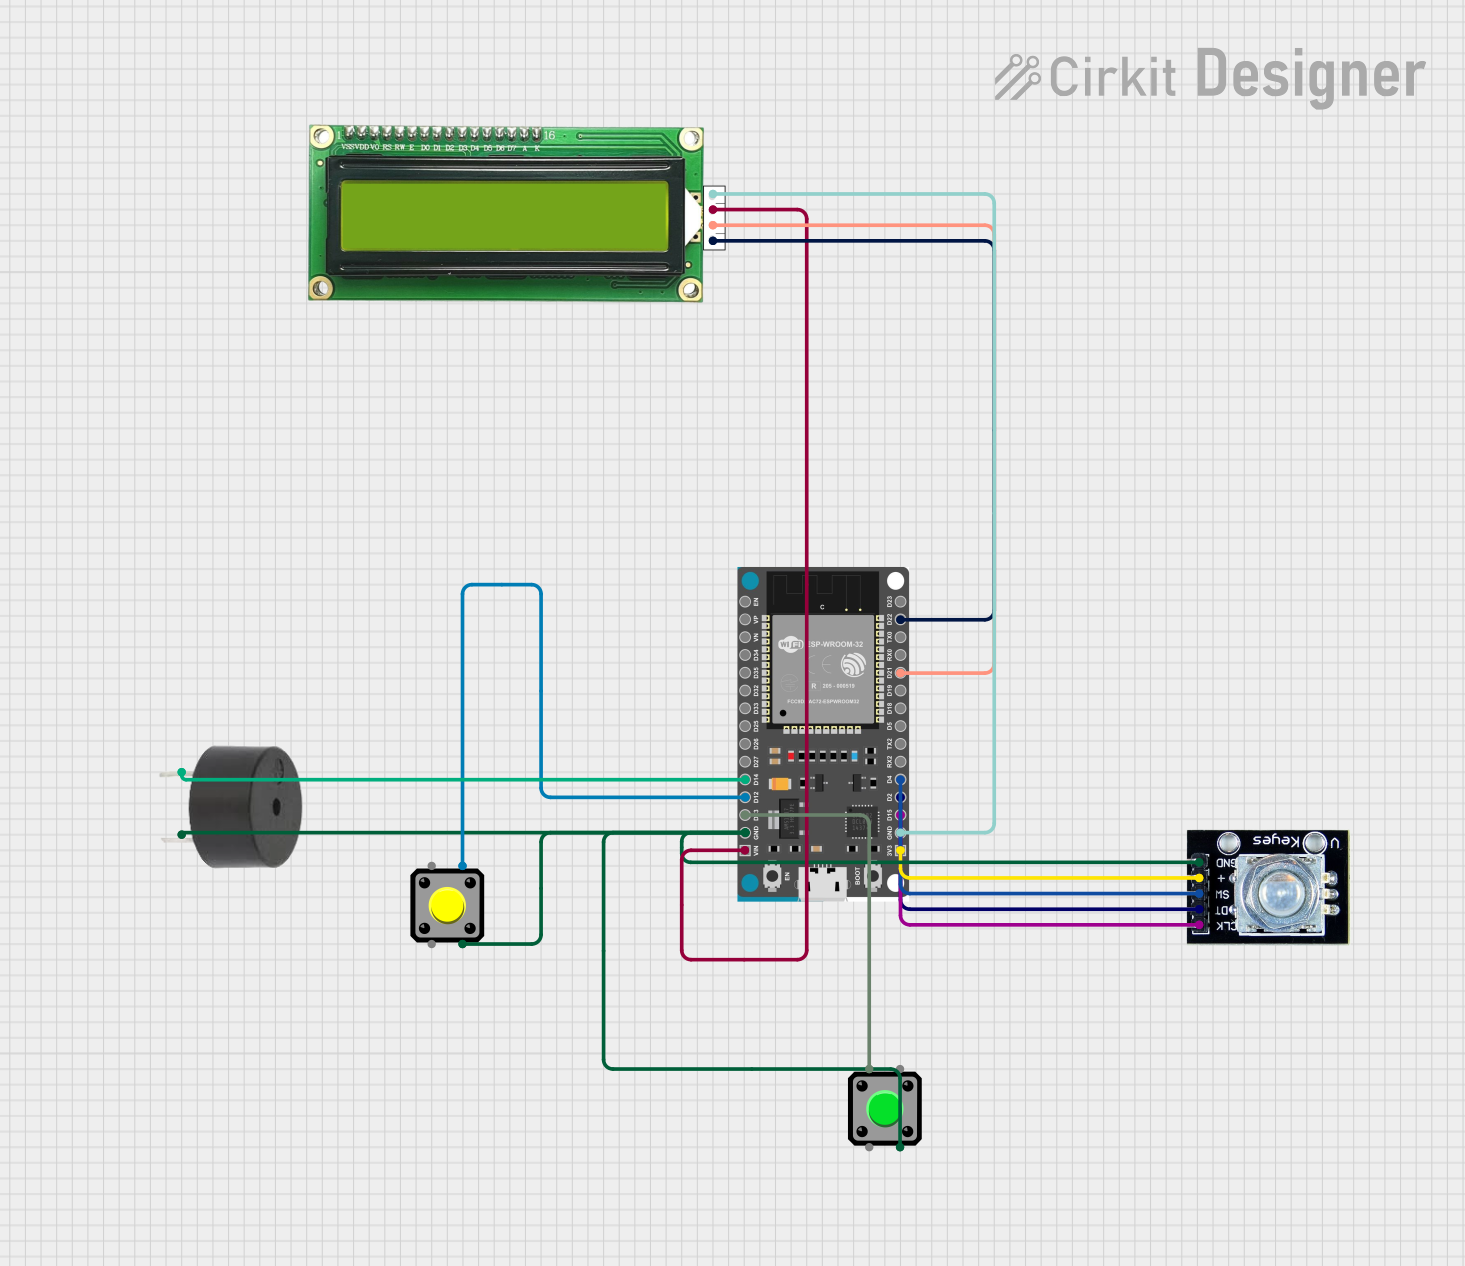
Wire Length Calculator Circuit Documentation
Summary
This document provides a detailed overview of the Wire Length Calculator circuit. The circuit is built around an ESP32 Devkit V1 microcontroller and interfaces with a rotary encoder, an LCD1602 I2C display, two pushbuttons, and a buzzer. The system measures the length of a wire as it is pulled through a tube, displays the length on the LCD screen, and allows for manual adjustment of the desired length using the buttons. A buzzer sounds when the desired length is reached.
Component List
ESP32 Devkit V1
- Description: A powerful microcontroller with Wi-Fi and Bluetooth capabilities.
- Pins: 3V3, GND, D15, D2, D4, RX2, TX2, D5, D18, D19, D21, RX0, TX0, D22, D23, EN, VP, VN, D34, D35, D32, D33, D25, D26, D27, D14, D12, D13, VIN
Rotary Encoder
- Description: A device that converts the angular position or motion of a shaft to an analog or digital code.
- Pins: clk, dt, sw, gnd, +
MKE-M07 LCD1602 I2C
- Description: A 16x2 character LCD display with I2C interface.
- Pins: GND, 5V, SDA, SCL
Pushbutton (Button 1)
- Description: A simple pushbutton used for user input.
- Pins: Pin 2, Pin 1, Pin 3, Pin 4
Pushbutton (Button 2)
- Description: Another simple pushbutton used for user input.
- Pins: Pin 2, Pin 1, Pin 3, Pin 4
Buzzer
- Description: An audio signaling device.
- Pins: PIN, GND
Wiring Details
ESP32 Devkit V1
- 3V3: Connected to Rotary Encoder (+)
- GND: Connected to MKE-M07 LCD1602 I2C (GND), Rotary Encoder (gnd), Buzzer (GND), Pushbutton (Button 1) (Pin 3), Pushbutton (Button 2) (Pin 3)
- D15: Connected to Rotary Encoder (clk)
- D2: Connected to Rotary Encoder (dt)
- D4: Connected to Rotary Encoder (sw)
- D21: Connected to MKE-M07 LCD1602 I2C (SDA)
- D22: Connected to MKE-M07 LCD1602 I2C (SCL)
- D14: Connected to Buzzer (PIN)
- D12: Connected to Pushbutton (Button 1) (Pin 4)
- D13: Connected to Pushbutton (Button 2) (Pin 1)
- VIN: Connected to MKE-M07 LCD1602 I2C (5V)
Rotary Encoder
- +: Connected to ESP32 Devkit V1 (3V3)
- gnd: Connected to ESP32 Devkit V1 (GND)
- clk: Connected to ESP32 Devkit V1 (D15)
- dt: Connected to ESP32 Devkit V1 (D2)
- sw: Connected to ESP32 Devkit V1 (D4)
MKE-M07 LCD1602 I2C
- GND: Connected to ESP32 Devkit V1 (GND)
- 5V: Connected to ESP32 Devkit V1 (VIN)
- SDA: Connected to ESP32 Devkit V1 (D21)
- SCL: Connected to ESP32 Devkit V1 (D22)
Pushbutton (Button 1)
- Pin 4: Connected to ESP32 Devkit V1 (D12)
- Pin 3: Connected to ESP32 Devkit V1 (GND)
Pushbutton (Button 2)
- Pin 1: Connected to ESP32 Devkit V1 (D13)
- Pin 3: Connected to ESP32 Devkit V1 (GND)
Buzzer
- PIN: Connected to ESP32 Devkit V1 (D14)
- GND: Connected to ESP32 Devkit V1 (GND)
Code Documentation
/*
 * Wire Length Calculator
 * This code runs on an ESP32 Devkit V1 and interfaces with a rotary encoder,
 * an LCD1602 I2C display, and two buttons for adjusting the desired length.
 * The system measures the length of a wire as it is pulled through a tube,
 * displays the length on the LCD screen, and allows for manual adjustment of
 * the desired length using the buttons. A buzzer sounds when the desired length is reached.
 */

#include <Wire.h>
#include <hd44780.h>                       // main hd44780 header
#include <hd44780ioClass/hd44780_I2Cexp.h> // i2c expander i/o class header
#include <Encoder.h>

#define LCD_I2C_ADDRESS 0x27 // Typical I2C address for LCD1602

hd44780_I2Cexp lcd; // Declare lcd object: auto locate & auto config expander chip

#define ENCODER_PIN_A 15
#define ENCODER_PIN_B 2
#define ENCODER_SWITCH_PIN 4
#define BUTTON_UP_PIN 12
#define BUTTON_DOWN_PIN 13
#define BUZZER_PIN 14

Encoder myEnc(ENCODER_PIN_A, ENCODER_PIN_B); // Rotary encoder pins
long oldPosition  = -999;
long newPosition;
long desiredLength = 1000; // Set your desired wire length here in cm
long currentLength = 0; // Current measured length in cm

// Calibration factor: number of encoder steps per centimeter
const float calibrationFactor = 4.0; // Adjust this value based on your setup

void setup() {
  pinMode(ENCODER_SWITCH_PIN, INPUT_PULLUP);
  pinMode(BUTTON_UP_PIN, INPUT_PULLUP);
  pinMode(BUTTON_DOWN_PIN, INPUT_PULLUP);
  pinMode(BUZZER_PIN, OUTPUT);

  lcd.begin(16, 2);
  lcd.backlight();
  lcd.setCursor(0, 0);
  lcd.print("Wire Length:");

  Serial.begin(115200); // For debugging purposes
}

void loop() {
  newPosition = myEnc.read();
  if (newPosition != oldPosition) {
    long steps = newPosition - oldPosition;
    currentLength += steps / calibrationFactor;
    oldPosition = newPosition;
    lcd.clear();
    lcd.setCursor(0, 0);
    lcd.print("Wire Length:");
    lcd.setCursor(0, 1);
    lcd.print(currentLength / 10.0, 1); // Display length in meters with one decimal place
    lcd.print(" m / ");
    lcd.print(desiredLength / 10.0, 1); // Display desired length in meters with one decimal place
  }

  if (digitalRead(ENCODER_SWITCH_PIN) == LOW) {
    delay(50); // Debounce delay
    if (digitalRead(ENCODER_SWITCH_PIN) == LOW) {
      desiredLength += 10; // Adjust desired length by 10 cm
      while (digitalRead(ENCODER_SWITCH_PIN) == LOW) {
        delay(10); // Wait for button release
      }
    }
  }

  if (digitalRead(BUTTON_UP_PIN) == LOW) {
    delay(50); // Debounce delay
    if (digitalRead(BUTTON_UP_PIN) == LOW) {
      desiredLength += 1; // Increment desired length by 1 cm
      while (digitalRead(BUTTON_UP_PIN) == LOW) {
        delay(10); // Wait for button release
      }
    }
  }

  if (digitalRead(BUTTON_DOWN_PIN) == LOW) {
    delay(50); // Debounce delay
    if (digitalRead(BUTTON_DOWN_PIN) == LOW) {
      desiredLength -= 1; // Decrement desired length by 1 cm
      while (digitalRead(BUTTON_DOWN_PIN) == LOW) {
        delay(10); // Wait for button release
      }
    }
  }

  if (currentLength >= desiredLength) {
    tone(BUZZER_PIN, 1000); // Sound buzzer at 1000 Hz
    delay(500); // Buzzer duration
    noTone(BUZZER_PIN); // Stop buzzer
  }
}
This concludes the documentation for the Wire Length Calculator circuit.