
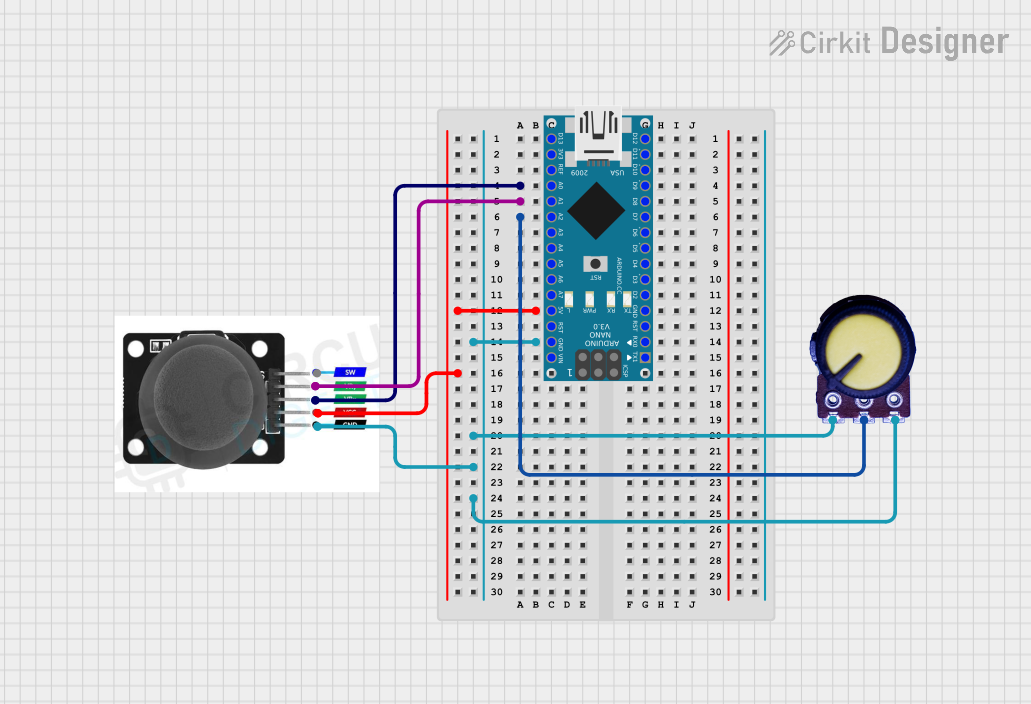
Circuit Documentation
Summary
This circuit involves an Arduino Nano microcontroller interfacing with a joystick module and a potentiometer. The joystick module provides analog input through its VRX and VRY pins, while the potentiometer provides an additional analog input. The Arduino Nano reads these inputs and can be programmed to perform various tasks based on the input values.
Component List
Arduino Nano
- Description: A small, complete, and breadboard-friendly board based on the ATmega328P.
- Pins: D1/TX, D0/RX, RESET, GND, D2, D3, D4, D5, D6, D7, D8, D9, D10, D11/MOSI, D12/MISO, VIN, 5V, A7, A6, A5, A4, A3, A2, A1, A0, AREF, 3V3, D13/SCK
Joystick Module
- Description: A module that provides analog input through two potentiometers and a digital input through a switch.
- Pins: SW, VRY, VRX, VCC, GND
Potentiometer
- Description: A three-terminal resistor with a sliding or rotating contact that forms an adjustable voltage divider.
- Pins: GND, Output, VCC
Wiring Details
Arduino Nano
- A0: Connected to Joystick Module VRX
- A1: Connected to Joystick Module VRY
- A2: Connected to Potentiometer Output
- 5V: Connected to Joystick Module VCC
- GND: Connected to Potentiometer GND, Joystick Module GND, and Potentiometer VCC
Joystick Module
- VRX: Connected to Arduino Nano A0
- VRY: Connected to Arduino Nano A1
- VCC: Connected to Arduino Nano 5V
- GND: Connected to Arduino Nano GND
Potentiometer
- Output: Connected to Arduino Nano A2
- GND: Connected to Arduino Nano GND
- VCC: Connected to Arduino Nano GND
Code Documentation
Arduino Nano Code
void setup() {
  // put your setup code here, to run once:

}

void loop() {
  // put your main code here, to run repeatedly:

}
This code is a basic template for the Arduino Nano. The setup() function is where you initialize any settings or configurations, and the loop() function is where the main code runs repeatedly. You can add code to read the analog inputs from the joystick and potentiometer and perform actions based on those readings.