
Arduino Uno Smart Distance-Based Relay Control with Ultrasonic Sensor
View and Edit Project In Cirkit Designer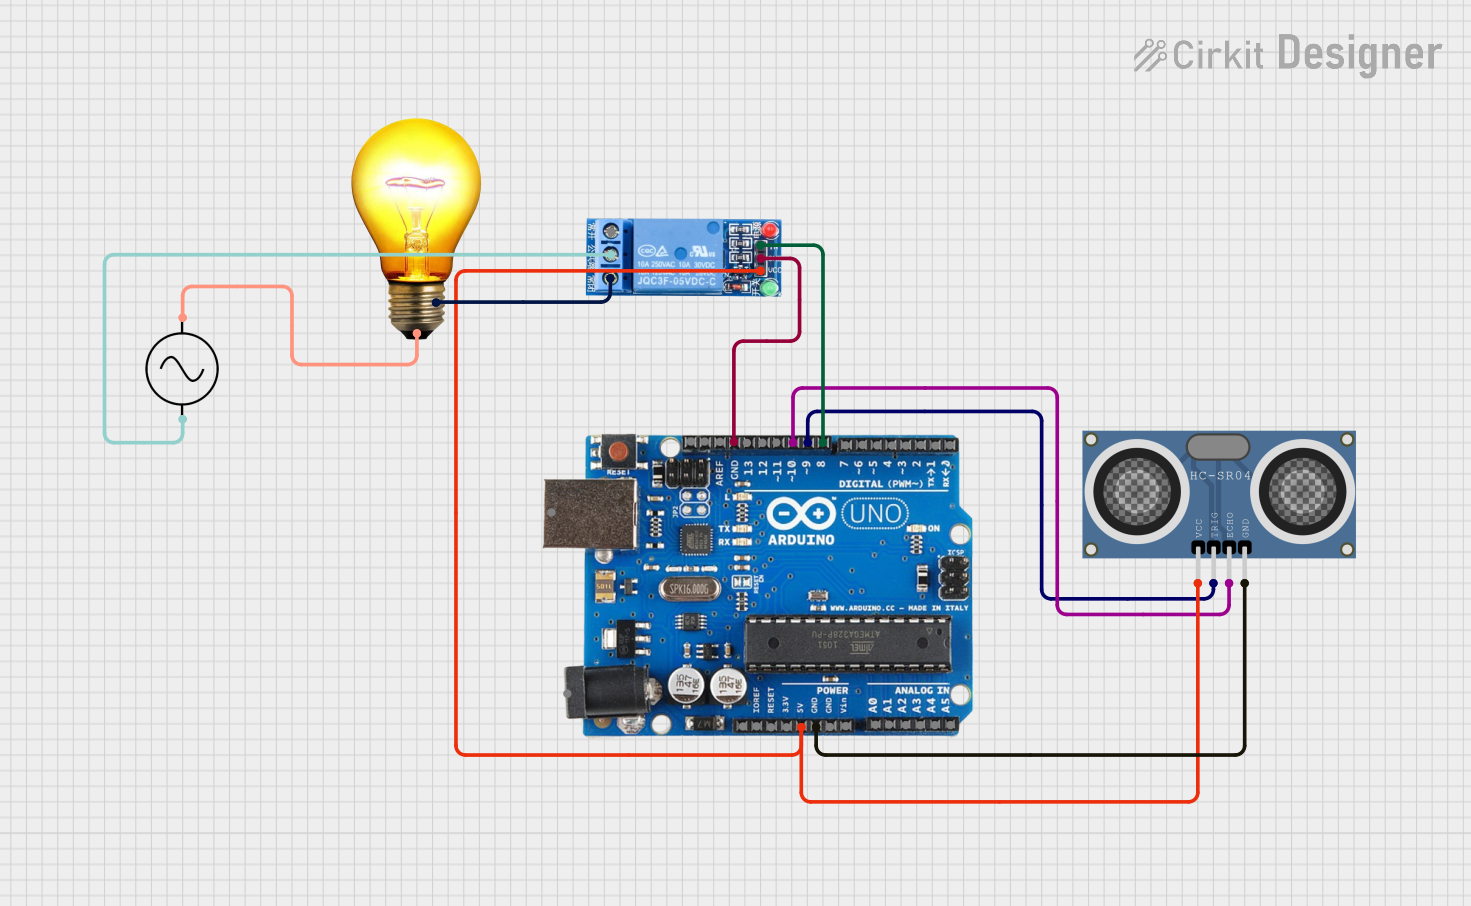
Circuit Documentation
Summary
This circuit is designed to measure distance using an HC-SR04 Ultrasonic Distance Sensor and control an AC bulb through a 1 Channel Relay based on the measured distance. The system is powered by an Arduino Uno R3 microcontroller, which reads the distance from the ultrasonic sensor and toggles the relay to turn the AC bulb on or off depending on the distance.
Component List
Arduino Uno R3
- Description: A microcontroller board based on the ATmega328P.
- Pins: D8, D9, D10, D11, D12, D13, GND, AREF, SDA, SCL, D0/RX, D1/Tx, D2, D3, D4, D5, 6, D7, A5/SCL, A4/SDA, A3, A2, A1, A0, Vin, 5V, 3.3V, RESET, IOREF, NONE, USB Jack, Power Jack
1 Channel Relay 5V
- Description: A relay module that allows control of high voltage devices with a low voltage signal.
- Pins: VCC, GND, IN, NC, COM, NO
HC-SR04 Ultrasonic Distance Sensor (Wokwi Compatible)
- Description: An ultrasonic sensor used for measuring distance.
- Pins: VCC, TRIG, ECHO, GND
AC Bulb
- Description: A standard AC bulb.
- Pins: P, N
AC Supply
- Description: An AC power supply.
- Pins: +ve, -ve
Wiring Details
Arduino Uno R3
- D8: Connected to IN of the 1 Channel Relay
- D9: Connected to TRIG of the HC-SR04 Ultrasonic Distance Sensor
- D10: Connected to ECHO of the HC-SR04 Ultrasonic Distance Sensor
- GND: Connected to GND of the 1 Channel Relay and GND of the HC-SR04 Ultrasonic Distance Sensor
- 5V: Connected to VCC of the 1 Channel Relay and VCC of the HC-SR04 Ultrasonic Distance Sensor
1 Channel Relay 5V
- VCC: Connected to 5V of the Arduino Uno R3
- GND: Connected to GND of the Arduino Uno R3
- IN: Connected to D8 of the Arduino Uno R3
- COM: Connected to -ve of the AC Supply
- NO: Connected to N of the AC Bulb
HC-SR04 Ultrasonic Distance Sensor (Wokwi Compatible)
- VCC: Connected to 5V of the Arduino Uno R3
- GND: Connected to GND of the Arduino Uno R3
- TRIG: Connected to D9 of the Arduino Uno R3
- ECHO: Connected to D10 of the Arduino Uno R3
AC Bulb
- P: Connected to +ve of the AC Supply
- N: Connected to NO of the 1 Channel Relay
AC Supply
- +ve: Connected to P of the AC Bulb
- -ve: Connected to COM of the 1 Channel Relay
Code Documentation
const int relayPin = 8; // Pin connected to the relay
const int trigPin = 9; // Pin connected to the HC-SR04 TRIG
const int echoPin = 10; // Pin connected to the HC-SR04 ECHO
const int numReadings = 5; // Number of readings to average

void setup() {
  // Initialize pin D8 as an output for the relay
  pinMode(relayPin, OUTPUT);
  // Initialize pins D9 and D10 for the ultrasonic sensor
  pinMode(trigPin, OUTPUT);
  pinMode(echoPin, INPUT);
  // Start the serial communication
  Serial.begin(9600);
}

void loop() {
  long totalDuration = 0;
  for (int i = 0; i < numReadings; i++) {
    // Send a 10us pulse to trigger the sensor
    digitalWrite(trigPin, LOW);
    delayMicroseconds(2);
    digitalWrite(trigPin, HIGH);
    delayMicroseconds(10);
    digitalWrite(trigPin, LOW);

    // Read the echo pin and calculate the distance
    long duration = pulseIn(echoPin, HIGH);
    totalDuration += duration;
    delay(50); // Small delay between readings
  }

  long averageDuration = totalDuration / numReadings;
  int distance = averageDuration * 0.034 / 2;

  // Print the distance to the serial monitor
  Serial.print("Distance: ");
  Serial.print(distance);
  Serial.println(" cm");

  // If the distance is less than 100 cm, turn the relay on
  if (distance < 100) {
    digitalWrite(relayPin, HIGH);
  } else {
    // If the distance is 100 cm or more, turn the relay off
    digitalWrite(relayPin, LOW);
  }

  // Small delay before the next measurement
  delay(100);
}
This code initializes the pins for the relay and the ultrasonic sensor, reads the distance from the sensor, and toggles the relay based on the measured distance. If the distance is less than 100 cm, the relay is turned on, otherwise, it is turned off. The distance is also printed to the serial monitor.