
Wi-Fi Controlled Battery Monitoring System with ESP8266 and TP4056
View and Edit Project In Cirkit Designer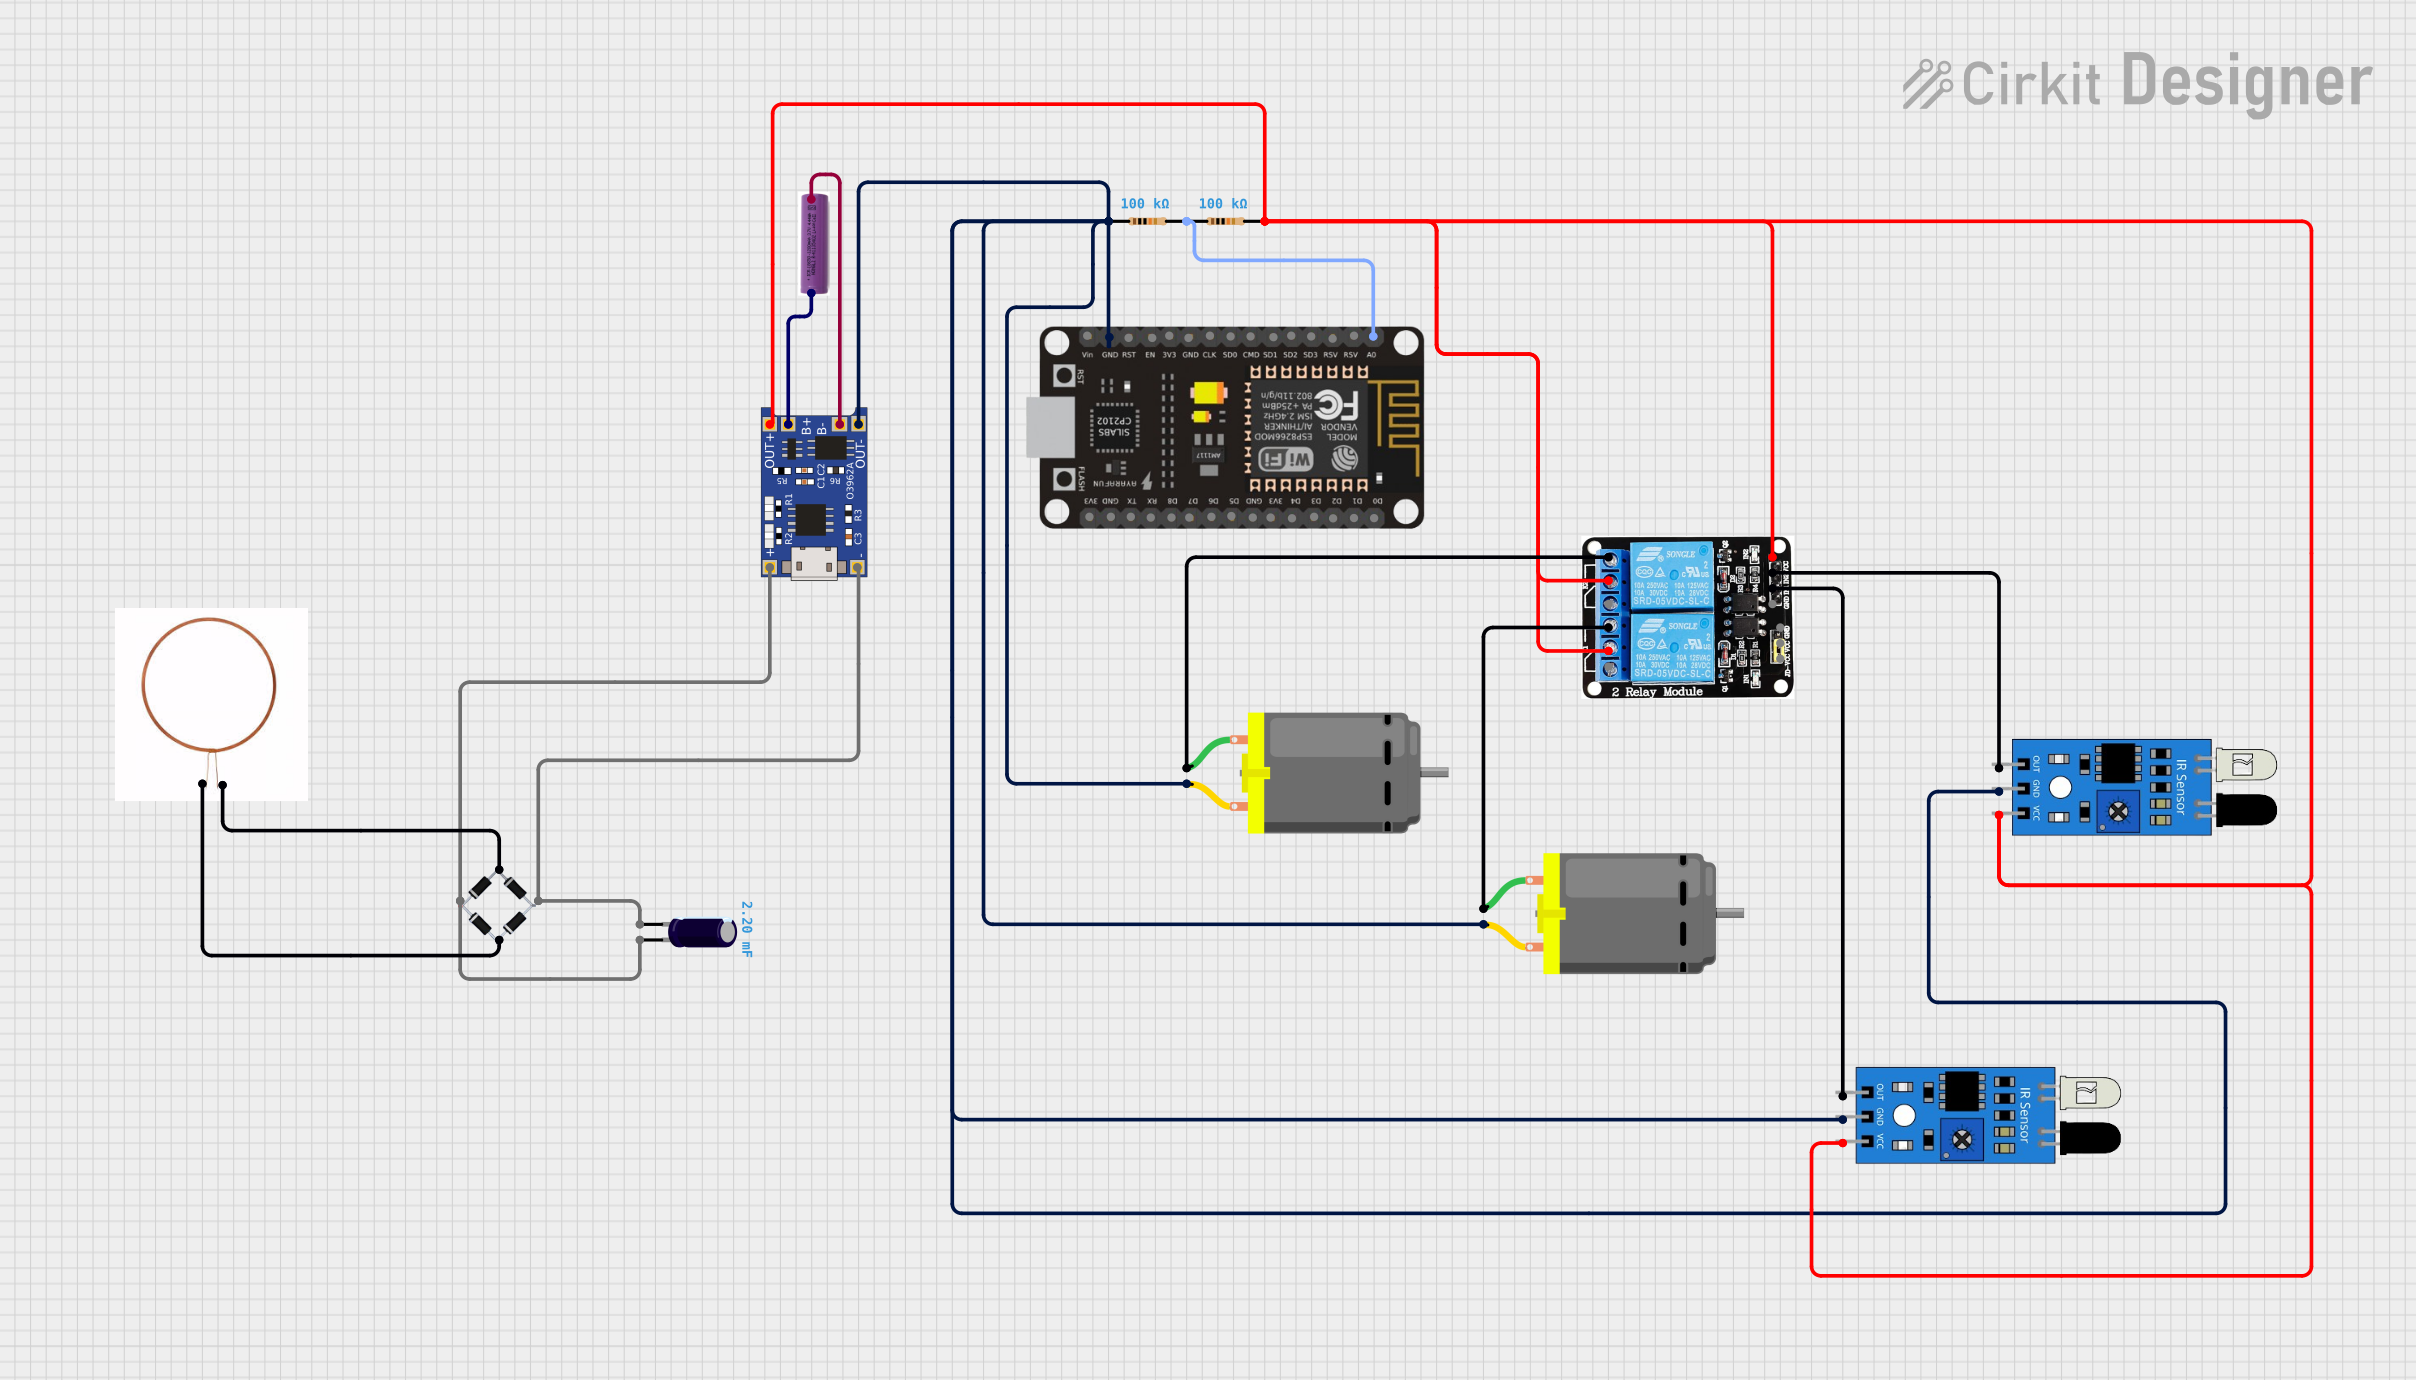
Circuit Documentation
Summary
The circuit in question appears to be a smart device that monitors battery voltage and reports the data to a server via Wi-Fi. It includes a charging module for a 3.7V battery, an ESP8266 NodeMCU microcontroller for processing and Wi-Fi connectivity, IR sensors for input, a relay module for controlling DC motors, and passive components like resistors and a capacitor for voltage regulation and filtering. The circuit also features a bridge rectifier and a copper coil, which may be part of a power supply or charging system.
Component List
TP4056
- Description: Lithium Battery Charger and Protection Module
- Pins: OUT-, B-, B+, OUT+, IN-, IN+
3.7V Battery
- Description: Rechargeable Lithium-Ion Battery
- Pins: +, -
ESP8266 NodeMCU
- Description: Wi-Fi Microcontroller Module
- Pins: D0, D1, D2, D3, D4, 3V3, GND, D5, D6, D7, D8, RX, TX, A0, RSV, SD3, SD2, SD1, CMD, SD0, CLK, EN, RST, VIN
Resistor (100k Ohms)
- Description: Passive Component to Limit Current or Divide Voltage
- Pins: pin1, pin2
DC Motor
- Description: Electric Motor Powered by DC Voltage
- Pins: pin 1, pin 2
5V 2-Relay Module (JD-VCC)
- Description: Relay Module for Switching High Power Devices
- Pins: JD-VCC, VCC, GND, IN1, IN2, NO, COM, NC
IR Sensor
- Description: Infrared Sensor for Detecting Objects or Movement
- Pins: out, gnd, vcc
Bridge Rectifier
- Description: Component for Converting AC to DC
- Pins: Source_in-, source_out-, source_out+, source_in+
Electrolytic Capacitor (2200uF)
- Description: Capacitor for Filtering and Storing Charge
- Pins: -, +
Copper Coil
- Description: Inductive Component, Possibly Part of a Power Supply
- Pins: -ve, +ve
Wiring Details
TP4056
- OUT- connected to GND of ESP8266 NodeMCU, IR Sensors, DC Motors, and Resistor
- B- connected to - of 3.7V Battery
- B+ connected to + of 3.7V Battery
- OUT+ connected to VCC of IR Sensors and COM of Relay Module
- IN- connected to - of Electrolytic Capacitor and source_out- of Bridge Rectifier
- IN+ connected to + of Electrolytic Capacitor and source_out+ of Bridge Rectifier
3.7V Battery
-
- connected to B+ of TP4056
-
- connected to B- of TP4056
ESP8266 NodeMCU
- GND connected to GND of IR Sensors, DC Motors, and TP4056
- A0 connected to pin1 of Resistor and pin2 of another Resistor
Resistor (100k Ohms)
- pin1 connected to GND of TP4056 and pin2 connected to VCC of IR Sensors and COM of Relay Module
- pin1 connected to A0 of ESP8266 NodeMCU and pin2 connected to pin1 of another Resistor
DC Motor
- pin 1 connected to NO of Relay Module
- pin 2 connected to GND of ESP8266 NodeMCU, IR Sensors, and TP4056
5V 2-Relay Module (JD-VCC)
- JD-VCC not connected
- VCC connected to OUT+ of TP4056
- GND not connected
- IN1 connected to out of IR Sensor
- IN2 connected to out of another IR Sensor
- NO connected to pin 1 of DC Motors
- COM connected to OUT+ of TP4056
IR Sensor
- out connected to IN1 and IN2 of Relay Module
- gnd connected to GND of ESP8266 NodeMCU, DC Motors, and TP4056
- vcc connected to OUT+ of TP4056 and pin2 of Resistor
Bridge Rectifier
- Source_in- connected to -ve of Copper Coil
- source_out- connected to IN- of TP4056
- source_out+ connected to IN+ of TP4056
- source_in+ connected to +ve of Copper Coil
Electrolytic Capacitor (2200uF)
-
- connected to IN- of TP4056
-
- connected to IN+ of TP4056
Copper Coil
- -ve connected to Source_in- of Bridge Rectifier
- +ve connected to source_in+ of Bridge Rectifier
Documented Code
#include <ESP8266WiFi.h>

String apiKey = "**************";
const char* ssid =  "**************";     // Enter your WiFi Network's SSID
const char* pass =  "**************"; // Enter your WiFi Network's Password
const char* server = "api.thingspeak.com";

int analogInPin  = A0;    // Analog input pin
int sensorValue;          // Analog Output of Sensor
float calibration = 0.36; // Check Battery voltage using multimeter & add/subtract the value
int bat_percentage;

WiFiClient client;

void setup()
{
  Serial.begin(115200);
  Serial.println("Connecting to ");
  Serial.println(ssid);
  WiFi.begin(ssid, pass);

  while (WiFi.status() != WL_CONNECTED)
  {
    delay(100);
    Serial.print("*");
  }
  Serial.println("");
  Serial.println("WiFi connected");
}

void loop()
{
  sensorValue = analogRead(analogInPin);
  float voltage = (((sensorValue * 3.3) / 1024) * 2 + calibration); //multiply by two as voltage divider network is 100K & 100K Resistor

  bat_percentage = mapfloat(voltage, 2.8, 4.2, 0, 100); //2.8V as Battery Cut off Voltage & 4.2V as Maximum Voltage

  if (bat_percentage >= 100)
  {
    bat_percentage = 100;
  }
  if (bat_percentage <= 0)
  {
    bat_percentage = 1;
  }

  Serial.print("Analog Value = ");
  Serial.print(sensorValue);
  Serial.print("\t Output Voltage = ");
  Serial.print(voltage);
  Serial.print("\t Battery Percentage = ");
  Serial.println(bat_percentage);
  delay(1000);

  if (client.connect(server, 80))
  {

    String postStr = apiKey;
    postStr += "&field1=";
    postStr += String(voltage);
    postStr += "&field2=";
    postStr += String(bat_percentage);
    postStr += "\r\n\r\n";

    client.print("POST /update HTTP/1.1\n");
    delay(100);
    client.print("Host: api.thingspeak.com\n");
    delay(100);
    client.print("Connection: close\n");
    delay(100);
    client.print("X-THINGSPEAKAPIKEY: " + apiKey + "\n");
    delay(100);
    client.print("Content-Type: application/x-www-form-urlencoded\n");
    delay(100);
    client.print("Content-Length: ");
    delay(100);
    client.print(postStr.length());
    delay(100);
    client.print("\n\n");
    delay(100);
    client.print(postStr);
    delay(100);
  }
  client.stop();
  Serial.println("Sending....");
  delay(15000);
}

float mapfloat(float x, float in_min, float in_max, float out_min, float out_max)
{
  return (x - in_min) * (out_max - out_min) / (in_max - in_min) + out_min;
}
This code snippet is for the ESP8266 NodeMCU microcontroller. It reads an analog value from pin A0, calculates the battery voltage and percentage, and sends this data to ThingSpeak server using Wi-Fi. The mapfloat function is used to map the voltage to a percentage value. The code includes a calibration factor to adjust the voltage reading to match the actual battery voltage as measured by a multimeter.