
Arduino UNO-Based Environmental Monitoring System with I2C LCD, Soil Moisture Sensing, and Data Logging
View and Edit Project In Cirkit Designer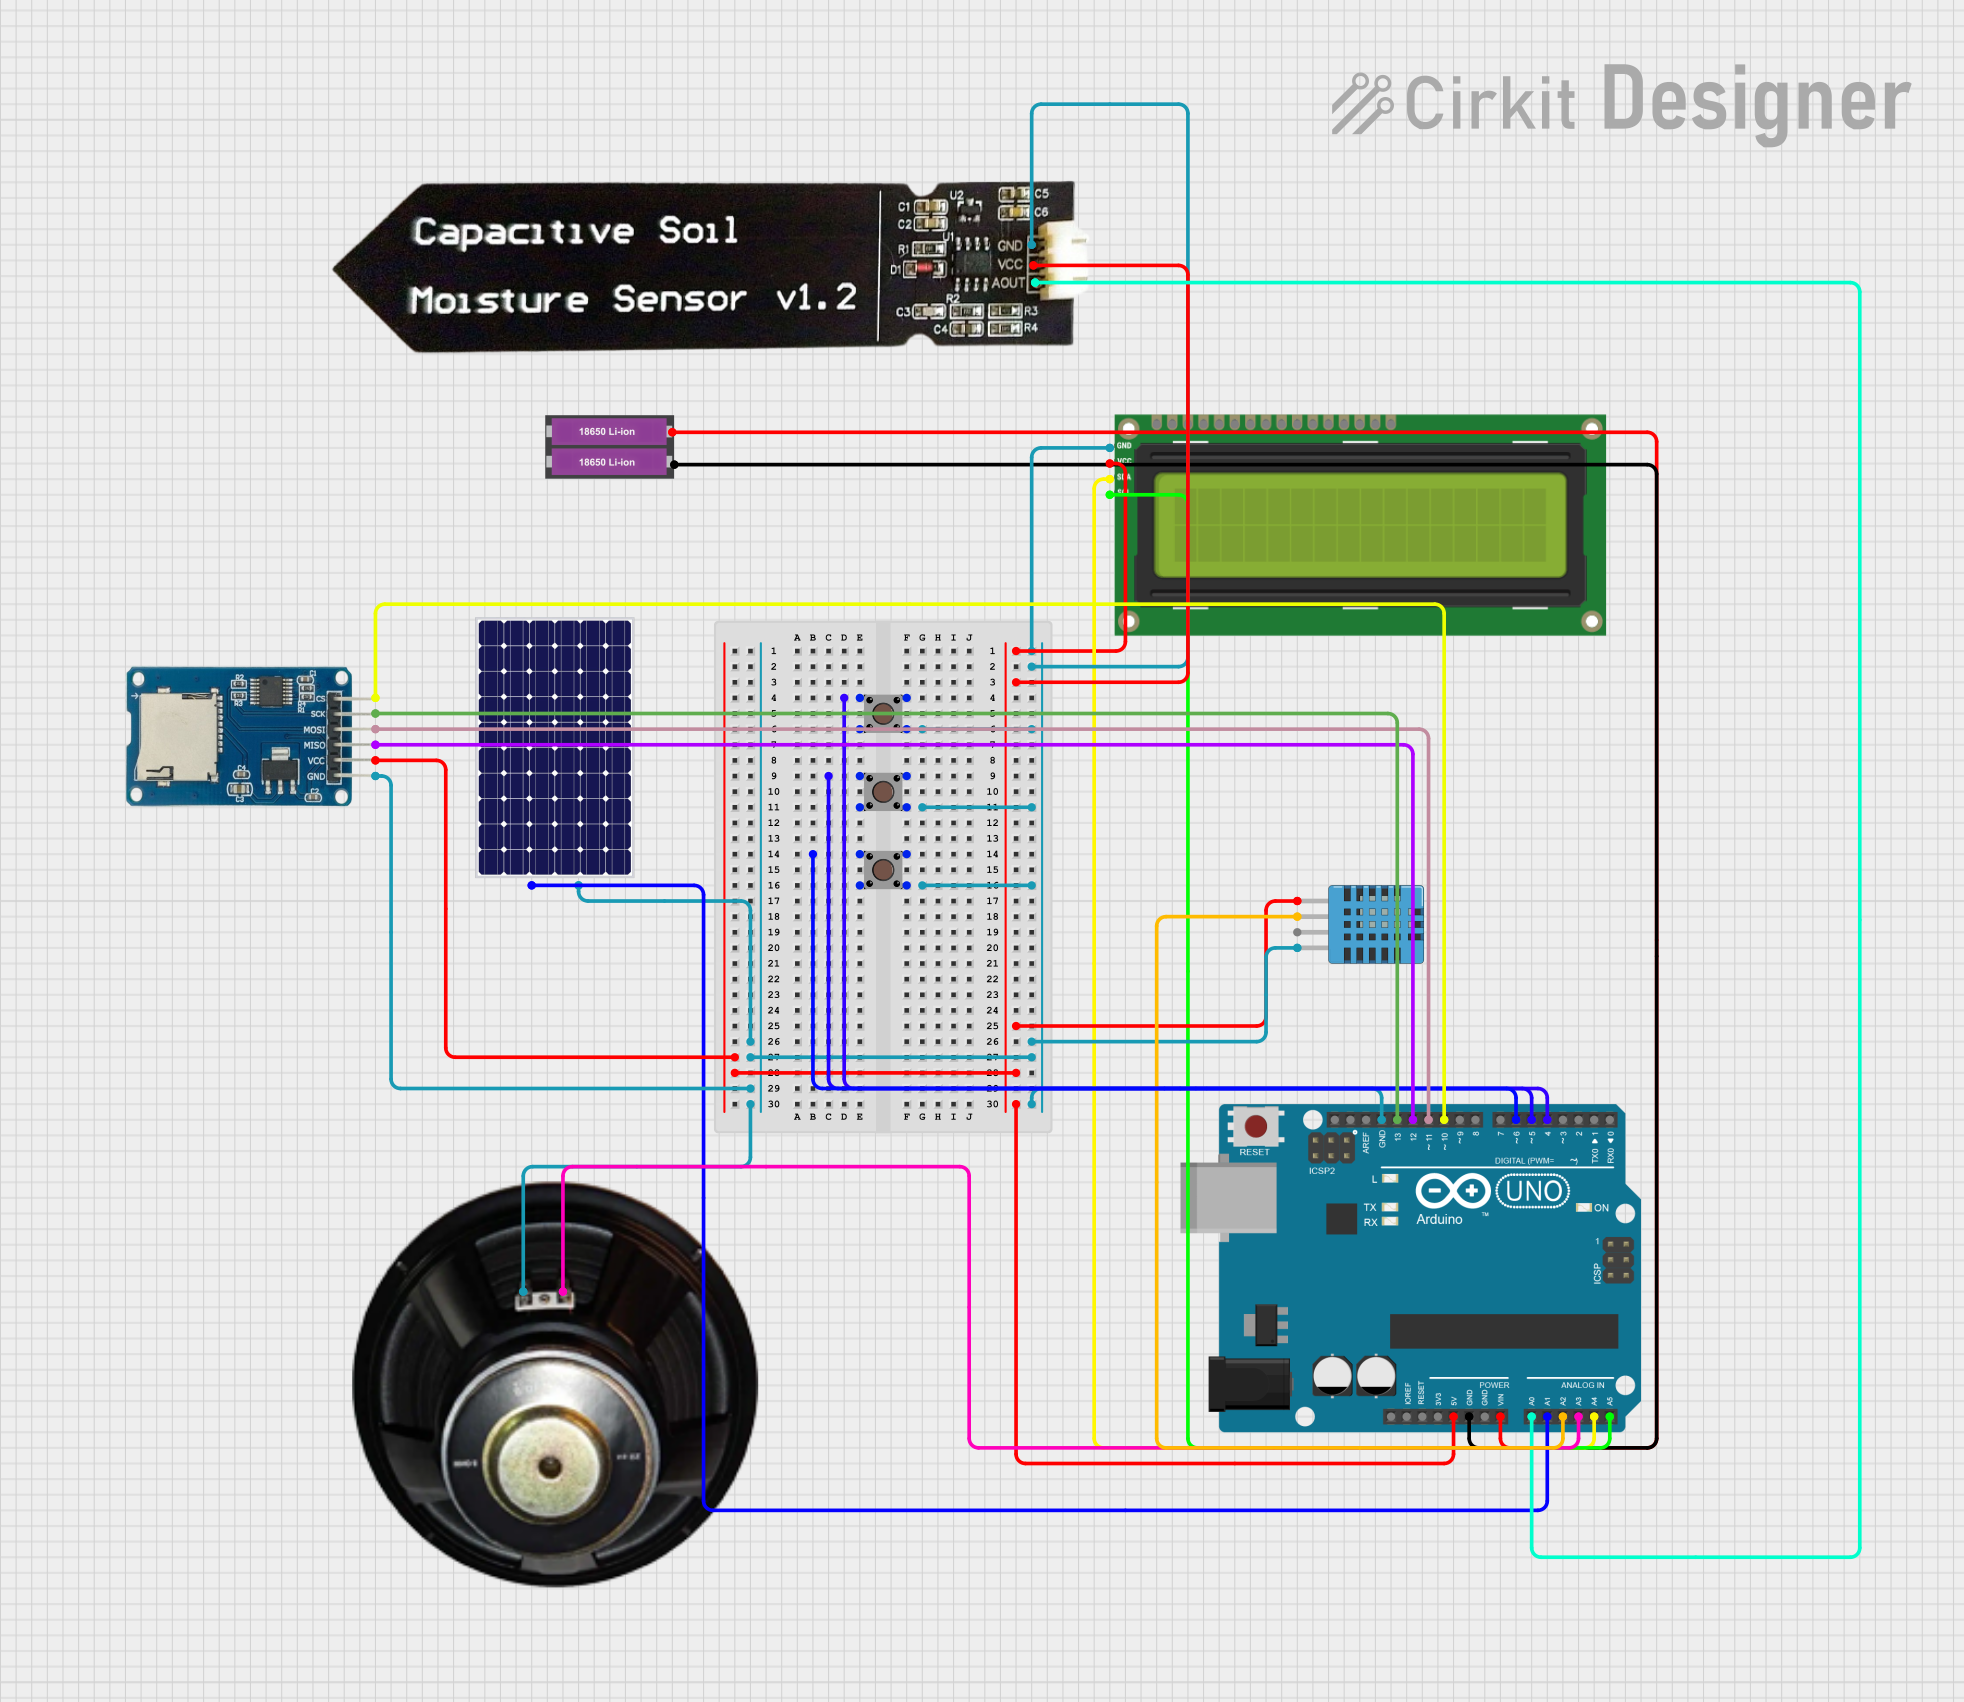
Circuit Documentation
Summary
This circuit is designed around an Arduino UNO microcontroller and includes various sensors and input/output devices to create an interactive system. The system is capable of reading environmental data such as soil moisture, humidity, and temperature, as well as controlling a speaker and displaying information on an I2C LCD screen. User input is captured through pushbuttons, allowing navigation through a menu system implemented in the Arduino's code. The circuit is powered by a pair of 18650 Li-ion batteries, and it also includes a solar panel for additional power input or monitoring.
Component List
Arduino UNO
- Microcontroller board based on the ATmega328P
- It has 14 digital input/output pins, 6 analog inputs, a 16 MHz quartz crystal, a USB connection, a power jack, an ICSP header, and a reset button.
Pushbutton (x3)
- A simple switch mechanism for controlling some aspect of a machine or a process. Buttons are typically made out of hard material, usually plastic or metal.
I2C LCD 16x2 Screen
- A liquid crystal display capable of displaying 16 characters per line and 2 lines.
- It uses the I2C communication protocol for interfacing with the microcontroller.
Speaker
- An electroacoustic transducer; a device which converts an electrical audio signal into a corresponding sound.
Capacitive Soil Moisture Sensor V1.2
- A simple and cost-effective soil moisture sensor that measures the volumetric content of water inside the soil.
18650 Li-ion Battery x 2
- Rechargeable batteries commonly used in portable electronics and electric vehicles.
Solar Panel
- A panel designed to absorb the sun's rays as a source of energy for generating electricity or heating.
DHT11 Humidity and Temperature Sensor
- A basic, ultra low-cost digital temperature and humidity sensor.
Micro SD Card Module
- A module that allows micro SD cards to be read and written via the SPI communication protocol.
Wiring Details
Arduino UNO
- Digital Pins:
- D4, D5, D6: Connected to pushbuttons for user input.
- D10, D11, D12, D13: Connected to the Micro SD Card Module for SPI communication.
- Analog Pins:
- A0: Connected to the Capacitive Soil Moisture Sensor V1.2 for moisture level reading.
- A1: Connected to the solar panel for sunlight level reading.
- A2: Connected to the DHT11 sensor for humidity and temperature data.
- A3: Connected to the Speaker for audio output.
- A4 (SDA), A5 (SCL): Connected to the I2C LCD 16x2 Screen for display.
- Power Pins:
- 5V: Powers the I2C LCD 16x2 Screen, Capacitive Soil Moisture Sensor V1.2, DHT11 sensor, and Micro SD Card Module.
- GND: Common ground for all components.
- Vin: Connected to the 18650 Li-ion Battery x 2 for power supply.
Pushbuttons (x3)
- One side of each pushbutton is connected to the Arduino's digital pins (D4, D5, D6) for user input.
- The other side of each pushbutton is connected to the common ground.
I2C LCD 16x2 Screen
- SDA: Connected to Arduino's A4 pin.
- SCL: Connected to Arduino's A5 pin.
- VCC (5V): Powered by Arduino's 5V pin.
- GND: Connected to the common ground.
Speaker
- "+": Connected to Arduino's A3 pin for audio signal.
- "-": Connected to the common ground.
Capacitive Soil Moisture Sensor V1.2
- AOUT: Connected to Arduino's A0 pin for analog moisture level reading.
- VCC: Powered by Arduino's 5V pin.
- GND: Connected to the common ground.
18650 Li-ion Battery x 2
- "+": Connected to Arduino's Vin pin for power supply.
- "-": Connected to the common ground.
Solar Panel
- "+": Connected to Arduino's A1 pin for analog sunlight level reading.
- "-": Connected to the common ground.
DHT11 Humidity and Temperature Sensor
- VDD: Powered by Arduino's 5V pin.
- DATA: Connected to Arduino's A2 pin for digital humidity and temperature data.
- GND: Connected to the common ground.
Micro SD Card Module
- cs: Connected to Arduino's D10 pin.
- sck: Connected to Arduino's D13 pin.
- mosi: Connected to Arduino's D11 pin.
- miso: Connected to Arduino's D12 pin.
- vcc: Powered by Arduino's 5V pin.
- gnd: Connected to the common ground.
Documented Code
#include <Wire.h>
#include <LiquidCrystal_I2C.h>
#include <DHT.h>

// Pin configuration
#define DHTPIN 2            // Pin for DHT11 sensor
#define DHTTYPE DHT11       // DHT 11 sensor type
#define SPEAKER_PIN 3       // Pin for speaker
#define MOISTURE_PIN A0     // Analog pin for moisture sensor
#define SUNLIGHT_PIN A1     // Analog pin for solar panel to measure sunlight

#define BUTTON_SELECT 4     // Button to select and navigate
#define BUTTON_ENTER 5      // Button to enter the selected option
#define BUTTON_EXIT 6       // Button to exit the submenus

// Initialize LCD with I2C address 0x27 (common address, check yours)
LiquidCrystal_I2C lcd(0x27, 16, 2);
DHT dht(DHTPIN, DHTTYPE);

// Variables for navigation
int currentOption = 0;      // Keeps track of the main menu option (A, B, C)
int subOption = 0;          // Keeps track of the sub-menu options
bool inSubmenu = false;     // Track if the system is in a submenu

void setup() {
  lcd.begin(16,2);               // Initialize the LCD
  pinMode(BUTTON_SELECT, INPUT_PULLUP);
  pinMode(BUTTON_ENTER, INPUT_PULLUP);
  pinMode(BUTTON_EXIT, INPUT_PULLUP);
  pinMode(SPEAKER_PIN, OUTPUT);
  dht.begin();

  // Show welcome message
  lcd.clear();
  lcd.setCursor(0, 0);
  lcd.print("HELLO, TERA IQ");
  delay(4000); // Show message for 4 seconds

  // Show main menu options
  displayMenu();
}

void loop() {
  // Navigate through the options
  if (!digitalRead(BUTTON_SELECT)) {
    navigateMenu();
    delay(300); // Debounce delay
  }

  // Enter selected option
  if (!digitalRead(BUTTON_ENTER)) {
    enterOption();
    delay(300); // Debounce delay
  }

  // Exit to main menu if in a submenu
  if (!digitalRead(BUTTON_EXIT) && inSubmenu) {
    exitSubmenu();
    delay(300); // Debounce delay
  }
}

// Function to navigate the main menu (A, B, C)
void navigateMenu() {
  if (!inSubmenu) {
    currentOption = (currentOption + 1) % 3; // Cycle through A -> B -> C -> A
    displayMenu();
  }
}

// Display the main menu on the LCD
void displayMenu() {
  lcd.clear();
  lcd.setCursor(0, 0);
  if (currentOption == 0) {
    lcd.print("> A: Problem Mode");
  } else {
    lcd.print("  A: Problem Mode");
  }

  lcd.setCursor(0, 1);
  if (currentOption == 1) {
    lcd.print("> B: Soil Scan Mode");
  } else {
    lcd.print("  B: Soil Scan Mode");
  }

  lcd.setCursor(0, 2);
  if (currentOption == 2) {
    lcd.print("> C: Humidity, Light");
    lcd.setCursor(0, 3);
    lcd.print("   And Moisture Level");
  } else {
    lcd.print("  C: Humidity, Light");
    lcd.setCursor(0, 3);
    lcd.print("   And Moisture Level");
  }
}

// Function to handle entering an option
void enterOption() {
  if (!inSubmenu) {
    inSubmenu = true; // Now in the submenu

    switch (currentOption) {
      case 0:
        displayProblemMode();
        break;
      case 1:
        displaySoilScanMode();
        break;
      case 2:
        displayEnvironmentalData();
        break;
    }
  }
}

// Display the submenu for "A: Problem Mode"
void displayProblemMode() {
  lcd.clear();
  lcd.setCursor(0, 0);
  lcd.print("> A: Soil Not Fertile");
  lcd.setCursor(0, 1);
  lcd.print("  B: Insect Plants");

  subOption = 0; // Default to the first sub-option
}

// Function to navigate and select sub-options
void navigateProblemMode() {
  subOption = (subOption + 1) % 2;
  lcd.clear();
  if (subOption == 0) {
    lcd.setCursor(0, 0);
    lcd