
Arduino UNO Controlled Multi-Color LED and Solenoid Valve System
View and Edit Project In Cirkit Designer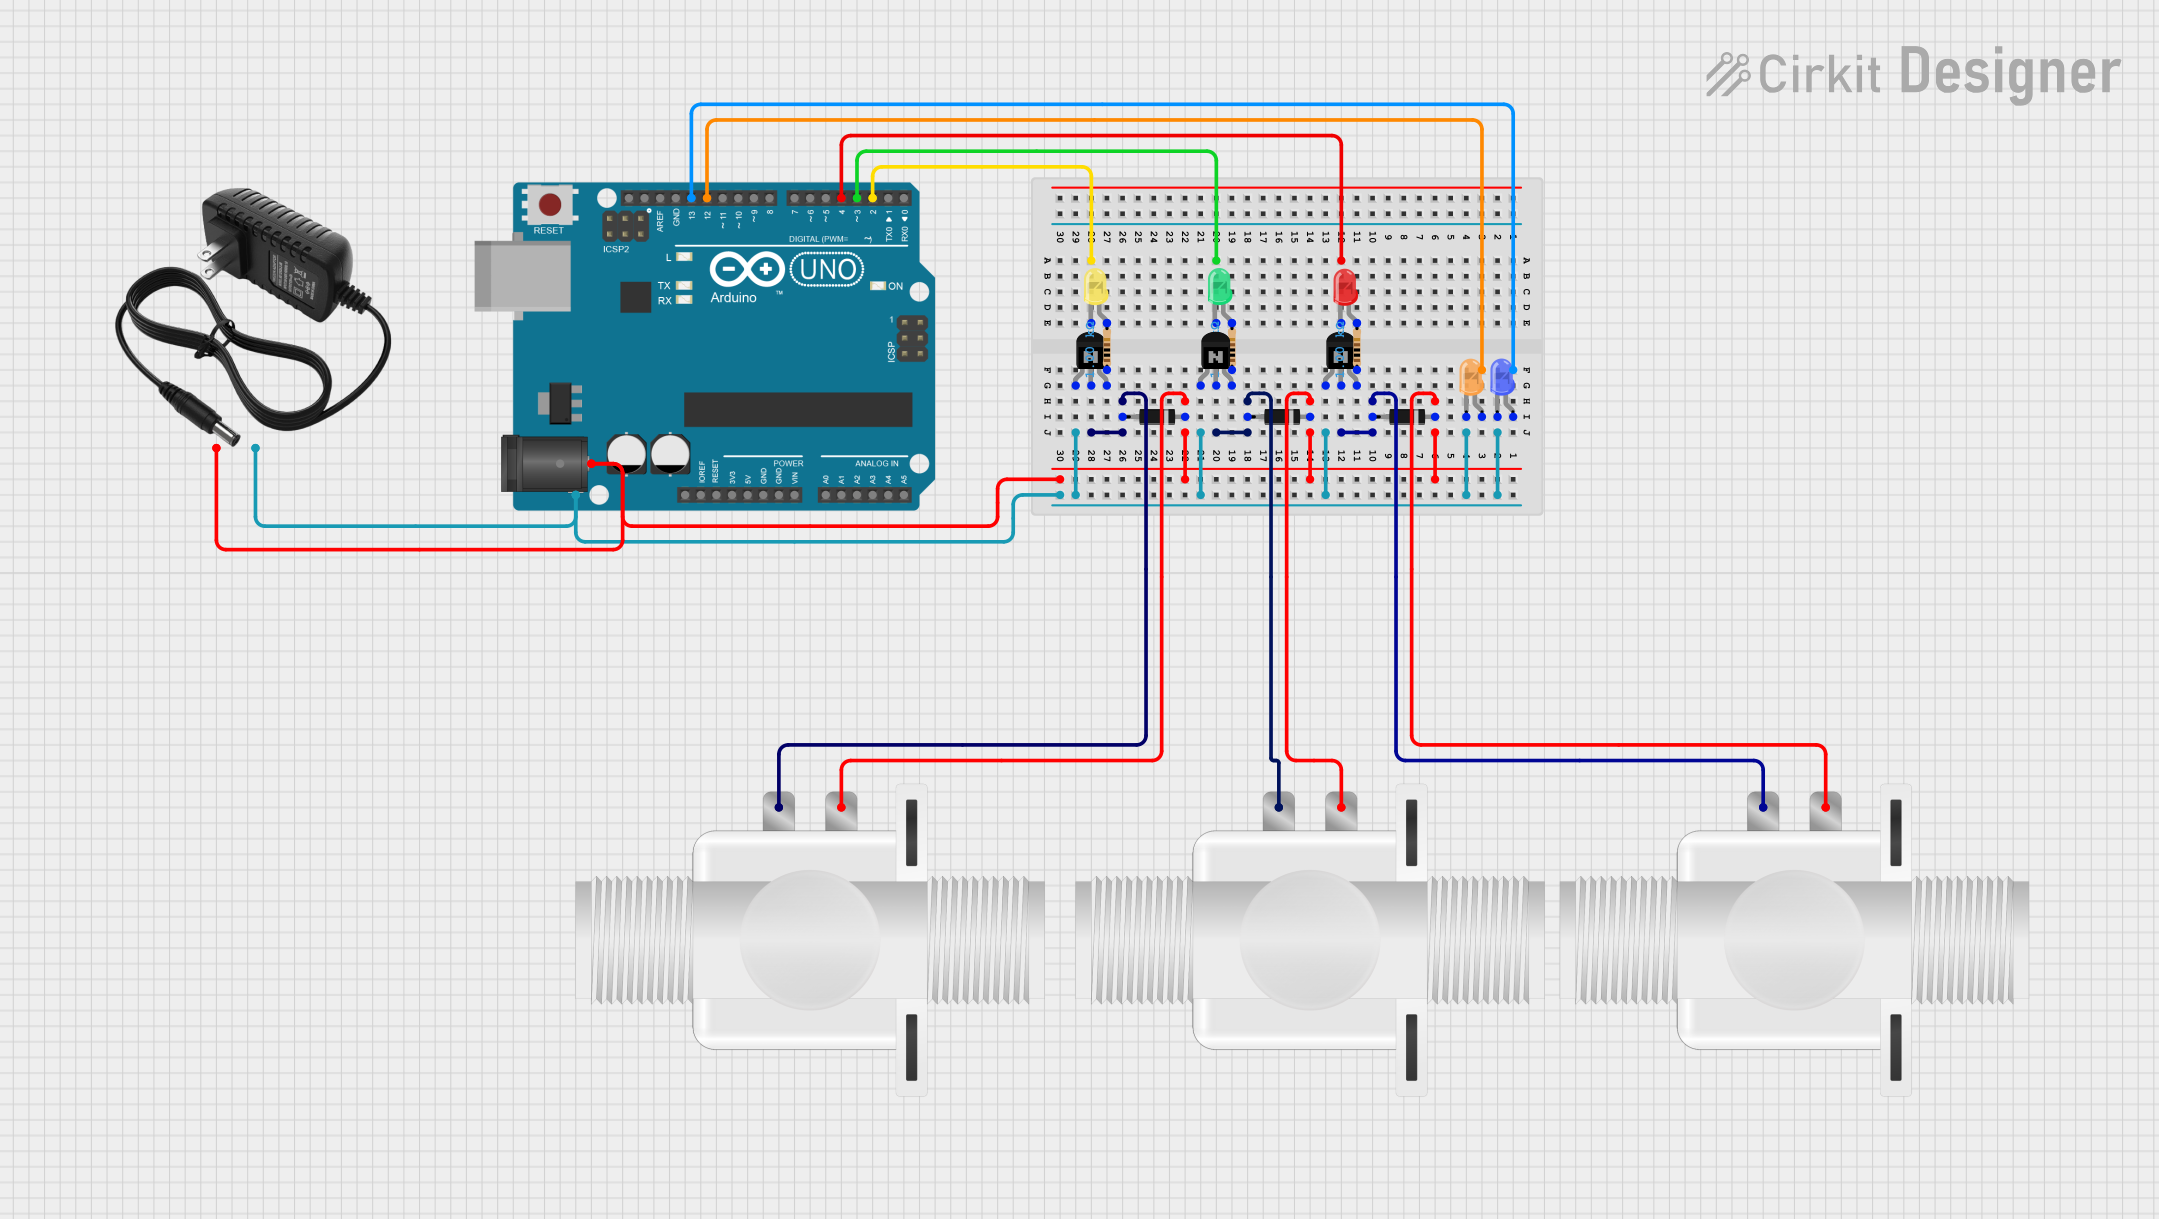
Circuit Documentation
Summary
This circuit involves an Arduino UNO microcontroller, multiple LEDs of different colors, NPN transistors, diodes, resistors, solenoid valves, a 12V power supply, and a 2.1mm DC barrel jack. The circuit is designed to control the LEDs and solenoid valves using the Arduino UNO.
Component List
Arduino UNO
- Description: Microcontroller board based on the ATmega328P.
- Pins: UNUSED, IOREF, Reset, 3.3V, 5V, GND, Vin, A0, A1, A2, A3, A4, A5, SCL, SDA, AREF, D13, D12, D11, D10, D9, D8, D7, D6, D5, D4, D3, D2, D1, D0
12V Power Supply
- Description: Provides 12V DC power.
- Pins: +, -
Diode
- Description: Standard diode.
- Pins: cathode, anode
LED: Two Pin (red)
- Description: Red LED.
- Pins: cathode, anode
LED: Two Pin (blue)
- Description: Blue LED.
- Pins: cathode, anode
LED: Two Pin (orange)
- Description: Orange LED.
- Pins: cathode, anode
LED: Two Pin (green)
- Description: Green LED.
- Pins: cathode, anode
LED: Two Pin (yellow)
- Description: Yellow LED.
- Pins: cathode, anode
Plastic Solenoid Valve
- Description: Solenoid valve for controlling fluid flow.
- Pins: pin1, pin2
NPN Transistor (ECB)
- Description: NPN transistor with emitter, collector, and base pins.
- Pins: emitter, collector, base
Resistor
- Description: Resistor with a resistance of 1000 Ohms.
- Pins: pin1, pin2
- Properties: Resistance: 1000 Ohms
2.1mm DC Barrel Jack
- Description: DC barrel jack for power input.
- Pins: switch, sleeve, center
Wiring Details
Arduino UNO
- D13 connected to anode of LED: Two Pin (blue)
- D12 connected to anode of LED: Two Pin (orange)
- D4 connected to cathode of LED: Two Pin (red)
- D3 connected to cathode of LED: Two Pin (green)
- D2 connected to cathode of LED: Two Pin (yellow)
12V Power Supply
- + connected to center of 2.1mm DC Barrel Jack
- - connected to sleeve of 2.1mm DC Barrel Jack
Diode
- cathode connected to pin1 of Plastic Solenoid Valve
- anode connected to collector of NPN Transistor (ECB)
LED: Two Pin (red)
- anode connected to pin2 of Resistor
- cathode connected to D4 of Arduino UNO
LED: Two Pin (blue)
- anode connected to D13 of Arduino UNO
- cathode connected to cathode of LED: Two Pin (orange), emitter of NPN Transistor (ECB), sleeve of 2.1mm DC Barrel Jack, - of 12V Power Supply
LED: Two Pin (orange)
- anode connected to D12 of Arduino UNO
- cathode connected to cathode of LED: Two Pin (blue), emitter of NPN Transistor (ECB), sleeve of 2.1mm DC Barrel Jack, - of 12V Power Supply
LED: Two Pin (green)
- anode connected to pin2 of Resistor
- cathode connected to D3 of Arduino UNO
LED: Two Pin (yellow)
- anode connected to pin2 of Resistor
- cathode connected to D2 of Arduino UNO
Plastic Solenoid Valve
- pin1 connected to cathode of Diode
- pin2 connected to anode of Diode
NPN Transistor (ECB)
- emitter connected to cathode of LED: Two Pin (blue), sleeve of 2.1mm DC Barrel Jack, - of 12V Power Supply
- collector connected to anode of Diode
- base connected to pin1 of Resistor
Resistor
- pin1 connected to base of NPN Transistor (ECB)
- pin2 connected to anode of LED: Two Pin (red), anode of LED: Two Pin (green), anode of LED: Two Pin (yellow)
2.1mm DC Barrel Jack
- center connected to + of 12V Power Supply
- sleeve connected to cathode of LED: Two Pin (blue), cathode of LED: Two Pin (orange), emitter of NPN Transistor (ECB), - of 12V Power Supply
Documented Code
Arduino UNO Code
void setup() {
  // put your setup code here, to run once:

}

void loop() {
  // put your main code here, to run repeatedly:

}
This code is a basic template for the Arduino UNO. The setup function is used to initialize any settings, and the loop function contains the main code that runs repeatedly.