
Arduino UNO Based Ultrasonic Distance Measurement with LCD Display
View and Edit Project In Cirkit Designer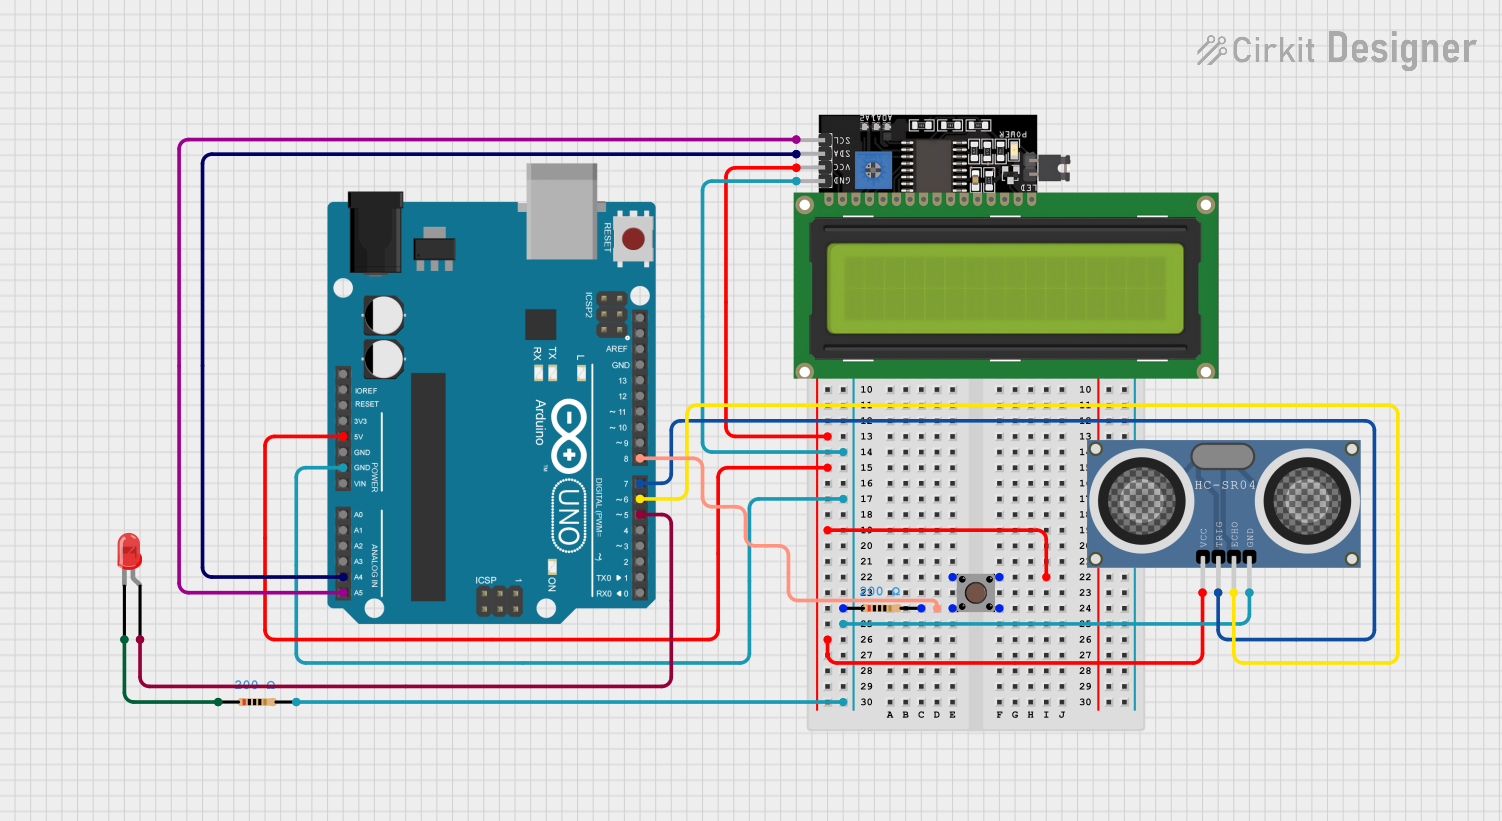
Circuit Documentation
Summary of the Circuit
This circuit is designed around an Arduino UNO microcontroller, which serves as the central processing unit. The circuit includes an LCD Display (16x4) with I2C interface for output, an HC-SR04 Ultrasonic Distance Sensor for distance measurement, a red LED as an indicator, a pushbutton for user input, and resistors for current limiting and pull-down purposes.
Component List
Arduino UNO
- Microcontroller board based on the ATmega328P
- It has 14 digital input/output pins, 6 analog inputs, a 16 MHz quartz crystal, a USB connection, a power jack, an ICSP header, and a reset button.
LCD Display 16x4 I2C
- A 16x4 character LCD display with an I2C interface module for communication.
- It requires VCC and GND for power and SCL, SDA for I2C communication.
HC-SR04 Ultrasonic Distance Sensor (Wokwi Compatible)
- An ultrasonic sensor capable of measuring distance by emitting ultrasonic waves and measuring the time taken for the echo to return.
- It has VCC and GND for power, TRIG for triggering the ultrasonic pulse, and ECHO for receiving the echo signal.
LED: Two Pin (red)
- A basic red LED with an anode and cathode for indicating status or events.
- It requires a current-limiting resistor to prevent damage.
Resistor
- A passive two-terminal electrical component that implements electrical resistance as a circuit element.
- In this circuit, resistors are used for current limiting for the LED and as a pull-down for the pushbutton.
Pushbutton
- A simple switch mechanism for controlling some aspect of a machine or a process.
- It has four pins, two for the input side and two for the output side.
Wiring Details
Arduino UNO
5VandGNDare used to power the LCD display, ultrasonic sensor, and pushbutton.A4 (SDA)andA5 (SCL)are connected to the I2C pins of the LCD display for communication.D5is connected to the anode of the LED through a resistor.D6is connected to the ECHO pin of the ultrasonic sensor.D7is connected to the TRIG pin of the ultrasonic sensor.D8is connected to one side of the pushbutton, which is also connected to a pull-down resistor to GND.
LCD Display 16x4 I2C
VCCconnected to 5V from the Arduino.GNDconnected to GND from the Arduino.SDAconnected to A4 on the Arduino.SCLconnected to A5 on the Arduino.
HC-SR04 Ultrasonic Distance Sensor
VCCconnected to 5V from the Arduino.GNDconnected to GND from the Arduino.TRIGconnected to D7 on the Arduino.ECHOconnected to D6 on the Arduino.
LED: Two Pin (red)
anodeconnected to D5 on the Arduino through a 200 Ohm resistor.cathodeconnected directly to GND.
Resistor
- One 200 Ohm resistor is connected between the anode of the LED and D5 on the Arduino.
- Another 200 Ohm resistor is connected between D8 on the Arduino and GND, serving as a pull-down for the pushbutton.
Pushbutton
- One side connected to 5V from the Arduino.
- The other side connected to D8 on the Arduino through a 200 Ohm pull-down resistor.
Documented Code
Arduino UNO Code (sketch.ino)
void setup() {
  // put your setup code here, to run once:

}

void loop() {
  // put your main code here, to run repeatedly:

}
Note: The provided code is a template and does not include any functionality. It needs to be populated with setup and loop code to control the components in the circuit.