
Arduino Nano-Based Smart Water Flow Monitoring System with LCD Display and Audio Alerts
View and Edit Project In Cirkit Designer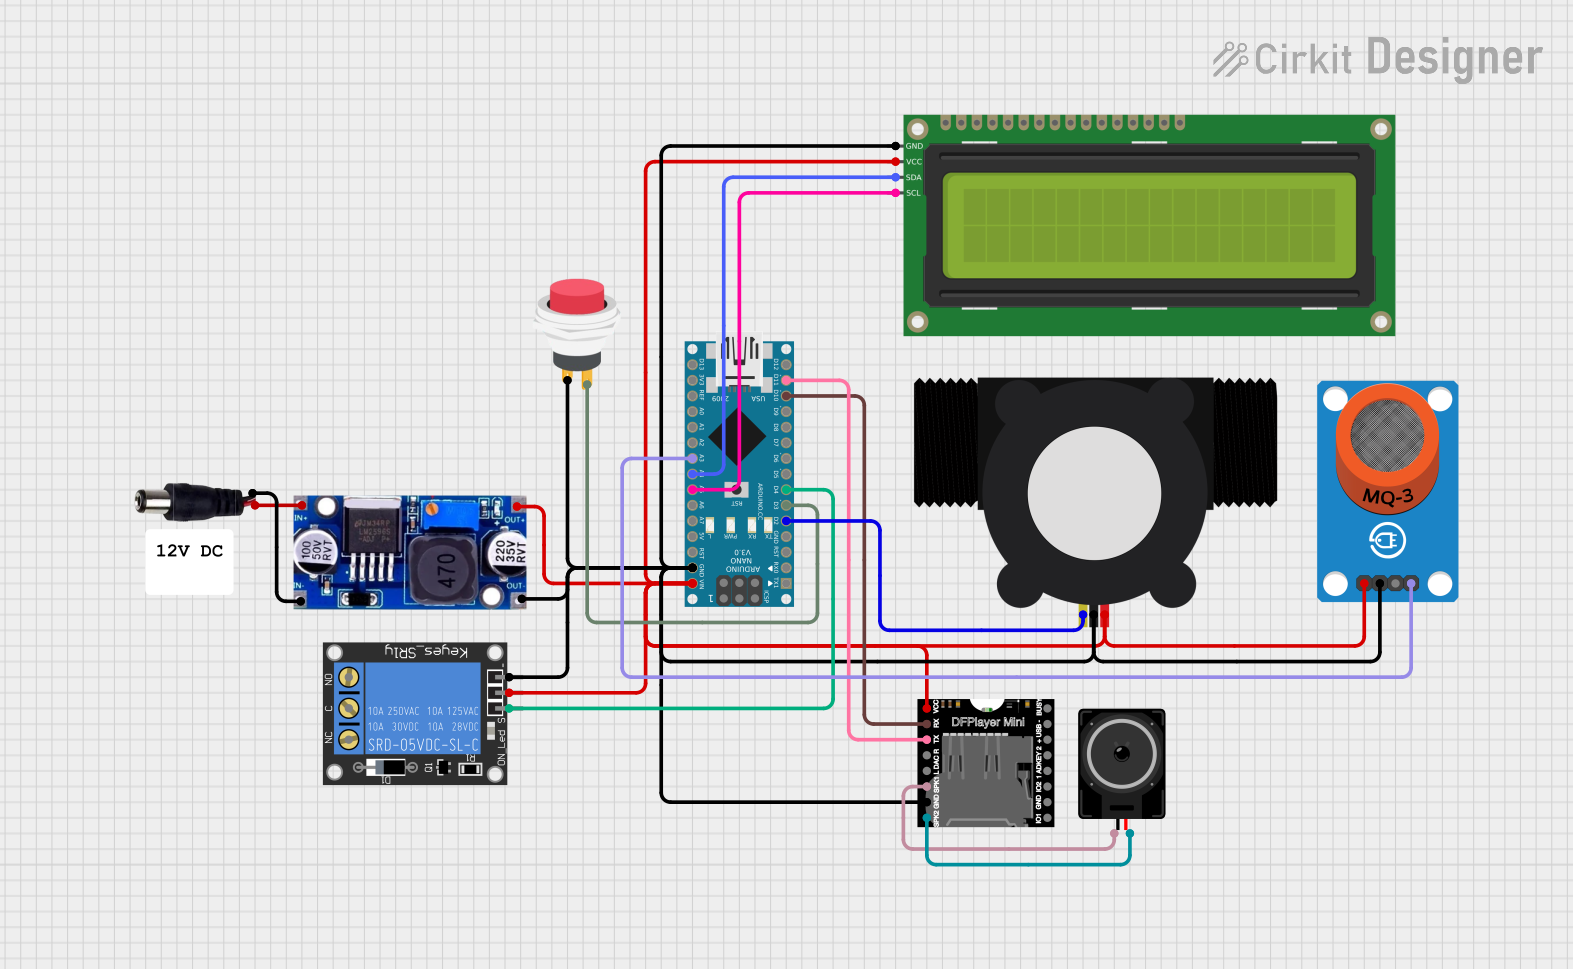
Circuit Documentation
Summary
This document provides a detailed overview of a circuit that includes an Arduino Nano, DFPlayer MINI, 16x2 I2C LCD, MQ-3 Breakout, 2Pin Push Switch, LM2596, Loudspeaker, YF-S201 Water Flow Meter, 1-Channel Relay, and a power jack. The circuit is designed to interface various sensors and modules with the Arduino Nano, enabling functionalities such as audio playback, display output, gas detection, water flow measurement, and relay control.
Component List
Arduino Nano
- Description: A small, complete, and breadboard-friendly board based on the ATmega328P.
- Pins: D1/TX, D0/RX, RESET, GND, D2, D3, D4, D5, D6, D7, D8, D9, D10, D11/MOSI, D12/MISO, VIN, 5V, A7, A6, A5, A4, A3, A2, A1, A0, AREF, 3V3, D13/SCK
DFPlayer MINI
- Description: A small MP3 player module with a simplified output directly to the speaker.
- Pins: VCC, BUSY, RX, USB -, TX, USB +, DAC_R, K2/ADC_KEY, DAC_L, K1/ADC_KEY, SPK1, IO 2, GND, SPK2, IO 1
16x2 I2C LCD
- Description: A 16x2 character LCD display with I2C interface.
- Pins: GND, VCC, SDA, SCL
MQ-3 Breakout
- Description: A gas sensor module for detecting alcohol.
- Pins: VCC, GND, DO, AO
2Pin Push Switch
- Description: A simple push-button switch.
- Pins: Input +, Output +
LM2596
- Description: A step-down voltage regulator.
- Pins: IN, OUT
Loudspeaker
- Description: A small speaker for audio output.
- Pins: pin1, pin2
YF-S201 Water Flow Meter
- Description: A water flow sensor.
- Pins: SIG, GND, VCC
1-Channel Relay (5V 10A)
- Description: A relay module for switching high-power devices.
- Pins: NC, signal, C, power, NO, ground
Power Jack
- Description: A power jack for connecting an external power supply.
- Pins: POSITIF, NEGATIF
Wiring Details
Arduino Nano
- D2 connected to YF-S201 Water Flow Meter SIG
- D3 connected to 2Pin Push Switch Output +
- D4 connected to 1-Channel Relay signal
- D10 connected to DFPlayer MINI RX
- D11/MOSI connected to DFPlayer MINI TX
- VIN connected to LM2596 OUT
- GND connected to LM2596 OUT
- A5 connected to 16x2 I2C LCD SCL
- A4 connected to 16x2 I2C LCD SDA
- A3 connected to MQ-3 Breakout AO
DFPlayer MINI
- RX connected to Arduino Nano D10
- TX connected to Arduino Nano D11/MOSI
- VCC connected to LM2596 OUT
- GND connected to LM2596 OUT
- SPK1 connected to Loudspeaker pin1
- SPK2 connected to Loudspeaker pin2
16x2 I2C LCD
- VCC connected to LM2596 OUT
- GND connected to LM2596 OUT
- SDA connected to Arduino Nano A4
- SCL connected to Arduino Nano A5
MQ-3 Breakout
- VCC connected to LM2596 OUT
- GND connected to LM2596 OUT
- AO connected to Arduino Nano A3
2Pin Push Switch
- Input + connected to LM2596 OUT
- Output + connected to Arduino Nano D3
LM2596
- IN connected to Power Jack POSITIF
- IN connected to Power Jack NEGATIF
- OUT connected to DFPlayer MINI VCC
- OUT connected to MQ-3 Breakout VCC
- OUT connected to Arduino Nano VIN
- OUT connected to YF-S201 Water Flow Meter VCC
- OUT connected to 1-Channel Relay power
- OUT connected to 16x2 I2C LCD VCC
- OUT connected to DFPlayer MINI GND
- OUT connected to MQ-3 Breakout GND
- OUT connected to Arduino Nano GND
- OUT connected to YF-S201 Water Flow Meter GND
- OUT connected to 2Pin Push Switch Input +
- OUT connected to 1-Channel Relay ground
- OUT connected to 16x2 I2C LCD GND
Loudspeaker
- pin1 connected to DFPlayer MINI SPK1
- pin2 connected to DFPlayer MINI SPK2
YF-S201 Water Flow Meter
- SIG connected to Arduino Nano D2
- VCC connected to LM2596 OUT
- GND connected to LM2596 OUT
1-Channel Relay
- signal connected to Arduino Nano D4
- power connected to LM2596 OUT
- ground connected to LM2596 OUT
Power Jack
- POSITIF connected to LM2596 IN
- NEGATIF connected to LM2596 IN
Documented Code
Arduino Nano Code (sketch.ino)
void setup() {
  // put your setup code here, to run once:

}

void loop() {
  // put your main code here, to run repeatedly:

}
Additional Documentation (documentation.txt)
This document provides a comprehensive overview of the circuit, including the components used, their connections, and the code running on the Arduino Nano.