
Arduino UNO-Based Automated Irrigation System with LCD Display and Soil Moisture Sensor
View and Edit Project In Cirkit Designer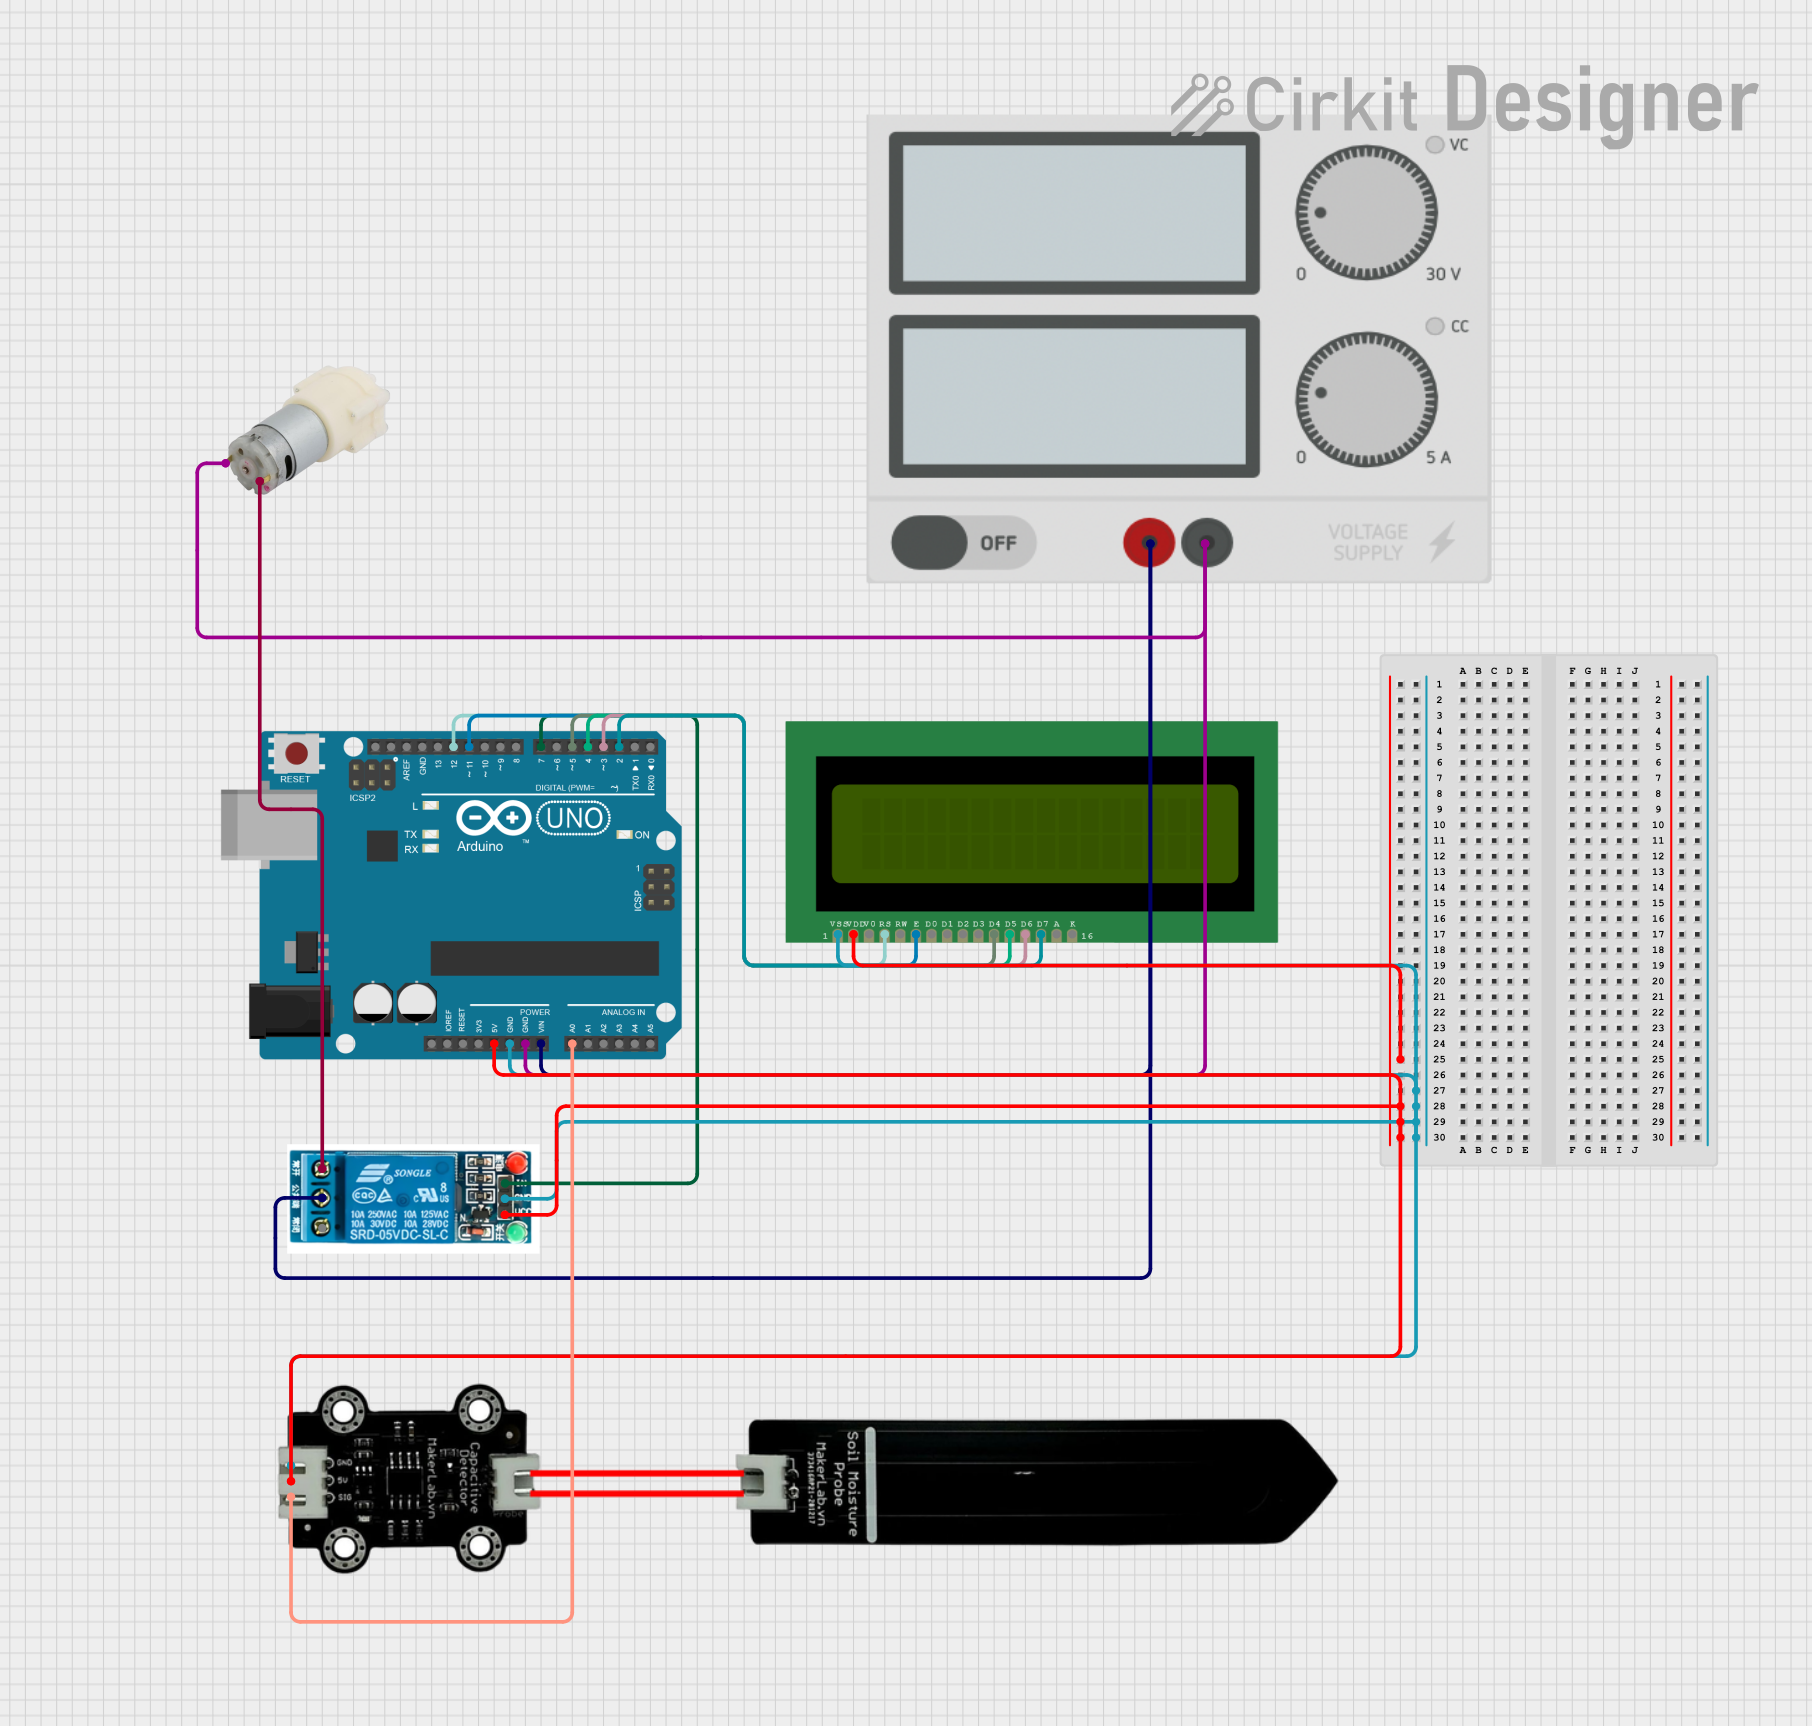
Circuit Documentation
Summary
This circuit is an automated irrigation system that uses an Arduino UNO to control a water pump based on soil moisture levels. The system includes a soil moisture sensor, a 5V relay, a 12V water pump, and an LCD display to show the moisture levels and pump status. The Arduino reads the moisture sensor data and activates the pump if the soil moisture is below a certain threshold. The LCD display provides real-time feedback on the system's status.
Component List
Arduino UNO
- Description: Microcontroller board based on the ATmega328P.
- Pins: UNUSED, IOREF, Reset, 3.3V, 5V, GND, Vin, A0, A1, A2, A3, A4, A5, SCL, SDA, AREF, D13, D12, D11, D10, D9, D8, D7, D6, D5, D4, D3, D2, D1, D0
Power Supply
- Description: Provides power to the circuit.
- Pins: +, -
5V Relay
- Description: Electromechanical switch used to control the water pump.
- Pins: Normally Open, Common terminal, Normally Closed, In, GND, VCC
Water Pump 12V
- Description: Pump used to irrigate the soil.
- Pins: +, -
MKE-S13 Soil Moisture Sensor
- Description: Sensor used to measure soil moisture levels.
- Pins: GND, 5V, SIG
LCD 16x2 (Wokwi Compatible)
- Description: Display used to show moisture levels and pump status.
- Pins: VSS, VDD, V0, RS, RW, E, D0, D1, D2, D3, D4, D5, D6, D7, A, K
Wiring Details
Arduino UNO
5V connected to:
- 5V Relay (VCC)
- MKE-S13 Soil Moisture Sensor (5V)
- LCD 16x2 (VDD)
GND connected to:
- 5V Relay (GND)
- MKE-S13 Soil Moisture Sensor (GND)
- LCD 16x2 (VSS)
- Water Pump 12V (-)
- Power Supply (-)
Vin connected to:
- Power Supply (+)
- 5V Relay (Common terminal)
A0 connected to:
- MKE-S13 Soil Moisture Sensor (SIG)
D12 connected to:
- LCD 16x2 (RS)
D11 connected to:
- LCD 16x2 (E)
D7 connected to:
- 5V Relay (In)
D5 connected to:
- LCD 16x2 (D4)
D4 connected to:
- LCD 16x2 (D5)
D3 connected to:
- LCD 16x2 (D6)
D2 connected to:
- LCD 16x2 (D7)
Power Supply
+ connected to:
- Arduino UNO (Vin)
- 5V Relay (Common terminal)
- connected to:
- Water Pump 12V (-)
- Arduino UNO (GND)
5V Relay
VCC connected to:
- Arduino UNO (5V)
GND connected to:
- Arduino UNO (GND)
Common terminal connected to:
- Power Supply (+)
- Arduino UNO (Vin)
In connected to:
- Arduino UNO (D7)
Normally Open connected to:
- Water Pump 12V (+)
Water Pump 12V
+ connected to:
- 5V Relay (Normally Open)
- connected to:
- Power Supply (-)
- Arduino UNO (GND)
MKE-S13 Soil Moisture Sensor
5V connected to:
- Arduino UNO (5V)
GND connected to:
- Arduino UNO (GND)
SIG connected to:
- Arduino UNO (A0)
LCD 16x2 (Wokwi Compatible)
VDD connected to:
- Arduino UNO (5V)
VSS connected to:
- Arduino UNO (GND)
RS connected to:
- Arduino UNO (D12)
E connected to:
- Arduino UNO (D11)
D4 connected to:
- Arduino UNO (D5)
D5 connected to:
- Arduino UNO (D4)
D6 connected to:
- Arduino UNO (D3)
D7 connected to:
- Arduino UNO (D2)
Code Documentation
#include <Wire.h>
#include <LiquidCrystal_I2C.h>

// Pin Definitions
int relayPin = 7; // Relay connected to digital pin 7
int moistureSensorPin = A0; // Soil moisture sensor connected to analog pin A0
int pumpInterval = 60000; // Interval time in milliseconds (e.g., 1 minute)
unsigned long previousMillis = 0;
int pumpDuration = 10000; // Time for which the pump will be ON (e.g., 10 seconds)

// LCD Display Setup
LiquidCrystal_I2C lcd(0x27, 16, 2); // Set the LCD address (0x27 is a common address for I2C)

void setup() {
  // Set relay pin as OUTPUT
  pinMode(relayPin, OUTPUT);

  // Set moisture sensor pin as INPUT
  pinMode(moistureSensorPin, INPUT);

  // Start with the pump OFF
  digitalWrite(relayPin, LOW);

  // Initialize the LCD
  lcd.begin(16, 2);
  lcd.print("Irrigation System");
  delay(2000); // Display startup message for 2 seconds

  // Initialize Serial Monitor for debugging (optional)
  Serial.begin(9600);
}

void loop() {
  // Get the current time
  unsigned long currentMillis = millis();

  // Check if the interval has passed
  if (currentMillis - previousMillis >= pumpInterval) {
    previousMillis = currentMillis;

    // Read the moisture sensor value
    int moistureLevel = analogRead(moistureSensorPin);

    // Display moisture level on LCD
    lcd.clear();
    lcd.setCursor(0, 0);
    lcd.print("Moisture: ");
    lcd.print(moistureLevel);

    // Debugging: Print moisture level to Serial Monitor (optional)
    Serial.print("Moisture Level: ");
    Serial.println(moistureLevel);

    // If moisture level is low, activate the pump
    if (moistureLevel < 500) {  // Adjust this threshold based on your sensor and soil
      lcd.setCursor(0, 1);
      lcd.print("Pump: ON  ");
      digitalWrite(relayPin, HIGH); // Turn pump ON
      delay(pumpDuration);          // Pump runs for the set duration
      digitalWrite(relayPin, LOW);  // Turn pump OFF
      lcd.setCursor(0, 1);
      lcd.print("Pump: OFF ");
    } else {
      lcd.setCursor(0, 1);
      lcd.print("Pump: OFF ");
    }

    // Optional delay to avoid fast updates on LCD
    delay(1000); // Updates every second
  }
}
This code initializes the Arduino UNO, sets up the pins for the relay and soil moisture sensor, and configures the LCD display. The main loop checks the soil moisture level at regular intervals and activates the water pump if the moisture level is below a specified threshold. The LCD display shows the current moisture level and the pump status.