
Arduino UNO Controlled Robotic Car with Ultrasonic Sensor and Servo Motor
View and Edit Project In Cirkit Designer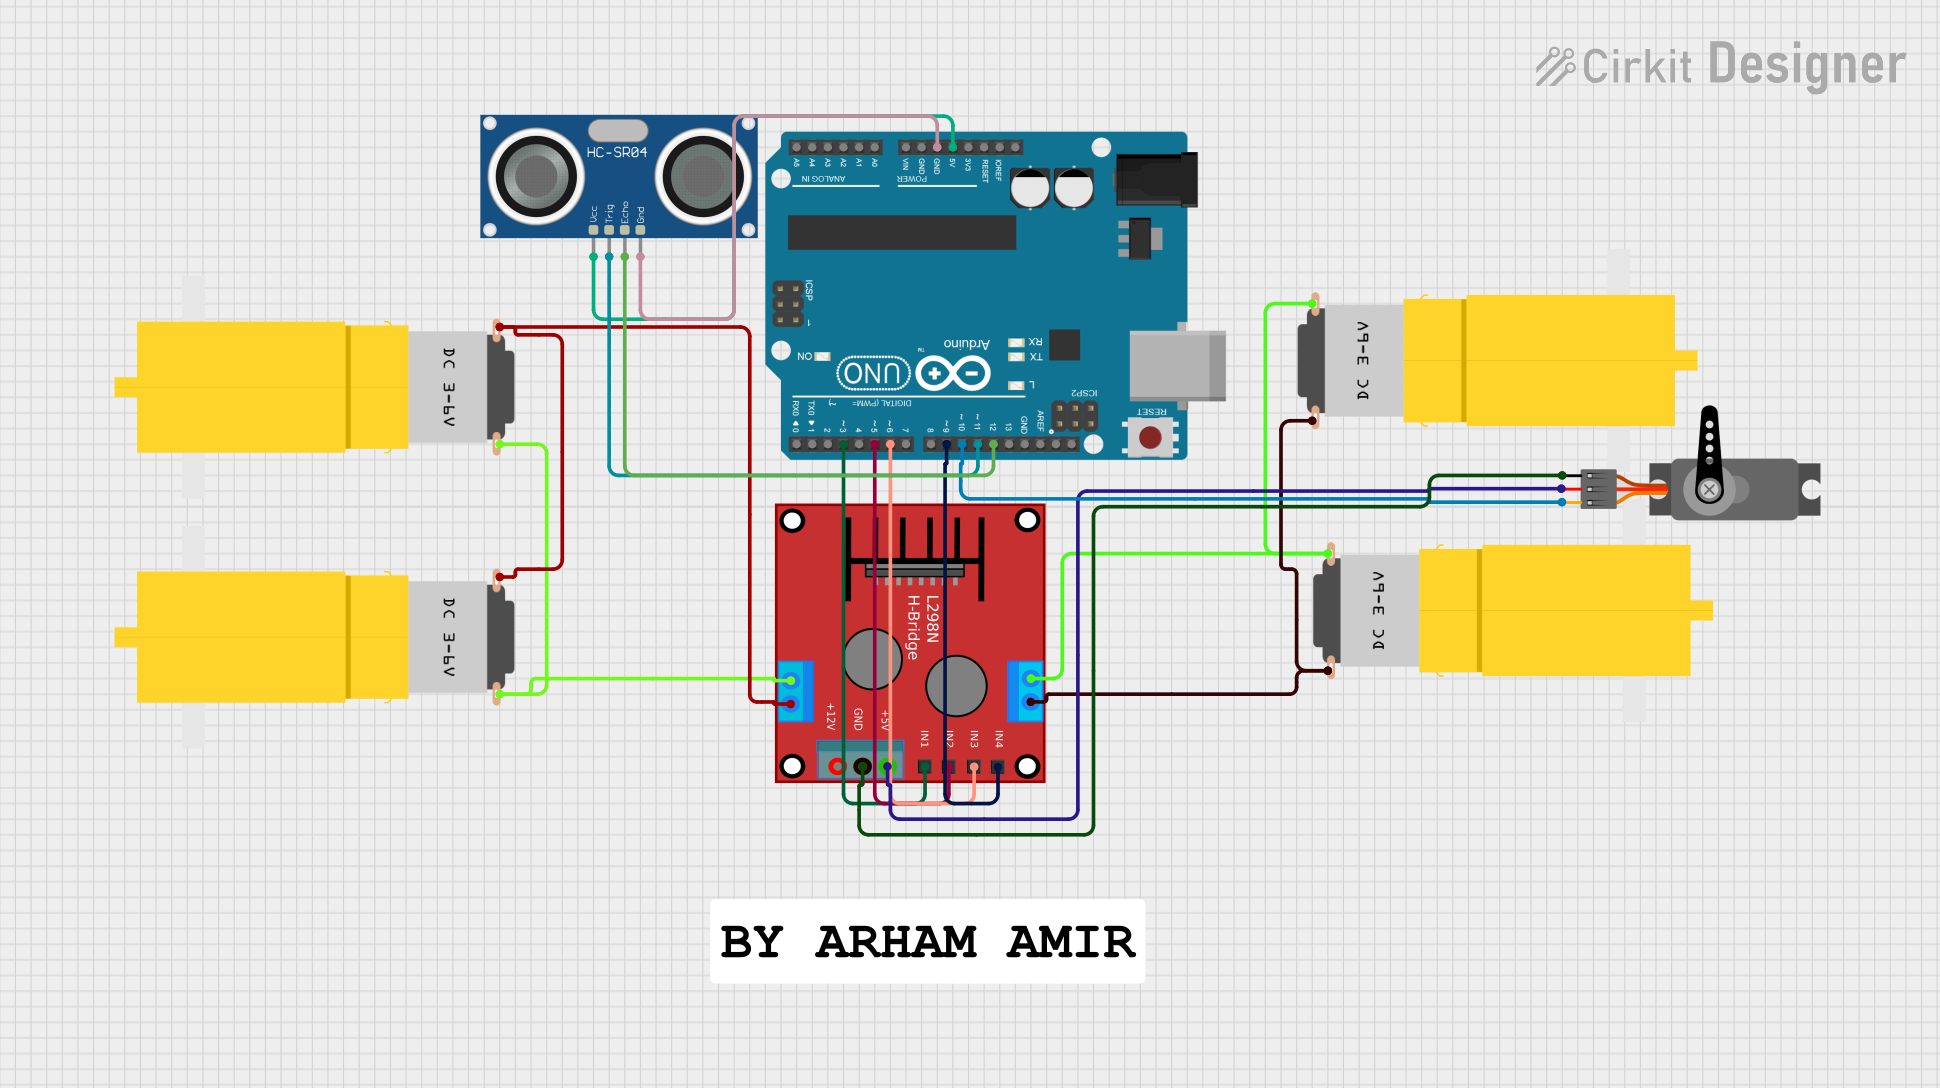
Circuit Documentation
Summary
This circuit involves an Arduino UNO microcontroller, a motor driver (H-bridge), multiple hobby motors, a servo motor, and an ultrasonic sensor. The Arduino UNO controls the motors and the servo via the H-bridge and directly interfaces with the ultrasonic sensor for distance measurement.
Component List
Motor amarillo motorreductor hobby
- Pins: VCC, GND
- Description: A small DC motor with a gearbox for hobby projects.
- Purpose in Circuit: Provides mechanical movement.
Servo
- Pins: GND, VCC, PWM
- Description: A servo motor for precise control of angular position.
- Purpose in Circuit: Provides controlled angular movement.
Ponte H (H-bridge)
- Pins: OUT4-Motor2, OUT3-Motor2, OUT2-Motor1, OUT1-Motor1, 5V, GND, 12V, IN3, IN1, IN2, IN4
- Description: A motor driver for controlling the direction and speed of DC motors.
- Purpose in Circuit: Controls the motors based on signals from the Arduino.
Arduino UNO
- Pins: UNUSED, IOREF, Reset, 3.3V, 5V, GND, Vin, A0, A1, A2, A3, A4, A5, SCL, SDA, AREF, D13, D12, D11, D10, D9, D8, D7, D6, D5, D4, D3, D2, D1, D0
- Description: A microcontroller board based on the ATmega328P.
- Purpose in Circuit: Acts as the main controller for the circuit.
HC-SR04 Ultrasonic Sensor
- Pins: VCC, TRIG, ECHO, GND
- Description: An ultrasonic distance sensor.
- Purpose in Circuit: Measures distance to objects.
Wiring Details
Motor amarillo motorreductor hobby
Motor 1:
- VCC: Connected to OUT4-Motor2 on the H-bridge.
- GND: Connected to OUT3-Motor2 on the H-bridge.
Motor 2:
- VCC: Connected to OUT2-Motor1 on the H-bridge.
- GND: Connected to OUT1-Motor1 on the H-bridge.
Servo
- VCC: Connected to 5V on the H-bridge.
- GND: Connected to GND on the H-bridge.
- PWM: Connected to D10 on the Arduino UNO.
Ponte H (H-bridge)
- OUT4-Motor2: Connected to VCC of Motor 1.
- OUT3-Motor2: Connected to GND of Motor 1.
- OUT2-Motor1: Connected to VCC of Motor 2.
- OUT1-Motor1: Connected to GND of Motor 2.
- 5V: Connected to VCC of the Servo.
- GND: Connected to GND of the Servo.
- IN3: Connected to D6 on the Arduino UNO.
- IN1: Connected to D3 on the Arduino UNO.
- IN2: Connected to D5 on the Arduino UNO.
- IN4: Connected to D9 on the Arduino UNO.
Arduino UNO
- D6: Connected to IN3 on the H-bridge.
- D3: Connected to IN1 on the H-bridge.
- D5: Connected to IN2 on the H-bridge.
- D9: Connected to IN4 on the H-bridge.
- 5V: Connected to VCC of the HC-SR04 Ultrasonic Sensor.
- GND: Connected to GND of the HC-SR04 Ultrasonic Sensor.
- D12: Connected to ECHO of the HC-SR04 Ultrasonic Sensor.
- D11: Connected to TRIG of the HC-SR04 Ultrasonic Sensor.
- D10: Connected to PWM of the Servo.
HC-SR04 Ultrasonic Sensor
- VCC: Connected to 5V on the Arduino UNO.
- GND: Connected to GND on the Arduino UNO.
- ECHO: Connected to D12 on the Arduino UNO.
- TRIG: Connected to D11 on the Arduino UNO.
Documented Code
Arduino UNO Code (sketch.ino)
void setup() {
  // put your setup code here, to run once:

}

void loop() {
  // put your main code here, to run repeatedly:

}
Additional Documentation (documentation.txt)
This documentation provides a comprehensive overview of the circuit, including a summary, detailed component descriptions, wiring details, and the code used in the microcontroller.