
Arduino UNO and SCP1000 Barometric Pressure Sensor Data Logger
View and Edit Project In Cirkit Designer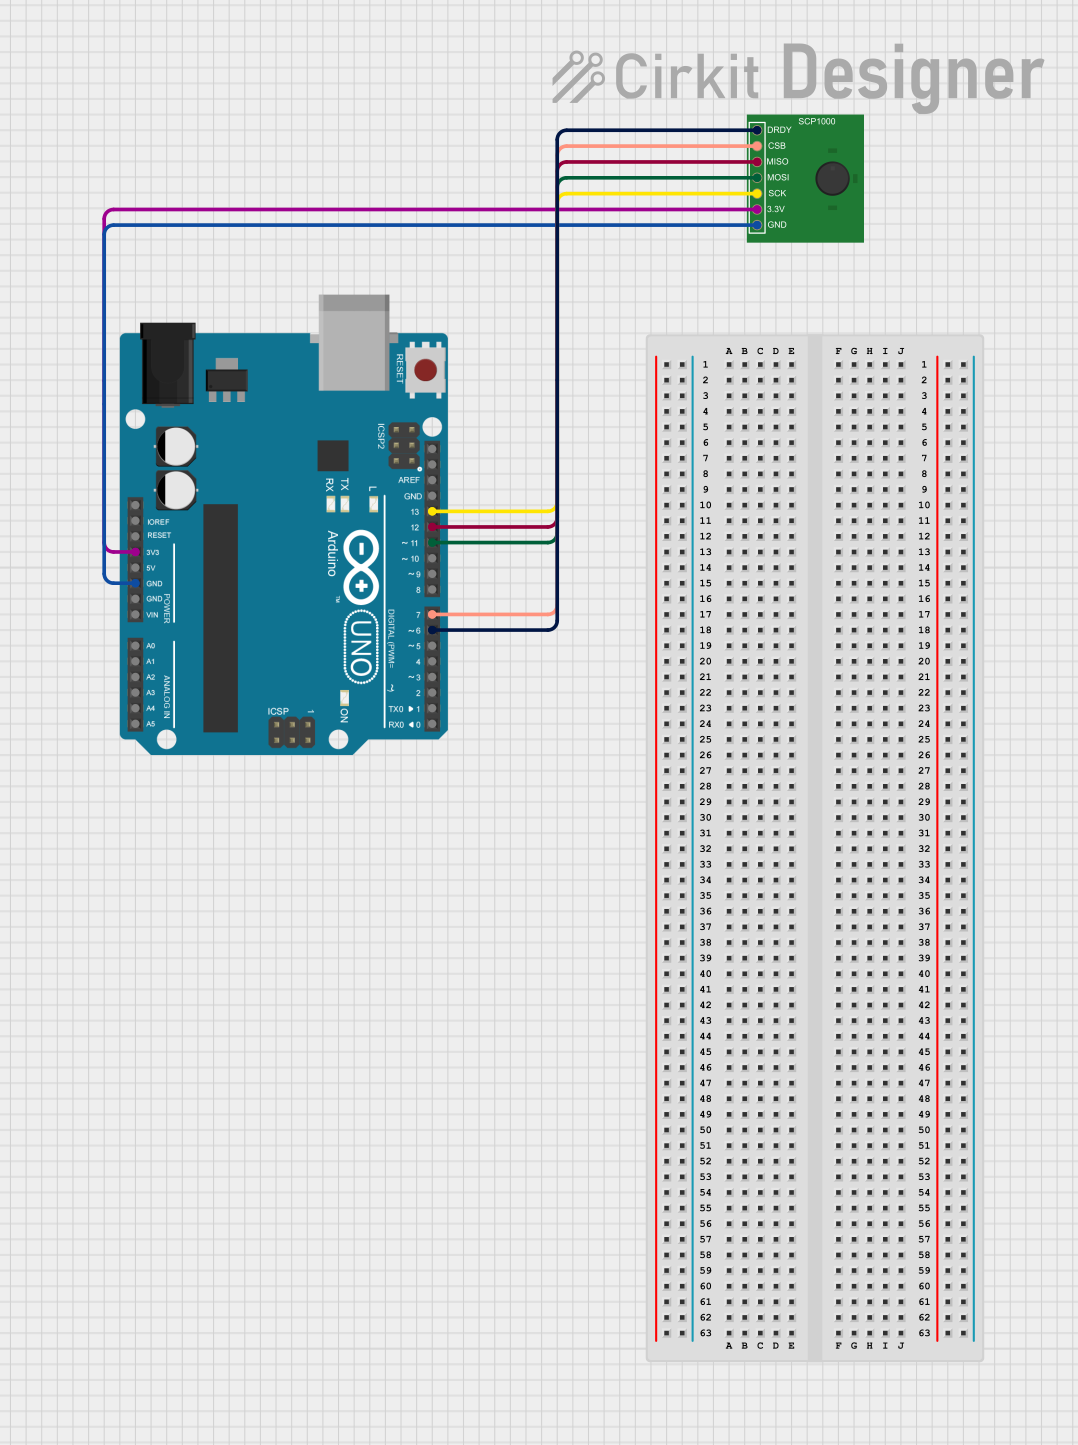
Circuit Documentation
Summary
This document describes a circuit that integrates an Arduino UNO microcontroller with a Barometric Pressure Sensor (SCP1000) to measure atmospheric pressure and temperature. The sensor communicates with the Arduino UNO via the Serial Peripheral Interface (SPI) protocol. The Arduino UNO reads the sensor data when the data ready pin is high and then processes and outputs the temperature in Celsius and pressure in Pascals through the serial interface.
Component List
Arduino UNO
- Description: A microcontroller board based on the ATmega328P.
- Pins: UNUSED, IOREF, Reset, 3.3V, 5V, GND, Vin, A0-A5, SCL, SDA, AREF, D0-D13.
- Purpose: Acts as the main controller for the circuit, interfacing with the Barometric Pressure Sensor and handling data processing and communication.
Barometric Pressure Sensor (SCP1000)
- Description: A high-accuracy sensor for measuring atmospheric pressure and temperature.
- Pins: DRDY, CSB, MISO, MOSI, SCK, 3.3V, GND.
- Purpose: Provides real-time barometric pressure and temperature readings to the Arduino UNO.
Wiring Details
Arduino UNO
- D6: Connected to the DRDY pin of the Barometric Pressure Sensor.
- D7: Connected to the CSB pin of the Barometric Pressure Sensor.
- D12: Connected to the MISO pin of the Barometric Pressure Sensor.
- D11: Connected to the MOSI pin of the Barometric Pressure Sensor.
- D13: Connected to the SCK pin of the Barometric Pressure Sensor.
- 3.3V: Provides power to the 3.3V pin of the Barometric Pressure Sensor.
- GND: Connected to the GND pin of the Barometric Pressure Sensor.
Barometric Pressure Sensor (SCP1000)
- DRDY: Connected to D6 on the Arduino UNO.
- CSB: Connected to D7 on the Arduino UNO.
- MISO: Connected to D12 on the Arduino UNO.
- MOSI: Connected to D11 on the Arduino UNO.
- SCK: Connected to D13 on the Arduino UNO.
- 3.3V: Powered by the 3.3V output from the Arduino UNO.
- GND: Connected to the GND pin on the Arduino UNO.
Documented Code
// the sensor communicates using SPI, so include the library:
#include <SPI.h>

//Sensor's memory register addresses:
const int PRESSURE = 0x1F;      //3 most significant bits of pressure
const int PRESSURE_LSB = 0x20;  //16 least significant bits of pressure
const int TEMPERATURE = 0x21;   //16 bit temperature reading

const byte READ = 0b11111100;     // SCP1000's read command
const byte WRITE = 0b00000010;    // SCP1000's write command

// pins used for the connection with the sensor
// the other you need are controlled by the SPI library):
const int dataReadyPin = 6;
const int chipSelectPin = 7;

void setup() {
  Serial.begin(9600);
  // start the SPI library:
  SPI.begin();
  // initialize the data ready and chip select pins:
  pinMode(dataReadyPin, INPUT);
  pinMode(chipSelectPin, OUTPUT);
  // Configure SCP1000 for low noise configuration:
  writeRegister(0x02, 0x2D);
  writeRegister(0x01, 0x03);
  writeRegister(0x03, 0x02);
  // give the sensor time to set up:
  delay(100);
}

void loop() {
  // Select High Resolution Mode
  writeRegister(0x03, 0x0A);
  // don't do anything until the data ready pin is high:
  if (digitalRead(dataReadyPin) == HIGH) {
    // Read the temperature data
    int tempData = readRegister(0x21, 2);
    // convert the temperature to celsius and display it:
    float realTemp = (float)tempData / 20.0;
    Serial.print("Temp[C]=");
    Serial.print(realTemp);
    // Read the pressure data highest 3 bits:
    byte pressure_data_high = readRegister(0x1F, 1);
    pressure_data_high &= 0b00000111; // you only need bits 2 to 0
    // Read the pressure data lower 16 bits:
    unsigned int pressure_data_low = readRegister(0x20, 2);
    // combine the two parts into one 19-bit number:
    long pressure = ((pressure_data_high << 16) | pressure_data_low) / 4;
    // display the pressure:
    Serial.println("\tPressure [Pa]=" + String(pressure));
  }
}

// Read from or write to register from the SCP1000:
unsigned int readRegister(byte thisRegister, int bytesToRead) {
  byte inByte = 0;           // incoming byte from the SPI
  unsigned int result = 0;   // result to return
  // SCP1000 expects the register name in the upper 6 bits
  // of the byte. So shift the bits left by two bits:
  thisRegister = thisRegister << 2;
  // now combine the address and the command into one byte
  byte dataToSend = thisRegister & READ;
  // take the chip select low to select the device:
  digitalWrite(chipSelectPin, LOW);
  // send the device the register you want to read:
  SPI.transfer(dataToSend);
  // send a value of 0 to read the first byte returned:
  result = SPI.transfer(0x00);
  // decrement the number of bytes left to read:
  bytesToRead--;
  // if you still have another byte to read:
  if (bytesToRead > 0) {
    // shift the first byte left, then get the second byte:
    result = result << 8;
    inByte = SPI.transfer(0x00);
    // combine the byte you just got with the previous one:
    result = result | inByte;
    // decrement the number of bytes left to read:
    bytesToRead--;
  }
  // take the chip select high to de-select:
  digitalWrite(chipSelectPin, HIGH);
  // return the result:
  return (result);
}

// Sends a write command to SCP1000
void writeRegister(byte thisRegister, byte thisValue) {
  // SCP1000 expects the register address in the upper 6 bits
  // of the byte. So shift the bits left by two bits:
  thisRegister = thisRegister << 2;
  // now combine the register address and the command into one byte:
  byte dataToSend = thisRegister | WRITE;
  // take the chip select low to select the device:
  digitalWrite(chipSelectPin, LOW);
  SPI.transfer(dataToSend); // Send register location
  SPI.transfer(thisValue);  // Send value to record into register
  // take the chip select high to de-select:
  digitalWrite(chipSelectPin, HIGH);
}
This code is designed to run on the Arduino UNO microcontroller and interfaces with the Barometric Pressure Sensor (SCP1000) to read temperature and pressure data. The code includes functions for initializing the SPI communication, reading from and writing to the sensor's registers, and processing the sensor data for output.