
Circuit Documentation
Summary
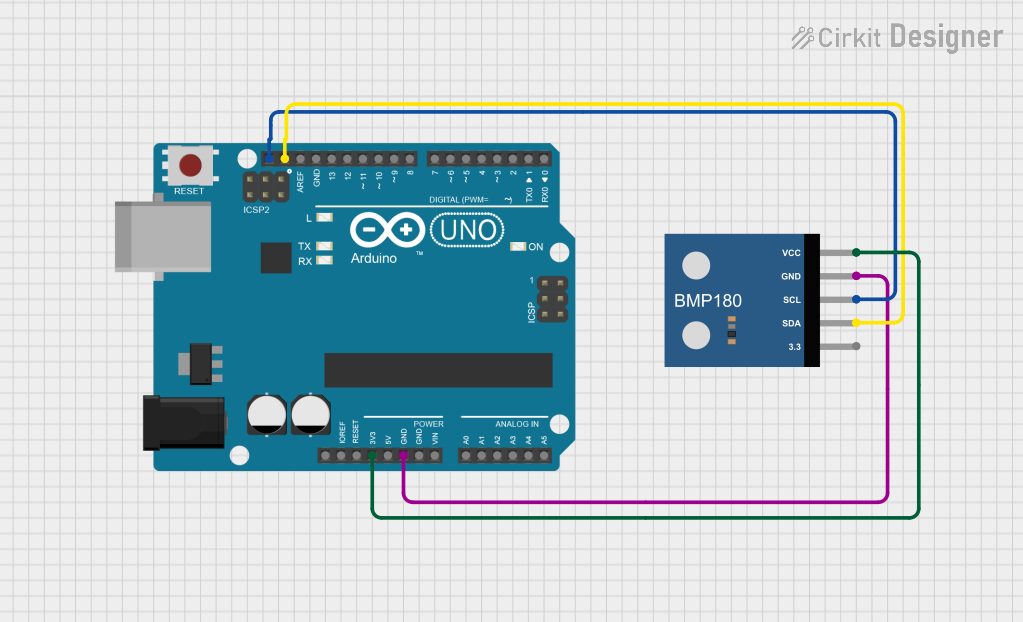
This circuit is designed to interface an Arduino UNO with a BMP180 sensor. The BMP180 sensor is used to measure atmospheric pressure and temperature. The sensor communicates with the Arduino via the I2C protocol, utilizing the SCL and SDA pins for data transmission. The sensor is powered by the 3.3V output from the Arduino, and both devices share a common ground.
Component List
Arduino UNO
- Description: A microcontroller board based on the ATmega328P. It is used for various applications in embedded systems and is popular for prototyping.
- Purpose in Circuit: Acts as the main controller to read data from the BMP180 sensor and process it for output.
BMP180
- Description: A digital barometric pressure sensor that can also measure temperature. It communicates with microcontrollers using the I2C protocol.
- Purpose in Circuit: Provides atmospheric pressure and temperature readings to the Arduino for further processing and display.
Wiring Details
Arduino UNO
3.3V: Connected to the VCC pin of the BMP180 to provide power.
GND: Connected to the GND pin of the BMP180 to establish a common ground.
SCL: Connected to the SCL pin of the BMP180 for I2C clock signal.
SDA: Connected to the SDA pin of the BMP180 for I2C data signal.
BMP180
VCC: Connected to the 3.3V pin of the Arduino UNO for power supply.
GND: Connected to the GND pin of the Arduino UNO for common ground.
SCL: Connected to the SCL pin of the Arduino UNO for I2C clock signal.
SDA: Connected to the SDA pin of the Arduino UNO for I2C data signal.
Documented Code
/*
  Arduino Sketch to interface with BMP180 sensor and display temperature
  and pressure readings to the serial console. The BMP180 is connected
  via I2C to the Arduino UNO. The sensor's SCL and SDA pins are connected
  to the corresponding SCL and SDA pins on the Arduino. The sensor is
  powered by the 3.3V and GND pins of the Arduino.
*/

#include <Wire.h>
#include <Adafruit_Sensor.h>
#include <Adafruit_BMP085_U.h>

// Create an instance of the sensor
Adafruit_BMP085_Unified bmp = Adafruit_BMP085_Unified(10085);

void setup() {
  // Initialize serial communication at 9600 baud rate
  Serial.begin(9600);
  // Initialize the I2C communication
  Wire.begin();

  // Initialize the BMP180 sensor
  if (!bmp.begin()) {
    // If sensor initialization fails, print an error message
    Serial.print("Could not find a valid BMP180 sensor, check wiring!");
    while (1);
  }
}

void loop() {
  // Create a sensor event
  sensors_event_t event;
  bmp.getEvent(&event);

  // Check if the event is valid
  if (event.pressure) {
    // Display the pressure value
    Serial.print("Pressure: ");
    Serial.print(event.pressure);
    Serial.println(" hPa");

    // Get temperature value
    float temperature;
    bmp.getTemperature(&temperature);
    // Display the temperature value
    Serial.print("Temperature: ");
    Serial.print(temperature);
    Serial.println(" C");
  } else {
    // If no valid event, print an error message
    Serial.println("Sensor error!");
  }

  // Wait for 2 seconds before the next reading
  delay(2000);
}
This documentation provides a comprehensive overview of the circuit, detailing the components used, their wiring, and the code necessary for operation.