
Arduino-Based Water Quality Monitoring System with Wi-Fi Connectivity
View and Edit Project In Cirkit Designer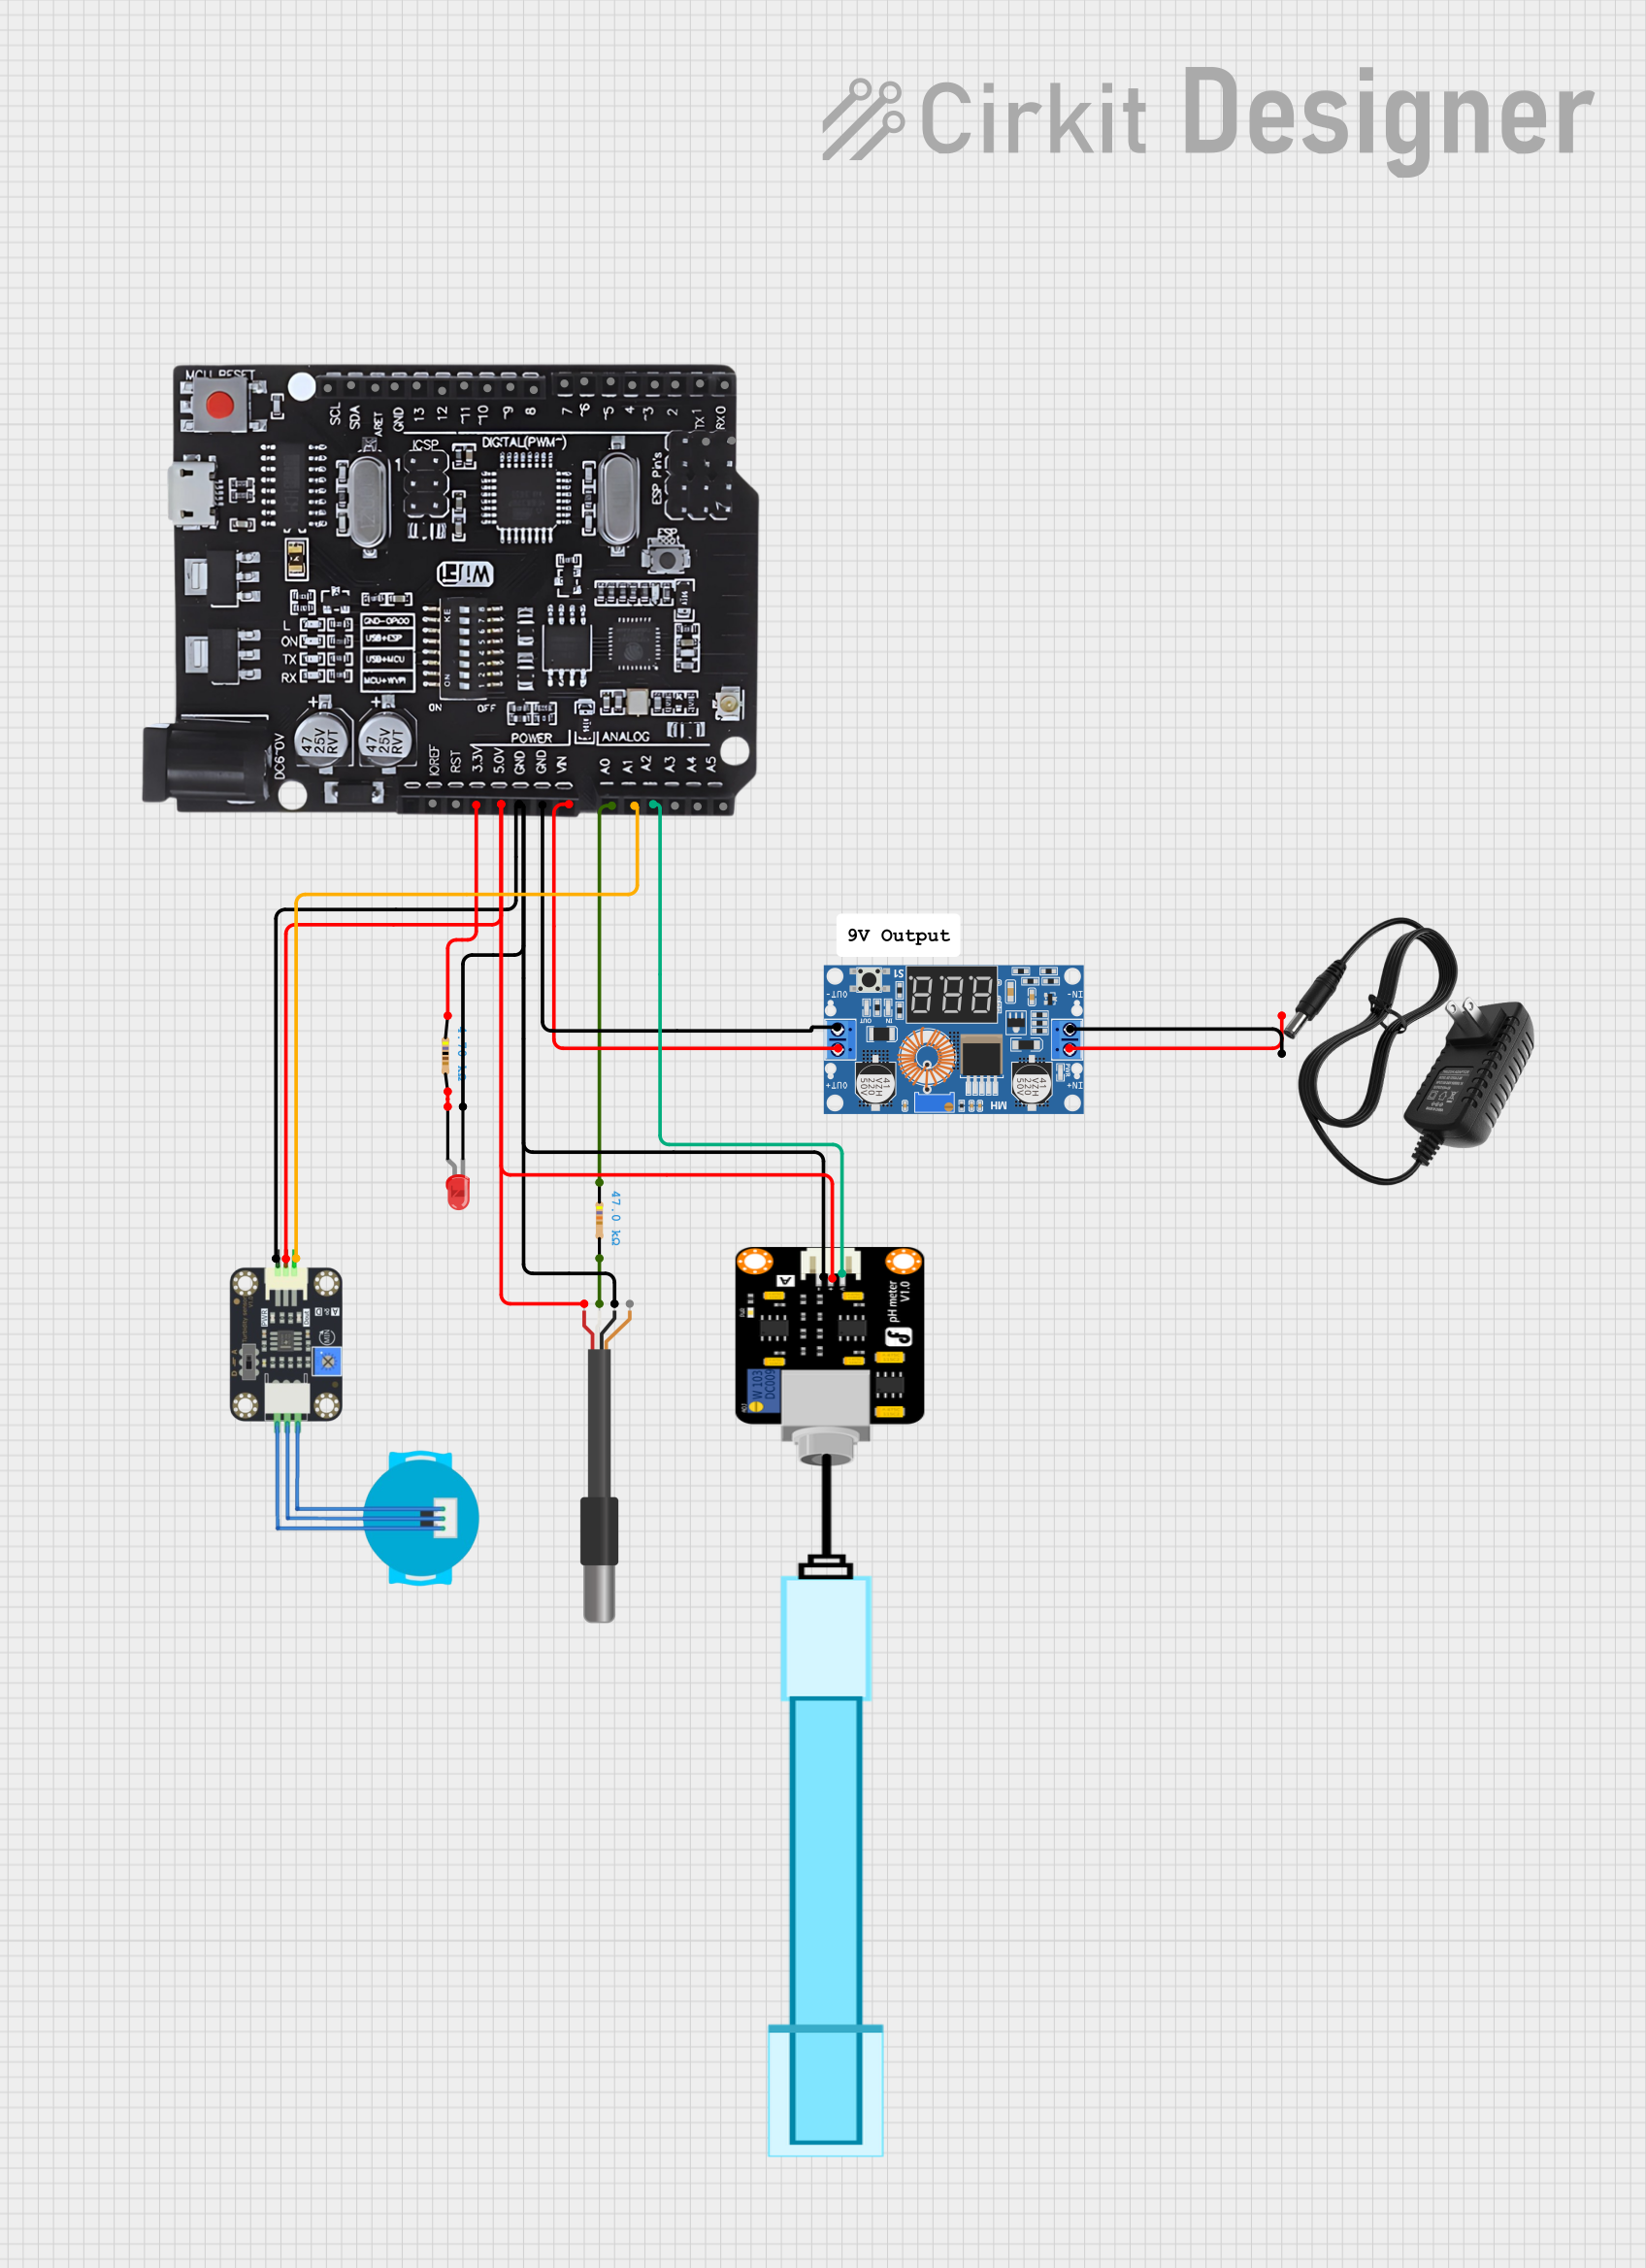
Circuit Documentation
Summary
This circuit is designed to interface with a pH meter, a turbidity sensor, and a DS18B20 temperature sensor, and display their readings through the Arduino UNO+WiFi R3 ATmega328P+Node MCU ESP8266 CH340G microcontroller. The circuit is powered by a 12V power supply, which is stepped down to 5V using an XL4015 5A DC Buck Step-down converter to power the microcontroller and sensors. The LED indicates the operational status, and resistors are used for current limiting and signal conditioning.
Component List
PH Meter
- Pins: Signal, VCC, GND
- Description: Measures the pH level of a solution.
Turbidity Sensor
- Pins: OUT, VCC, GND
- Description: Measures the turbidity of a liquid.
LED: Two Pin (red)
- Pins: cathode, anode
- Description: Provides visual indication.
DS18B20 1-Wire Temperature Sensor Probe Cable
- Pins: shield, GND, DQ, VDD
- Description: Measures temperature.
Resistor (47k Ohms)
- Pins: pin1, pin2
- Description: Limits current or divides voltage.
Resistor (4.7k Ohms)
- Pins: pin1, pin2
- Description: Used for the DS18B20 temperature sensor's data line pull-up.
XL4015 5A DC Buck Step-down
- Pins: Output +, Output -, Input +, Input -
- Description: Steps down the voltage from 12V to 5V.
Arduino UNO+WiFi R3 ATmega328P+Node MCU ESP8266 CH340G
- Pins: Multiple digital and analog pins, power, and ground.
- Description: Microcontroller board for processing and I/O interfacing.
12v Power Supply
- Pins: +, -
- Description: Provides 12V power to the circuit.
Wiring Details
PH Meter
- Signal connected to Arduino's A2
- VCC connected to Arduino's 5.0v
- GND connected to common ground net
Turbidity Sensor
- OUT connected to Arduino's A1
- VCC connected to Arduino's 5.0v
- GND connected to common ground net
LED: Two Pin (red)
- cathode connected to common ground net
- anode connected to Resistor (4.7k Ohms) pin2
DS18B20 1-Wire Temperature Sensor Probe Cable
- DQ connected to Resistor (4.7k Ohms) pin2
- VDD connected to Arduino's 5.0v
- GND connected to common ground net
Resistor (47k Ohms)
- pin1 connected to Arduino's A0
- pin2 connected to DS18B20's DQ
Resistor (4.7k Ohms)
- pin1 connected to Arduino's 3.5v
- pin2 connected to LED's anode
XL4015 5A DC Buck Step-down
- Output + connected to Arduino's VIN
- Output - connected to common ground net
- Input + connected to 12v Power Supply's +
- Input - connected to 12v Power Supply's -
12v Power Supply
- + connected to XL4015's Input +
- - connected to XL4015's Input -
Documented Code
/*
 * This Arduino Sketch reads data from a turbidity sensor, a DS18B20 temperature
 * sensor, and a pH meter. The readings are printed to the Serial Monitor.
 */

#include <OneWire.h>
#include <DallasTemperature.h>

// Pin definitions
const int turbidityPin = A1;
const int phPin = A2;
const int oneWireBus = A0;

// Setup a oneWire instance to communicate with any OneWire devices
OneWire oneWire(oneWireBus);

// Pass our oneWire reference to Dallas Temperature sensor
DallasTemperature sensors(&oneWire);

void setup() {
  // Start serial communication
  Serial.begin(9600);

  // Start up the temperature sensor library
  sensors.begin();
}

void loop() {
  // Read turbidity sensor
  int turbidityValue = analogRead(turbidityPin);
  float turbidityVoltage = turbidityValue * (5.0 / 1023.0);

  // Read pH sensor
  int phValue = analogRead(phPin);
  float phVoltage = phValue * (5.0 / 1023.0);

  // Request temperature readings
  sensors.requestTemperatures();
  float temperatureC = sensors.getTempCByIndex(0);

  // Print sensor values to Serial Monitor
  Serial.print("Turbidity Voltage: ");
  Serial.print(turbidityVoltage);
  Serial.println(" V");

  Serial.print("pH Voltage: ");
  Serial.print(phVoltage);
  Serial.println(" V");

  Serial.print("Temperature: ");
  Serial.print(temperatureC);
  Serial.println(" °C");

  // Wait 1 second before next loop
  delay(1000);
}
This code is designed to be uploaded to the Arduino UNO+WiFi R3 ATmega328P+Node MCU ESP8266 CH340G. It initializes the sensors in the setup() function and continuously reads the sensor values in the loop() function, outputting the results to the Serial Monitor.