
Wi-Fi Controlled Temperature Monitoring System with OLED Display
View and Edit Project In Cirkit Designer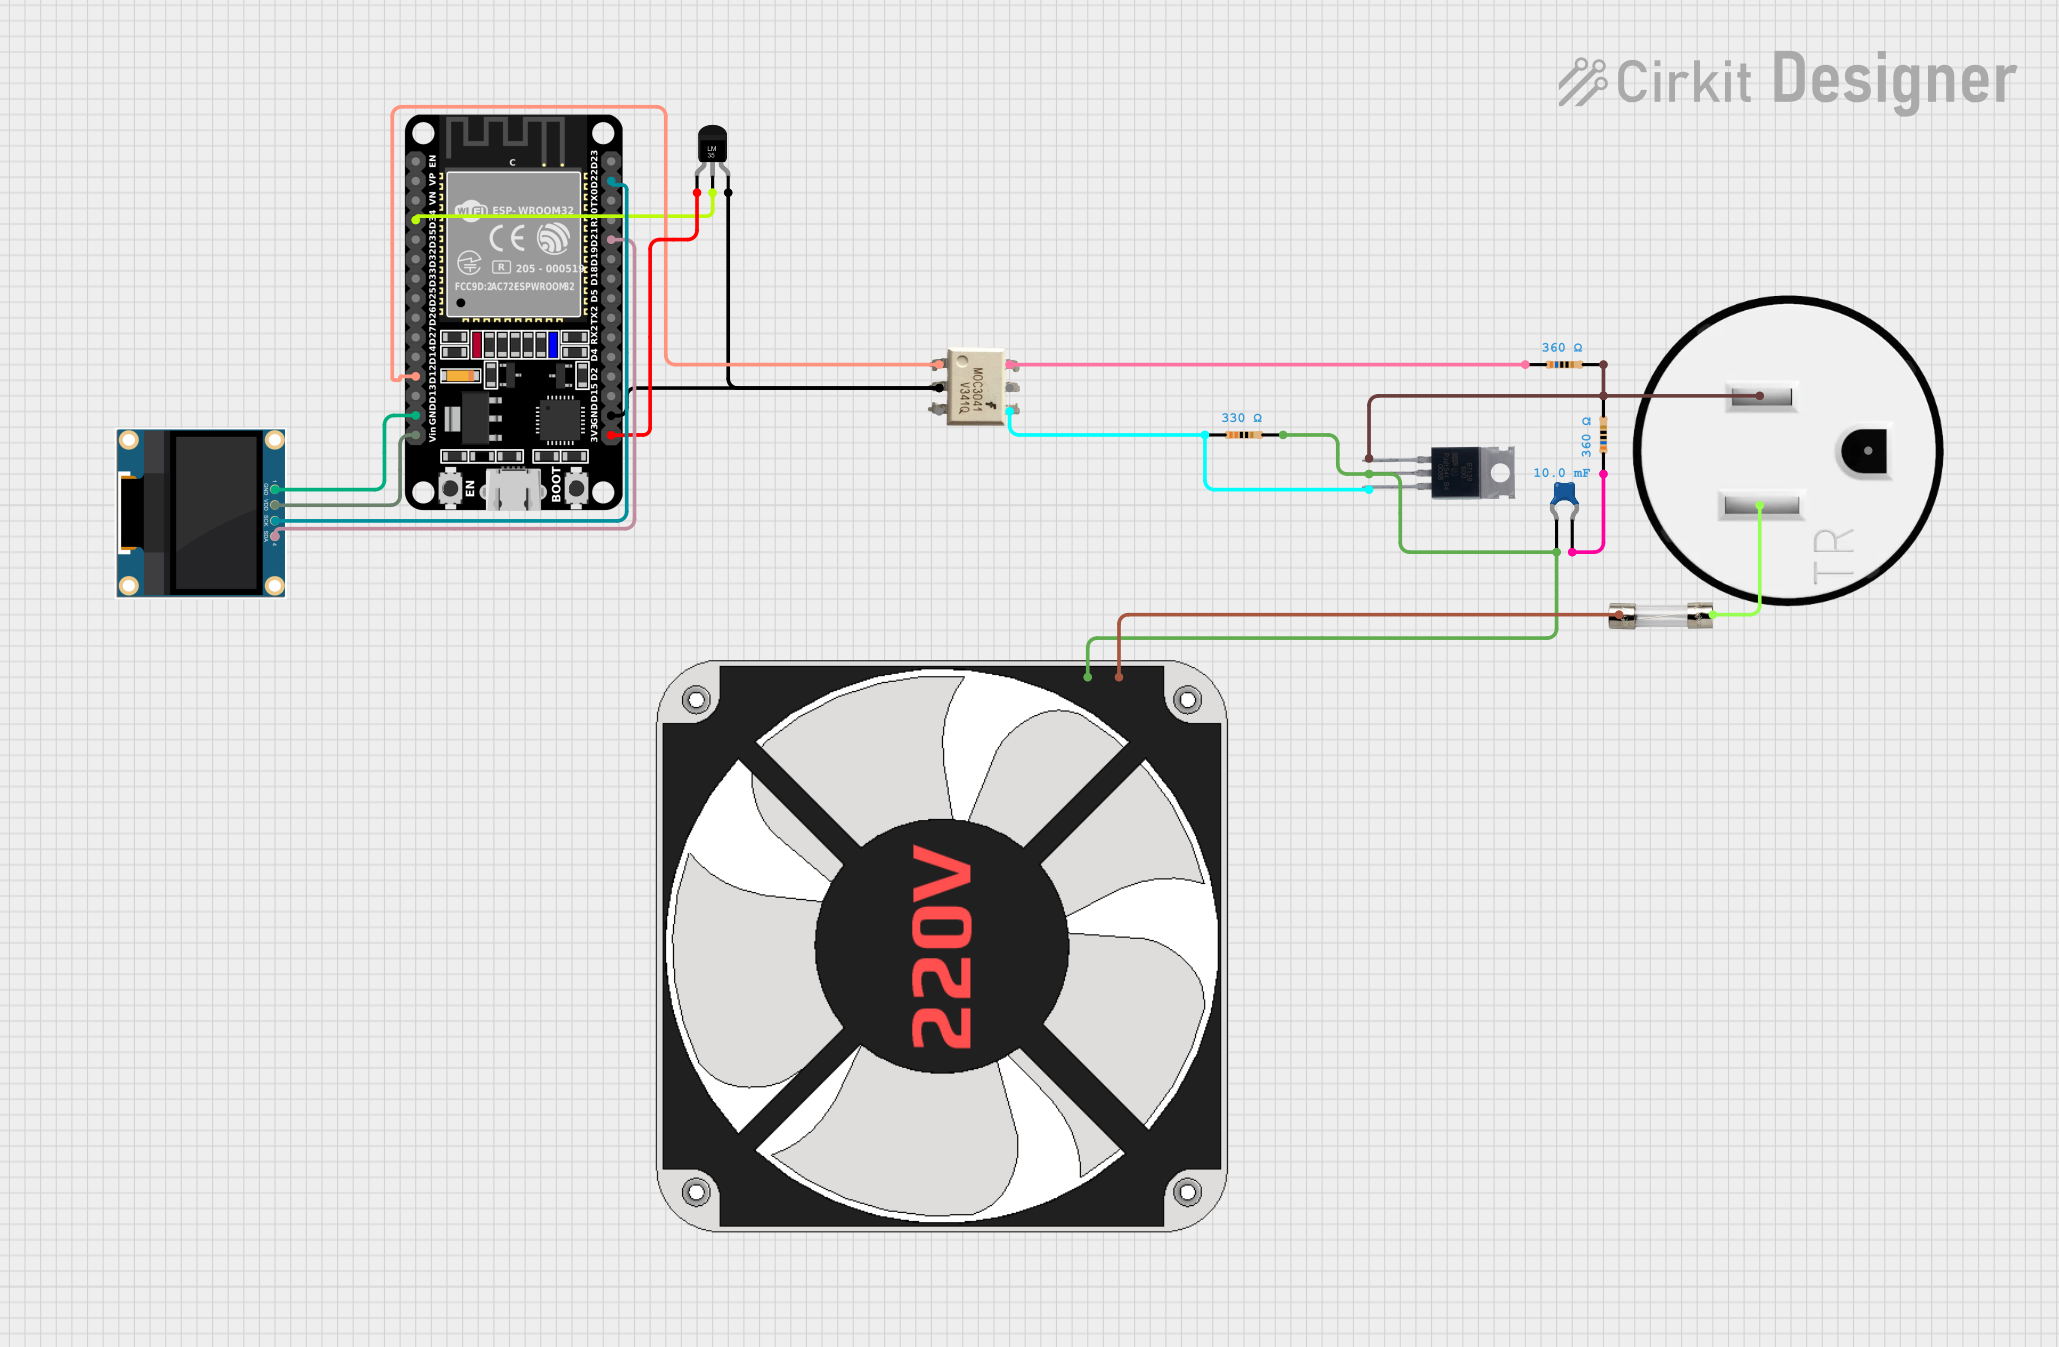
Circuit Documentation
Summary
This circuit is designed to monitor temperature using an LM35 temperature sensor and control a fan based on the temperature readings. The ESP32 microcontroller processes the sensor data and drives a TRIAC to control the fan's power. An OLED display is used to show the current temperature and fan speed. The circuit also includes a MOC3041 optoisolator for safe interfacing with the TRIAC, and a BT139 for controlling the AC load.
Component List
1. ESP32 (30 pin)
- Description: A powerful microcontroller with built-in Wi-Fi and Bluetooth capabilities.
- Purpose: Acts as the main controller for the circuit, processing sensor data and controlling the fan.
2. 0.96" OLED
- Description: A small OLED display for visual output.
- Purpose: Displays the current temperature and fan speed.
3. 120V Outlet
- Description: A standard electrical outlet for AC power.
- Purpose: Provides power to the fan and other AC components.
4. MOC3041
- Description: An optoisolator with a built-in TRIAC.
- Purpose: Isolates the microcontroller from the high voltage AC circuit while controlling the TRIAC.
5. Temperature Sensor (LM35)
- Description: An analog temperature sensor.
- Purpose: Measures the ambient temperature and provides an output voltage proportional to the temperature.
6. BT139 600
- Description: A TRIAC for controlling AC loads.
- Purpose: Switches the fan on and off based on the control signal from the microcontroller.
7. 220 Fan
- Description: A fan that operates on 220V AC.
- Purpose: Provides cooling based on temperature readings.
8. Resistors
- Description: Passive components that limit current flow.
- Purpose: Used in various parts of the circuit for current limiting and voltage division.
9. Ceramic Capacitor
- Description: A capacitor used for filtering and stability.
- Purpose: Provides stability in the circuit by filtering out noise.
10. 5A Fuse
- Description: A safety device that protects the circuit from overcurrent.
- Purpose: Prevents damage to the circuit components by breaking the circuit in case of excessive current.
Wiring Details
ESP32 (30 pin)
D34 connected to Vout of Temperature Sensor (LM35)
D12 connected to ANODE of MOC3041
GND connected to GND of 0.96" OLED
Vin connected to VDD of 0.96" OLED
D22 connected to SCK of 0.96" OLED
D21 connected to SDA of 0.96" OLED
GND connected to CATHODE of MOC3041
3V3 connected to +Vs of Temperature Sensor (LM35)
0.96" OLED
GND connected to GND of ESP32
VDD connected to Vin of ESP32
SCK connected to D22 of ESP32
SDA connected to D21 of ESP32
120V Outlet
AC Neutral connected to output of 5A fuse
AC Hot connected to MT1 of BT139 600
pin2 of Resistor connected to AC Hot of 120V Outlet
pin2 of Resistor connected to MT2 of BT139 600
MOC3041
TRIAC1 connected to pin1 of Resistor
CATHODE connected to GND of ESP32
Temperature Sensor (LM35)
GND connected to GND of ESP32
+Vs connected to 3V3 of ESP32
Vout connected to D34 of ESP32
BT139 600
GATE connected to pin2 of Resistor
MT1 connected to AC Hot of 120V Outlet
MT2 connected to pin2 of Resistor
220 Fan
N connected to input of 5A fuse
L connected to pin2 of Resistor
Resistors
Resistor 1 (360 Ohms):
- pin1 connected to pin1 of Ceramic Capacitor
- pin2 connected to TRIAC1 of MOC3041
Resistor 2 (330 Ohms):
- pin1 connected to pin1 of Ceramic Capacitor
- pin2 connected to L of 220 Fan
Resistor 3 (360 Ohms):
- pin1 connected to pin1 of MOC3041
- pin2 connected to GND of ESP32
Documented Code
#include <Wire.h>
#include <Adafruit_GFX.h>
#include <Adafruit_SSD1306.h>

#define SCREEN_WIDTH 128  // OLED display width, in pixels
#define SCREEN_HEIGHT 64  // OLED display height, in pixels

// Declaration for an SSD1306 display connected to I2C (SDA, SCL pins)
#define OLED_RESET -1  // Reset pin (or -1 if sharing Arduino reset pin)
Adafruit_SSD1306 display(SCREEN_WIDTH, SCREEN_HEIGHT, &Wire, OLED_RESET);

#define LM35_PIN 34          // ESP32 analog input pin connected to LM35
#define TRIAC_PIN 12         // Pin controlling the TRIAC (GPIO 12)
#define ZERO_CROSS_PIN 13    // Pin connected to zero-cross detector (GPIO 13)
#define FAN_MAX_DELAY 8333   // Max delay in microseconds (100% off at 60Hz)

// Baseline temperature in °C (adjust this to your desired baseline)
float baselineTemp = 20.0;
int delayTime = 0;  // Delay for phase angle control

void IRAM_ATTR zeroCrossDetected() {
  delayMicroseconds(delayTime);
  digitalWrite(TRIAC_PIN, HIGH);  // Fire the TRIAC
  delayMicroseconds(10);          // Keep TRIAC on for a few microseconds
  digitalWrite(TRIAC_PIN, LOW);   // Turn off the TRIAC
}

void setup() {
  pinMode(TRIAC_PIN, OUTPUT);
  pinMode(ZERO_CROSS_PIN, INPUT);

  // Attach interrupt for zero-cross detection
  attachInterrupt(digitalPinToInterrupt(ZERO_CROSS_PIN), zeroCrossDetected, RISING);

  Serial.begin(115200);  // ESP32 operates faster, so use a higher baud rate

  // Initialize the OLED display
  if (!display.begin(SSD1306_SWITCHCAPVCC, 0x3C)) {  // Address 0x3C for most OLEDs
    Serial.println(F("SSD1306 allocation failed"));
    for (;;);  // Don't proceed, loop forever
  }
  display.clearDisplay();  // Clear the buffer
  display.setTextSize(4);  // Set text size (increase for bigger text)
  display.setTextColor(SSD1306_WHITE);  // Set text color

  delay(2000);  // Give display some time to initialize
}

void loop() {
  int sensorValue = analogRead(LM35_PIN);  // Read analog value from LM35

  // Convert the analog value to temperature in Celsius
  // LM35 outputs 10mV per degree Celsius, powered at 5V
  float voltage = sensorValue * (5.0 / 4095.0);  // Convert analog reading to voltage at 5V
  int currentTemp = (int)(voltage * 100);  // Convert voltage to temperature in Celsius as whole number

  // Display the temperature in the Serial Monitor
  Serial.print("Current Temp: ");
  Serial.println(currentTemp);

  // Display the temperature on the OLED
  display.clearDisplay();  // Clear the display each loop
  display.setCursor(0, 0);  // Start at top-left corner
  display.setTextSize(2);   // Set text size
  display.print("Temp: ");
  display.print(currentTemp); // Show only whole degrees
  display.println(" C");

  // Display fan speed (based on the delay time)
  float fanSpeed = map(delayTime, FAN_MAX_DELAY, 0, 0, 100);  // Calculate fan speed as percentage
  display.print("Fan: ");
  display.print((int)fanSpeed); // Show fan speed as whole number
  display.println(" %");

  display