
Arduino UNO Controlled Security System with LCD Feedback and Keypad Entry
View and Edit Project In Cirkit Designer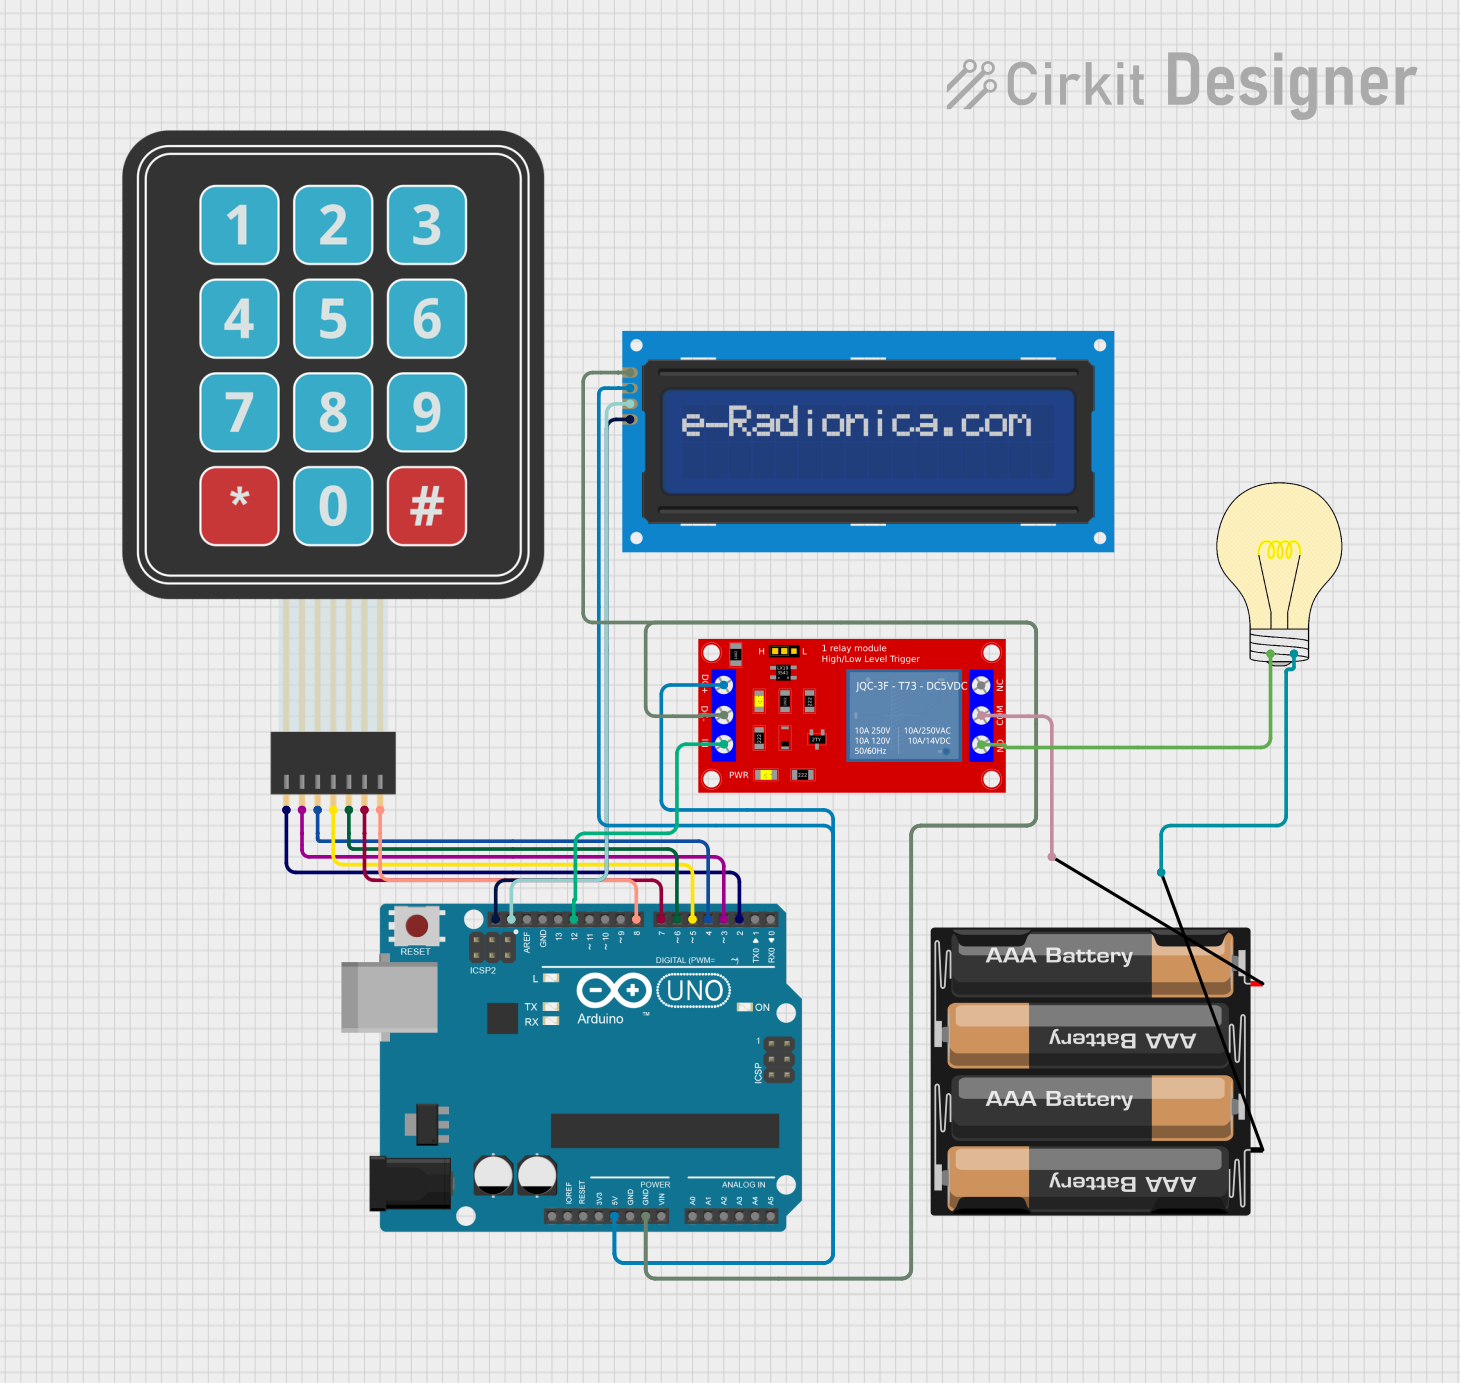
Circuit Documentation
Summary
This circuit is designed to interface an Arduino UNO with an LCD screen, a relay module, a membrane matrix keypad, and a bulb. The Arduino UNO acts as the central controller, running embedded code to interact with the keypad and display information on the LCD screen. The relay module is used to control the power to the bulb, which is powered by a 4 x AAA battery mount. The system is designed to arm or disarm based on a correct code entered via the keypad, with the relay activating the bulb for a set time if an incorrect code is entered.
Component List
Arduino UNO
- Microcontroller board based on the ATmega328P
- Provides I/O pins and power for the circuit components
LCD screen 16x2 I2C
- Alphanumeric liquid crystal display with 16 characters by 2 lines
- Uses I2C communication to interface with the Arduino UNO
1 Channel 5V Relay Module
- Electromechanical switch that can be controlled by the Arduino UNO
- Used to switch the bulb on and off
Membrane Matrix Keypad
- Input device with rows and columns of buttons
- Allows the user to input a code to arm or disarm the system
Bulb
- A simple light-emitting component
- Indicates the status of the system or alerts when the wrong code is entered
4 x AAA Battery Mount
- Power source for the bulb
- Provides the necessary voltage to light the bulb when the relay is activated
Wiring Details
Arduino UNO
5Vconnected to LCD screen VCC and Relay Module VCC+GNDconnected to LCD screen GND and Relay Module VCC- (GND)SCLconnected to LCD screen SCLSDAconnected to LCD screen SDAD12connected to Relay Module IND2toD8connected to corresponding pins on the Membrane Matrix Keypad
LCD screen 16x2 I2C
SCLconnected to Arduino UNO SCLSDAconnected to Arduino UNO SDAVCCconnected to Arduino UNO 5VGNDconnected to Arduino UNO GND
1 Channel 5V Relay Module
VCC+connected to Arduino UNO 5VVCC- (GND)connected to Arduino UNO GNDINconnected to Arduino UNO D12N.O.connected to Bulb positiveCOMconnected to 4 x AAA Battery Mount positive
Membrane Matrix Keypad
Row 1toRow 4connected to Arduino UNO D2 to D5 respectivelyColumn 1toColumn 3connected to Arduino UNO D6 to D8 respectively
Bulb
Positiveconnected to Relay Module N.O.Negativeconnected to 4 x AAA Battery Mount negative
4 x AAA Battery Mount
+connected to Relay Module COM-connected to Bulb negative
Documented Code
#include <Wire.h>
#include <LiquidCrystal_I2C.h>

// Initialize the LCD connected to the I2C interface
LiquidCrystal_I2C lcd(0x27, 16, 2);

// Define the keypad and relay pins
const byte ROWS = 4; // Four rows
const byte COLS = 3; // Three columns
char keys[ROWS][COLS] = {
  {'1','2','3'},
  {'4','5','6'},
  {'7','8','9'},
  {'*','0','#'}
};
byte rowPins[ROWS] = {2, 3, 4, 5}; // Connect to the row pinouts of the keypad
byte colPins[COLS] = {6, 7, 8}; // Connect to the column pinouts of the keypad

// Include the Keypad library
#include <Keypad.h>

// Initialize the keypad
Keypad keypad = Keypad(makeKeymap(keys), rowPins, colPins, ROWS, COLS);

// Relay pin
const int relayPin = 12;

// Code settings
const String correctCode = "1234"; // Set the correct 4-digit code
String enteredCode = "";
bool systemArmed = false;
unsigned long wrongCodeTime = 0;
const unsigned long relayActivationTime = 5000; // 5 seconds activation

void setup() {
  pinMode(relayPin, OUTPUT);
  digitalWrite(relayPin, LOW); // Start with the relay off
  lcd.init(); // Initialize the LCD
  lcd.backlight();
  lcd.print("Enter Code:");
}

void loop() {
  char key = keypad.getKey();
  if (key) {
    if (key == '#') {
      // Check the entered code
      if (enteredCode == correctCode) {
        systemArmed = !systemArmed; // Toggle arming/disarming
        lcd.clear();
        lcd.print(systemArmed ? "System Armed" : "System Disarmed");
        delay(2000);
        lcd.clear();
        lcd.print("Enter Code:");
      } else {
        // Wrong code entered, activate relay for a set time
        digitalWrite(relayPin, HIGH);
        wrongCodeTime = millis();
        lcd.clear();
        lcd.print("Wrong Code!");
        delay(2000);
        lcd.clear();
        lcd.print("Enter Code:");
      }
      enteredCode = ""; // Reset entered code
    } else if (key == '*') {
      enteredCode = ""; // Clear the entered code
      lcd.clear();
      lcd.print("Enter Code:");
    } else {
      enteredCode += key; // Append the entered digit
      lcd.setCursor(enteredCode.length(), 1);
      lcd.print("*"); // Print * for each digit
    }
  }

  // Turn off the relay after the activation time has passed
  if (millis() - wrongCodeTime >= relayActivationTime && digitalRead(relayPin) == HIGH) {
    digitalWrite(relayPin, LOW);
    lcd.clear();
    lcd.print("Enter Code:");
  }
}
This code is designed to run on the Arduino UNO and controls the LCD screen, keypad, and relay module. It prompts the user to enter a code on the keypad, displays feedback on the LCD, and toggles the relay based on the correctness of the entered code.