Arduino UNO-Based Ultrasonic Distance Sensor with Servo Motor Control
Circuit Documentation
Summary
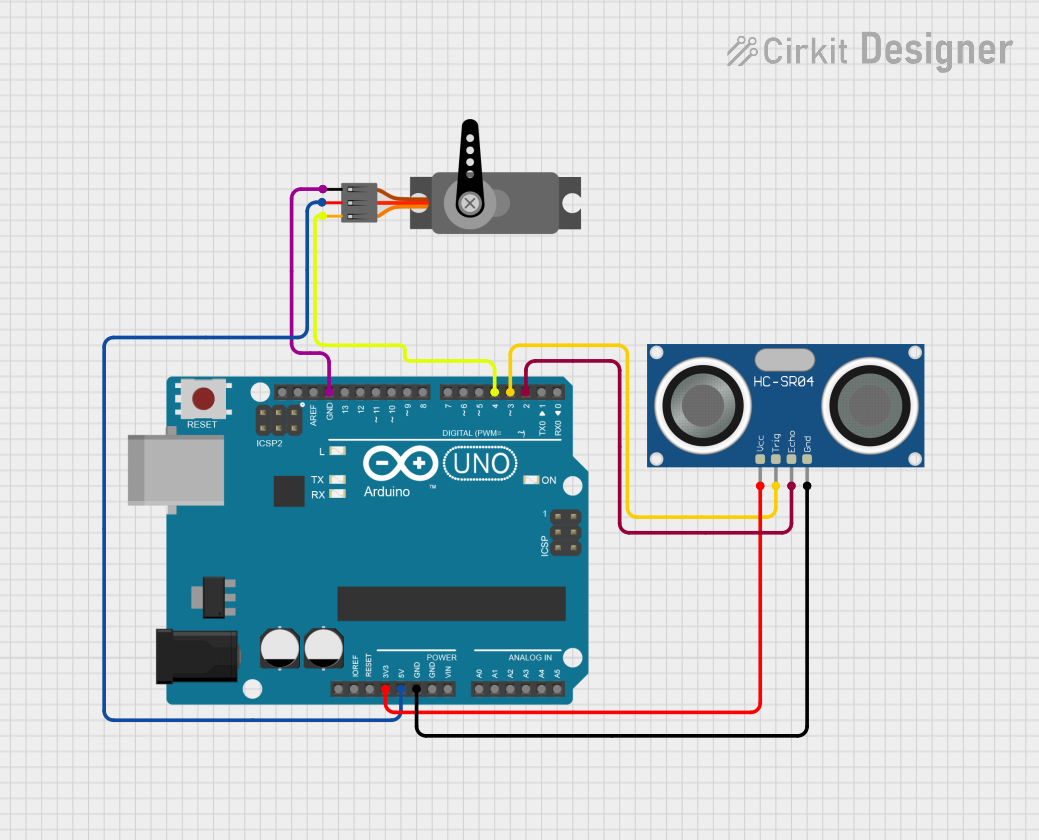
This circuit consists of an Arduino UNO microcontroller, a Servo motor, and an HC-SR04 Ultrasonic Sensor. The Arduino UNO controls the Servo motor based on the distance measured by the Ultrasonic Sensor. The sensor sends out ultrasonic waves and measures the time it takes for the echo to return, which is then used to calculate the distance to an object. If the object is within a certain range, the Servo motor is activated to perform a series of movements.
Component List
Arduino UNO
- Description: A microcontroller board based on the ATmega328P.
- Pins: UNUSED, IOREF, Reset, 3.3V, 5V, GND, Vin, A0, A1, A2, A3, A4, A5, SCL, SDA, AREF, D13, D12, D11, D10, D9, D8, D7, D6, D5, D4, D3, D2, D1, D0
Servo
- Description: A motor that can be controlled to move to a specific position.
- Pins: GND, VCC, PWM
HC-SR04 Ultrasonic Sensor
- Description: A sensor that measures distance by using ultrasonic waves.
- Pins: VCC, TRIG, ECHO, GND
Wiring Details
Arduino UNO
- 3.3V: Connected to VCC of HC-SR04 Ultrasonic Sensor
- 5V: Connected to VCC of Servo
- GND: Connected to GND of HC-SR04 Ultrasonic Sensor and GND of Servo
- D4: Connected to PWM of Servo
- D3: Connected to TRIG of HC-SR04 Ultrasonic Sensor
- D2: Connected to ECHO of HC-SR04 Ultrasonic Sensor
Servo
- GND: Connected to GND of Arduino UNO
- VCC: Connected to 5V of Arduino UNO
- PWM: Connected to D4 of Arduino UNO
HC-SR04 Ultrasonic Sensor
- VCC: Connected to 3.3V of Arduino UNO
- TRIG: Connected to D3 of Arduino UNO
- ECHO: Connected to D2 of Arduino UNO
- GND: Connected to GND of Arduino UNO
Code Documentation
Arduino UNO Code
#include <Servo.h> //includes the servo library
Servo myservo;

#define echopin 2 // echo pin
#define trigpin 3 // Trigger pin

int set_cm = 50;

long ultra_time;
long dis_cm;

void setup(){ // put your setup code here, to run once

    Serial.begin(9600);// initialize serial communication at 9600 bits per second:

    myservo.attach(4);
    myservo.write(0);

    pinMode (trigpin, OUTPUT); // declare ultrasonic sensor Trigger pin as Output
    pinMode (echopin, INPUT);  // declare ultrasonic sensor Echo pin as input

    delay(1000); // Waiting for a while
}

void loop(){
    //*************************
    ultra_read();
    //*************************

    Serial.print("Dis :");Serial.println(dis_cm);

    if(dis_cm<set_cm){
        myservo.write(20);
        delay(50);
        myservo.write(30);
        delay(50);
        myservo.write(40);
        delay(50);
        myservo.write(50);
        delay(50);
        myservo.write(80);
        delay(50);
        myservo.write(110);
        delay(3000);
    }

    if(dis_cm>set_cm){
        myservo.write(0);
    }

    delay(100);
}

//**********************ultra_read****************************
void ultra_read(){
    digitalWrite(trigpin, LOW);
    delayMicroseconds(2);
    digitalWrite(trigpin, HIGH);
    delayMicroseconds(10);
    ultra_time = pulseIn (echopin, HIGH);
    dis_cm =  ultra_time / 29 / 2;
}
This code initializes the Servo motor and the HC-SR04 Ultrasonic Sensor. In the setup function, the Servo motor is attached to pin D4, and the ultrasonic sensor pins are set as input and output. The loop function continuously reads the distance from the ultrasonic sensor and moves the Servo motor if the distance is less than a predefined value (set_cm). The ultra_read function handles the ultrasonic sensor reading and calculates the distance in centimeters.