
Arduino-Based Load Cell Weight Monitoring System with Wi-Fi Connectivity
View and Edit Project In Cirkit Designer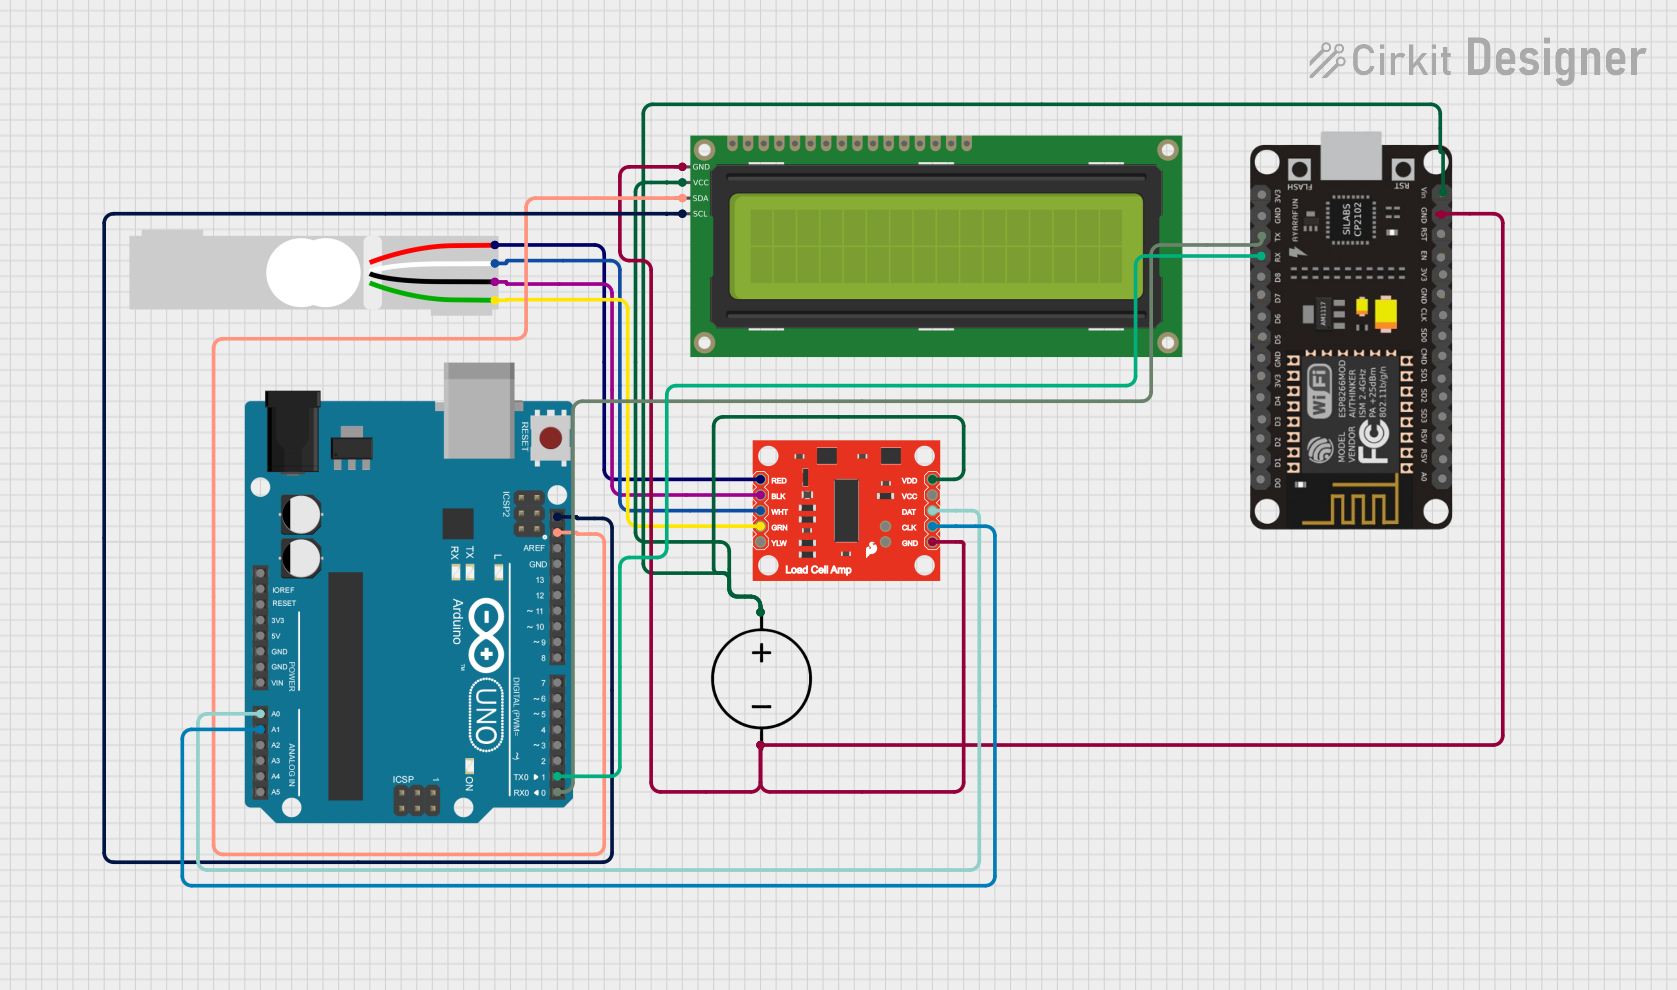
Circuit Documentation
Summary
This circuit is designed to measure weight using a load cell and display the measured weight on a 16x2 I2C LCD. The system includes an Arduino UNO for processing the data from the load cell via an HX711 load cell amplifier. Additionally, an ESP8266 NodeMCU is used for potential wireless communication. The circuit is powered by a DC power source.
Component List
Load Cell - Red/white/black/green
- Description: A sensor used to measure weight.
- Pins: E+, A-, E-, A+
SparkFun Load Cell Amplifier - HX711
- Description: An amplifier to interface the load cell with the microcontroller.
- Pins: VDD, VCC, DAT, SCK, GND, B+, B-, A+, A-, AVDD
Arduino UNO
- Description: A microcontroller used for processing the data from the load cell and controlling the LCD.
- Pins: UNUSED, IOREF, Reset, 3.3V, 5V, GND, Vin, A0, A1, A2, A3, A4, A5, SCL, SDA, AREF, D13, D12, D11, D10, D9, D8, D7, D6, D5, D4, D3, D2, D1, D0
16x2 I2C LCD
- Description: A display module to show the measured weight.
- Pins: GND, VCC, SDA, SCL
ESP8266 NodeMCU
- Description: A Wi-Fi module for potential wireless communication.
- Pins: D0, D1, D2, D3, D4, 3V3, GND, D5, D6, D7, D8, RX, TX, A0, RSV, SD3, SD2, SD1, CMD, SD0, CLK, EN, RST, VIN
DC Power Source
- Description: Provides power to the circuit.
- Pins: Ground, Positive
Wiring Details
Load Cell - Red/white/black/green
- E+ connected to AVDD of SparkFun Load Cell Amplifier - HX711
- A- connected to A- of SparkFun Load Cell Amplifier - HX711
- E- connected to GND of SparkFun Load Cell Amplifier - HX711
- A+ connected to A+ of SparkFun Load Cell Amplifier - HX711
SparkFun Load Cell Amplifier - HX711
- VDD connected to Positive of DC Power Source
- DAT connected to A0 of Arduino UNO
- SCK connected to A1 of Arduino UNO
- GND connected to Ground of DC Power Source
Arduino UNO
- A0 connected to DAT of SparkFun Load Cell Amplifier - HX711
- A1 connected to SCK of SparkFun Load Cell Amplifier - HX711
- SCL connected to SCL of 16x2 I2C LCD
- SDA connected to SDA of 16x2 I2C LCD
- D1 connected to RX of ESP8266 NodeMCU
- D0 connected to TX of ESP8266 NodeMCU
16x2 I2C LCD
- VCC connected to VIN of ESP8266 NodeMCU and Positive of DC Power Source
- GND connected to GND of ESP8266 NodeMCU and Ground of DC Power Source
- SCL connected to SCL of Arduino UNO
- SDA connected to SDA of Arduino UNO
ESP8266 NodeMCU
- VIN connected to VCC of 16x2 I2C LCD and Positive of DC Power Source
- GND connected to GND of 16x2 I2C LCD and Ground of DC Power Source
- RX connected to D1 of Arduino UNO
- TX connected to D0 of Arduino UNO
DC Power Source
- Positive connected to VCC of 16x2 I2C LCD, VIN of ESP8266 NodeMCU, and VDD of SparkFun Load Cell Amplifier - HX711
- Ground connected to GND of 16x2 I2C LCD, GND of ESP8266 NodeMCU, and GND of SparkFun Load Cell Amplifier - HX711
Documented Code
#include <Wire.h>
#include <LiquidCrystal_I2C.h>
#include <SoftwareSerial.h>

LiquidCrystal_I2C lcd(0x27, 16, 2);

#define DT A0
#define SCK A1
#define sw 10
const int buzzer=13;
long sample=0;
float val=0;
long count=0;
int position = 0;

unsigned long readCount(void)
{
    unsigned long Count;
    unsigned char i;
    pinMode(DT, OUTPUT);
    digitalWrite(DT,HIGH);
    digitalWrite(SCK,LOW);
    Count=0;
    pinMode(DT, INPUT);
    while(digitalRead(DT));
    for (i=0;i<24;i++)
    {
        digitalWrite(SCK,HIGH);
        Count=Count<<1;
        digitalWrite(SCK,LOW);
        if(digitalRead(DT))
            Count++;
    }
    digitalWrite(SCK,HIGH);
    Count=Count^0x800000;
    digitalWrite(SCK,LOW);
    return(Count);
}

void setup()
{
    Serial.begin(9600);
    lcd.begin();
    pinMode(SCK, OUTPUT);
    pinMode(buzzer, OUTPUT);
    lcd.backlight();
    lcd.clear();
    lcd.print("Vehicle Over-Weight: ");
    lcd.setCursor(0,1);
    lcd.print("Monitoring system");
    delay(3000); /* Power On Warm Up Delay */
    lcd.clear();
    calibrate();
    delay(150); // waits 15 ms for the servo to reach the position
}

void loop()
{
    count= readCount();
    int w=(((count-sample)/val)-2*((count-sample)/val));
    lcd.setCursor(0,0);
    lcd.print("Measured Weight");
    lcd.setCursor(0,1);
    lcd.print(w);
    lcd.print("grams");
    Serial.print("*");
    Serial.print(String(w));//FIRE
    Serial.print("/");
    Serial.print(String(0));//FIRE
    Serial.print("/");
    delay(3000);

    if(w>1000)
    {
        lcd.clear();
        lcd.setCursor(0,0);
        lcd.print("Over-Weight ");
        lcd.setCursor(0,0);
        lcd.print("High Alert....");
        Serial.print("*");
        Serial.print(String(w));//FIRE
        Serial.print("/");
        Serial.print(String(100));//FIRE
        Serial.print("/");
        digitalWrite(buzzer,HIGH);
        delay(3500);
        digitalWrite(buzzer,LOW);
        while(1);
    }
}

void calibrate()
{
    lcd.clear();
    lcd.print("Calibrating...");
    lcd.setCursor(0,1);
    lcd.print("Please Wait...");
    for(int i=0;i<100;i++)
    {
        count=readCount();
        sample+=count;
    }
    sample/=100;
    lcd.clear();
    lcd.print("Put 100g & wait");
    count=0;
    while(count<1000)
    {
        count=readCount();
        count=sample-count;
    }
    lcd.clear();
    lcd.print("Please Wait....");
    delay(2000);
    for(int i=0;i<100;i++)
    {
        count=readCount();
        val+=sample-count;
    }
    val=val/100.0;
    val=val/100.0; // put here your calibrating weight
    lcd.clear();
}
This code initializes the LCD, reads data from the load cell via the HX711 amplifier, and displays the measured weight on the LCD. If the weight exceeds a certain threshold, an alert is triggered.