Cirkit Designer
Your all-in-one circuit design IDE
Home /
Project Documentation
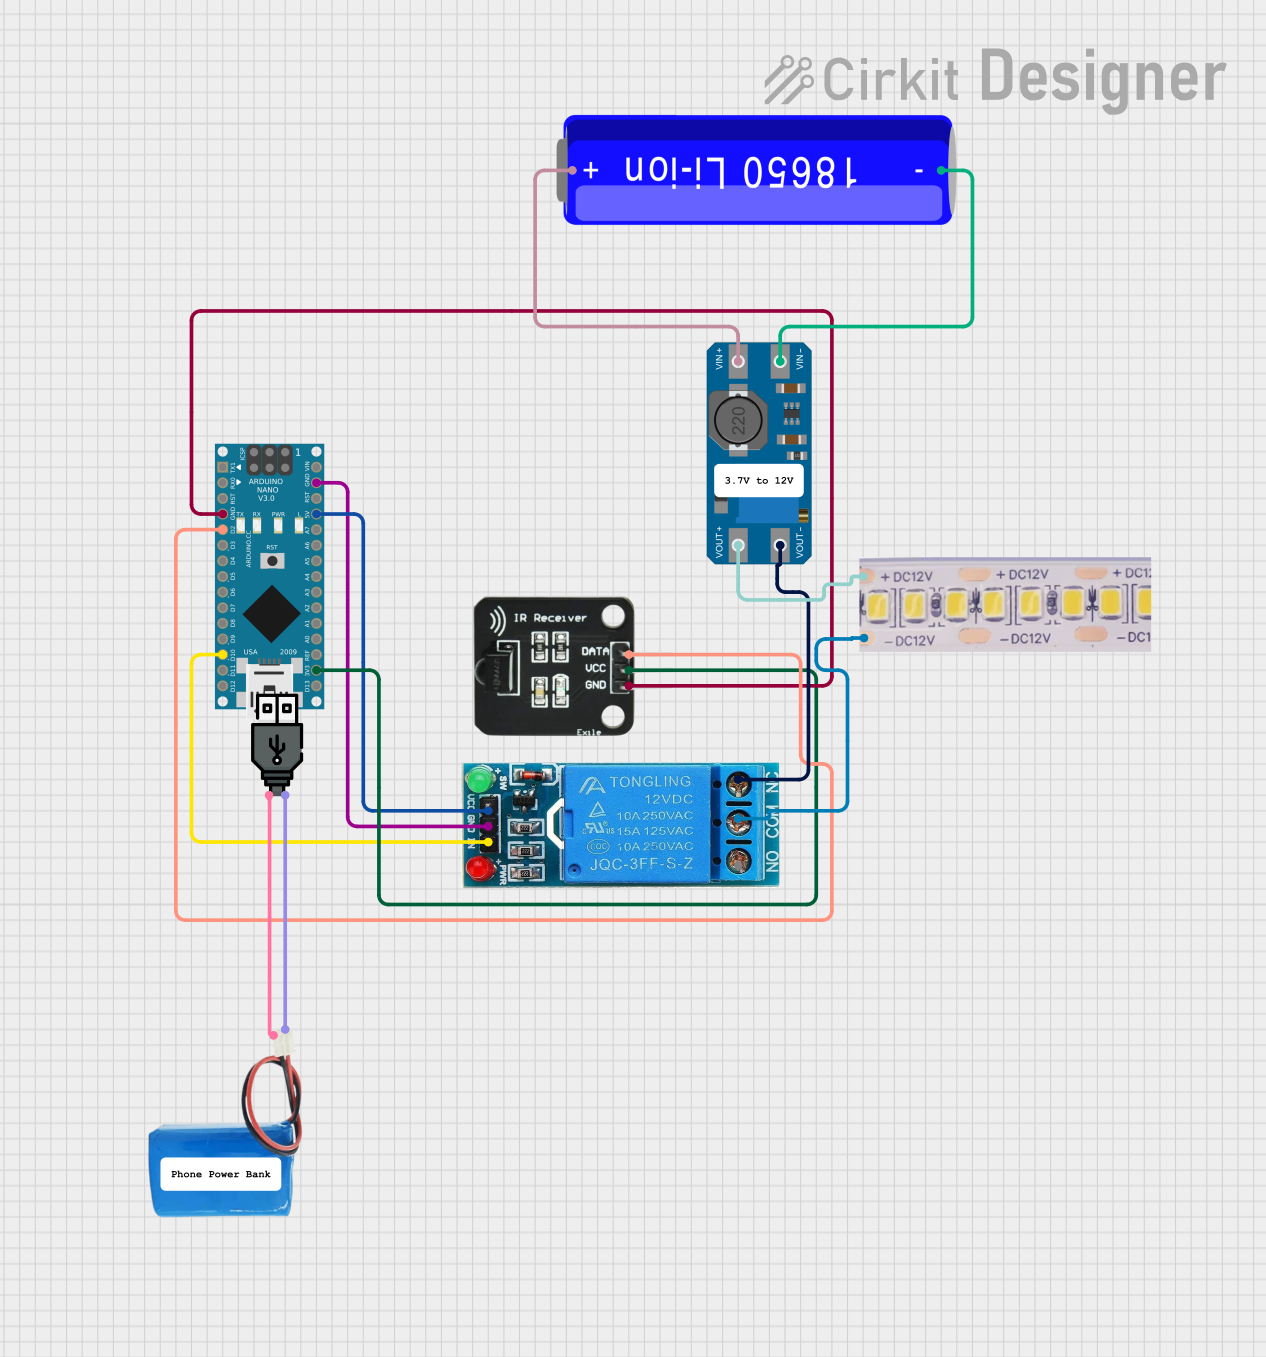
Arduino Nano IR-Controlled 12V LED Strip with Battery Power
Circuit Documentation
Summary
This circuit is designed to control a 12V white LED strip using an Arduino Nano, an IR receiver, and a 12V single-channel relay. The circuit is powered by a 18650 Li-ion battery and a 5V battery connected to a USB power source. The MT3608 DC-DC converter is used to step up the voltage from the 18650 Li-ion battery to power the LED strip.
Component List
Arduino Nano
- Description: A small, complete, and breadboard-friendly board based on the ATmega328P.
- Pins: D1/TX, D0/RX, RESET, GND, D2, D3, D4, D5, D6, D7, D8, D9, D10, D11/MOSI, D12/MISO, VIN, 5V, A7, A6, A5, A4, A3, A2, A1, A0, AREF, 3V3, D13/SCK
MT3608
- Description: A DC-DC step-up converter module.
- Pins: VOUT+, VIN+, VOUT-, VIN-
12V Single Channel Relay
- Description: A relay module that allows a low-power microcontroller to control a high-power device.
- Pins: NC, COM, NO, IN, GND, VCC
IR Receiver
- Description: A device that receives infrared signals from a remote control.
- Pins: DATA, VCC, GND
12V White LED Strip
- Description: A strip of white LEDs that operates at 12V.
- Pins: +12V, GND
18650 Li-ion Battery
- Description: A rechargeable lithium-ion battery.
- Pins: +, -
5V Battery
- Description: A battery that provides a 5V output.
- Pins: positive, negative
USB Power
- Description: A power source that provides power through a USB connection.
- Pins: +, -
Wiring Details
Arduino Nano
- GND connected to GND of IR Receiver
- D2 connected to DATA of IR Receiver
- D10 connected to IN of 12V Single Channel Relay
- GND connected to GND of 12V Single Channel Relay
- 5V connected to VCC of 12V Single Channel Relay
- 3V3 connected to VCC of IR Receiver
MT3608
- VOUT+ connected to +12V of 12V White LED Strip
- VIN+ connected to + of 18650 Li-ion Battery
- VOUT- connected to NC of 12V Single Channel Relay
- VIN- connected to - of 18650 Li-ion Battery
12V Single Channel Relay
- COM connected to GND of 12V White LED Strip
5V Battery
- positive connected to + of USB Power
- negative connected to - of USB Power
Documented Code
Arduino Nano Code (sketch.ino)
void setup() {
  // put your setup code here, to run once:

}

void loop() {
  // put your main code here, to run repeatedly:

}
Documentation (documentation.txt)
This documentation provides a comprehensive overview of the circuit, including a summary, detailed component list, wiring details, and the code used in the microcontroller.