
Battery-Powered Router and Raspberry Pi Network with TP-Link Omada
View and Edit Project In Cirkit Designer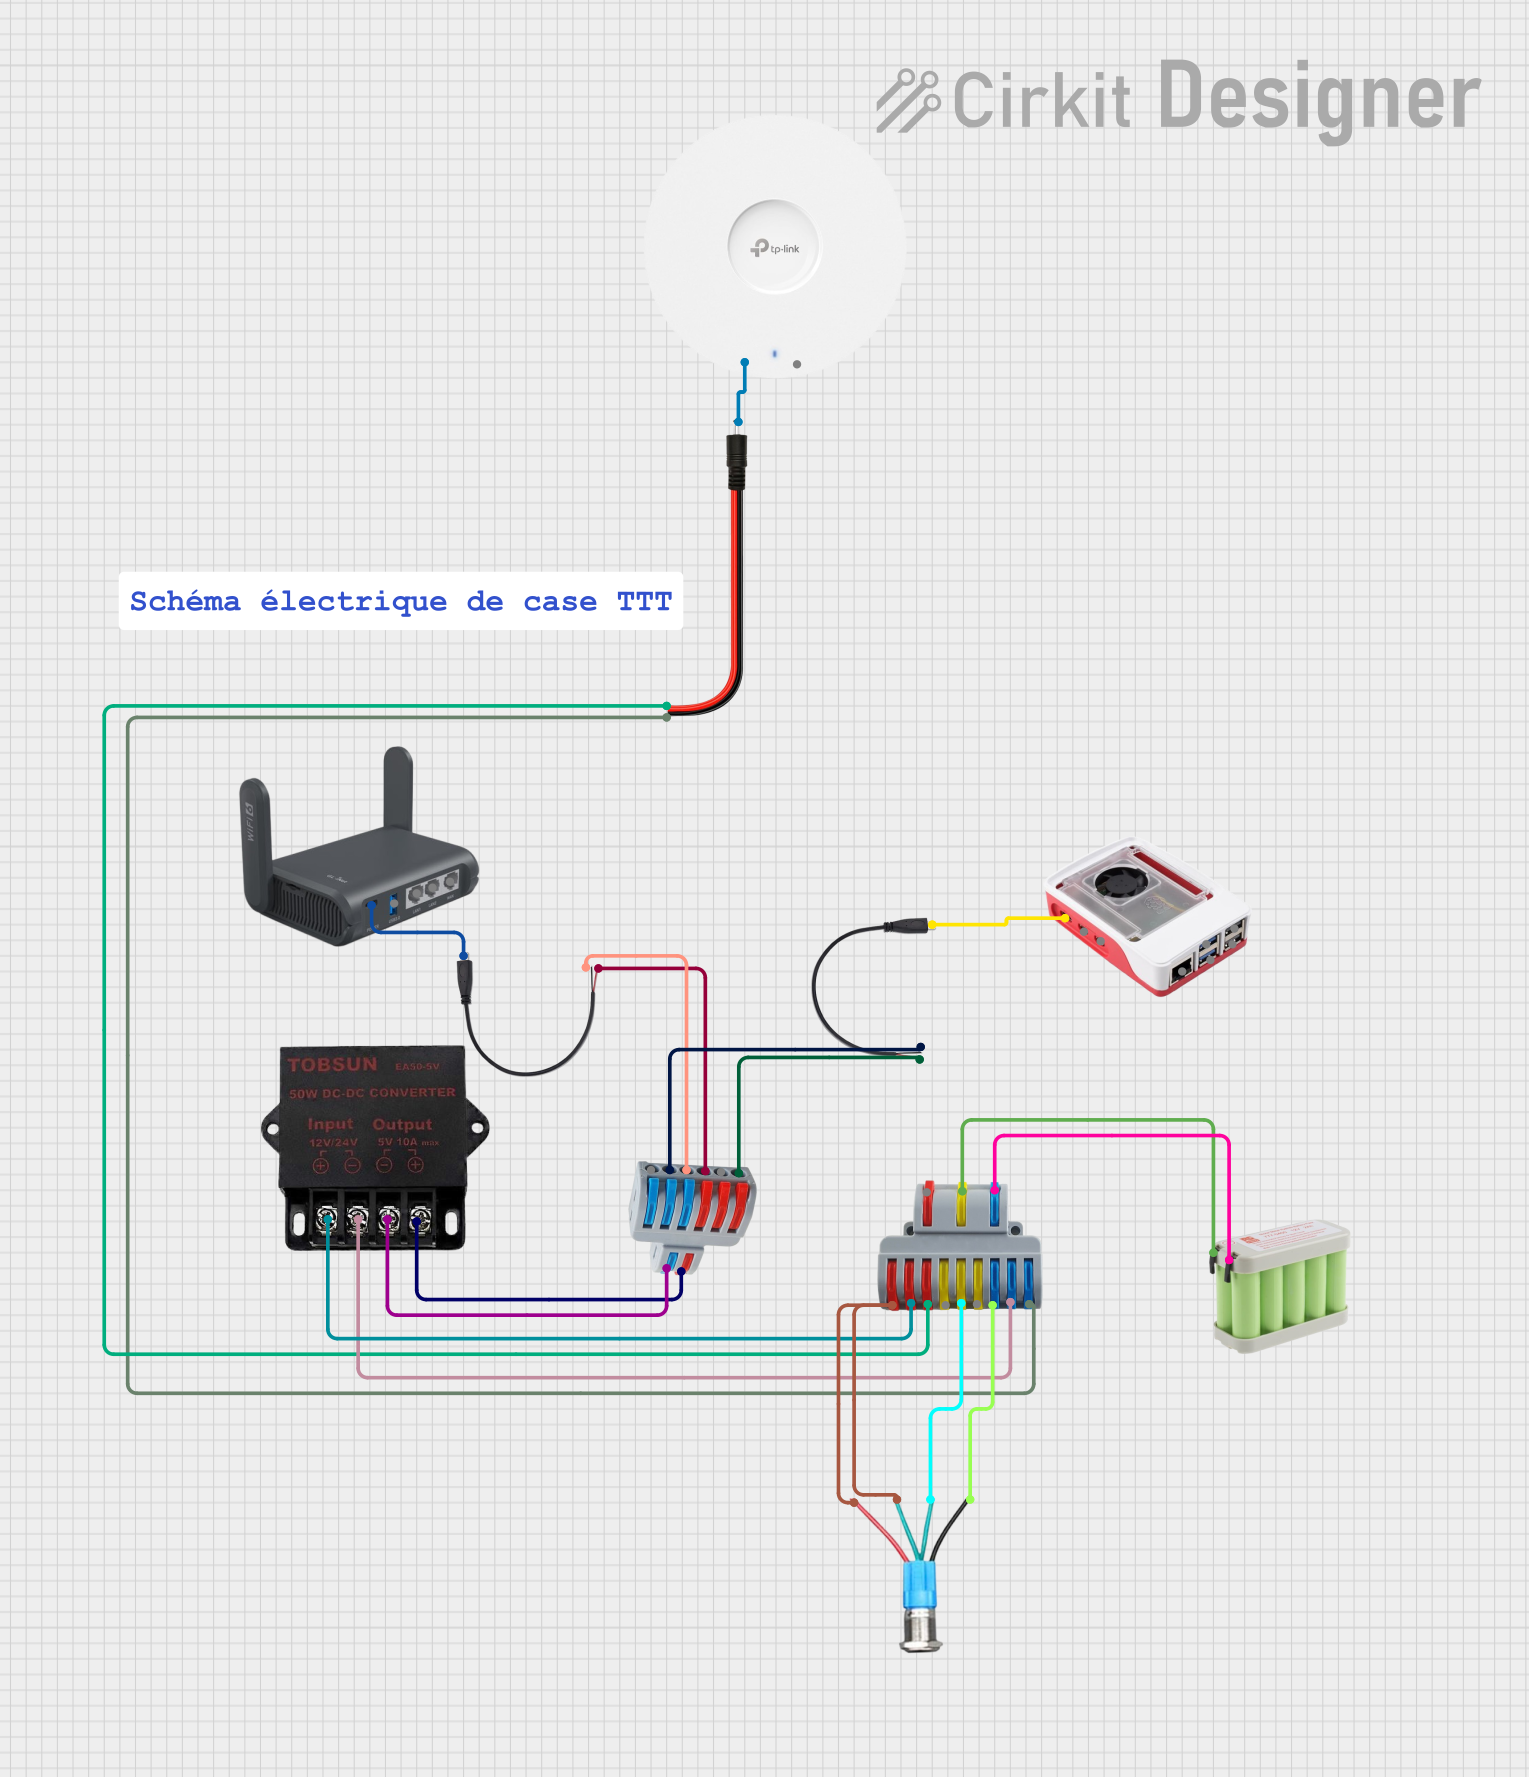
Circuit Documentation
Summary
This document provides a detailed overview of a circuit comprising various components such as a router, battery pack, TP-Link Omada, Raspberry Pi, and several connectors and modules. The circuit is designed to interconnect these components to achieve a specific functionality, which includes power distribution and data communication.
Component List
Router
- Description: A network device that forwards data packets between computer networks.
- Pins: LAN 1, LAN é, WAN, USB 3.0, POWER
Bloc batterie 12V
- Description: A 12V battery pack used for power supply.
- Pins: +, -
TP-Link Omada
- Description: A network device used for wireless access.
- Pins: POWER, ETH (POE)
Raspberry Pi
- Description: A small single-board computer.
- Pins: ETHERNET, USB 3, USB 2, POWER, MICRO HDMI PORT
Comment
- Description: A placeholder for comments or notes.
- Pins: None
Connecteur 2 to 6
- Description: A connector with 2 to 6 pin connections.
- Pins: -, +
Connecteur 3 to 9
- Description: A connector with 3 to 9 pin connections.
- Pins: -, +, /
Module 12V to 5V
- Description: A voltage regulator module that converts 12V to 5V.
- Pins: + 5V, - 5V, - 12V or 24V, + 12V or 24V
USB C to 2 fils
- Description: A USB C connector to 2-wire connection.
- Pins: USB C, +, -
Cable DC 2 fils
- Description: A DC cable with 2-wire connections.
- Pins: +, -, DC 12V
Bouton-Poussoir
- Description: A push-button switch.
- Pins: +, ON, NO, -
Wiring Details
Router
- POWER is connected to USB C of USB C to 2 fils.
Bloc batterie 12V
- + is connected to / of Connecteur 3 to 9.
- - is connected to - of Connecteur 3 to 9.
TP-Link Omada
- POWER is connected to DC 12V of Cable DC 2 fils.
Raspberry Pi
- POWER is connected to USB C of USB C to 2 fils.
Connecteur 2 to 6
- - is connected to - 5V of Module 12V to 5V.
- - is connected to - of USB C to 2 fils.
- - is connected to - of USB C to 2 fils.
- + is connected to + of USB C to 2 fils.
- + is connected to + of USB C to 2 fils.
- + is connected to + 5V of Module 12V to 5V.
Connecteur 3 to 9
- - is connected to - of Cable DC 2 fils.
- - is connected to - 12V or 24V of Module 12V to 5V.
- - is connected to - of Bouton-Poussoir.
- + is connected to + of Cable DC 2 fils.
- + is connected to + 12V or 24V of Module 12V to 5V.
- + is connected to + of Bouton-Poussoir.
- / is connected to + of Bloc batterie 12V.
- / is connected to NO of Bouton-Poussoir.
Module 12V to 5V
- - 5V is connected to - of Connecteur 2 to 6.
- + 5V is connected to + of Connecteur 2 to 6.
- - 12V or 24V is connected to - of Connecteur 3 to 9.
- + 12V or 24V is connected to + of Connecteur 3 to 9.
USB C to 2 fils
- USB C is connected to POWER of Router.
- USB C is connected to POWER of Raspberry Pi.
- - is connected to - of Connecteur 2 to 6.
- - is connected to - of Connecteur 2 to 6.
- + is connected to + of Connecteur 2 to 6.
- + is connected to + of Connecteur 2 to 6.
Cable DC 2 fils
- DC 12V is connected to POWER of TP-Link Omada.
- - is connected to - of Connecteur 3 to 9.
- + is connected to + of Connecteur 3 to 9.
Bouton-Poussoir
- - is connected to - of Connecteur 3 to 9.
- + is connected to + of Connecteur 3 to 9.
- ON is connected to + of Connecteur 3 to 9.
- NO is connected to / of Connecteur 3 to 9.
Code
No code is provided for this circuit.
This document provides a comprehensive overview of the circuit, including a detailed list of components and their interconnections. This should serve as a useful reference for understanding and troubleshooting the circuit.