
Arduino 101 Based Simon Says Game with Multi-Color LEDs and Buzzer
View and Edit Project In Cirkit Designer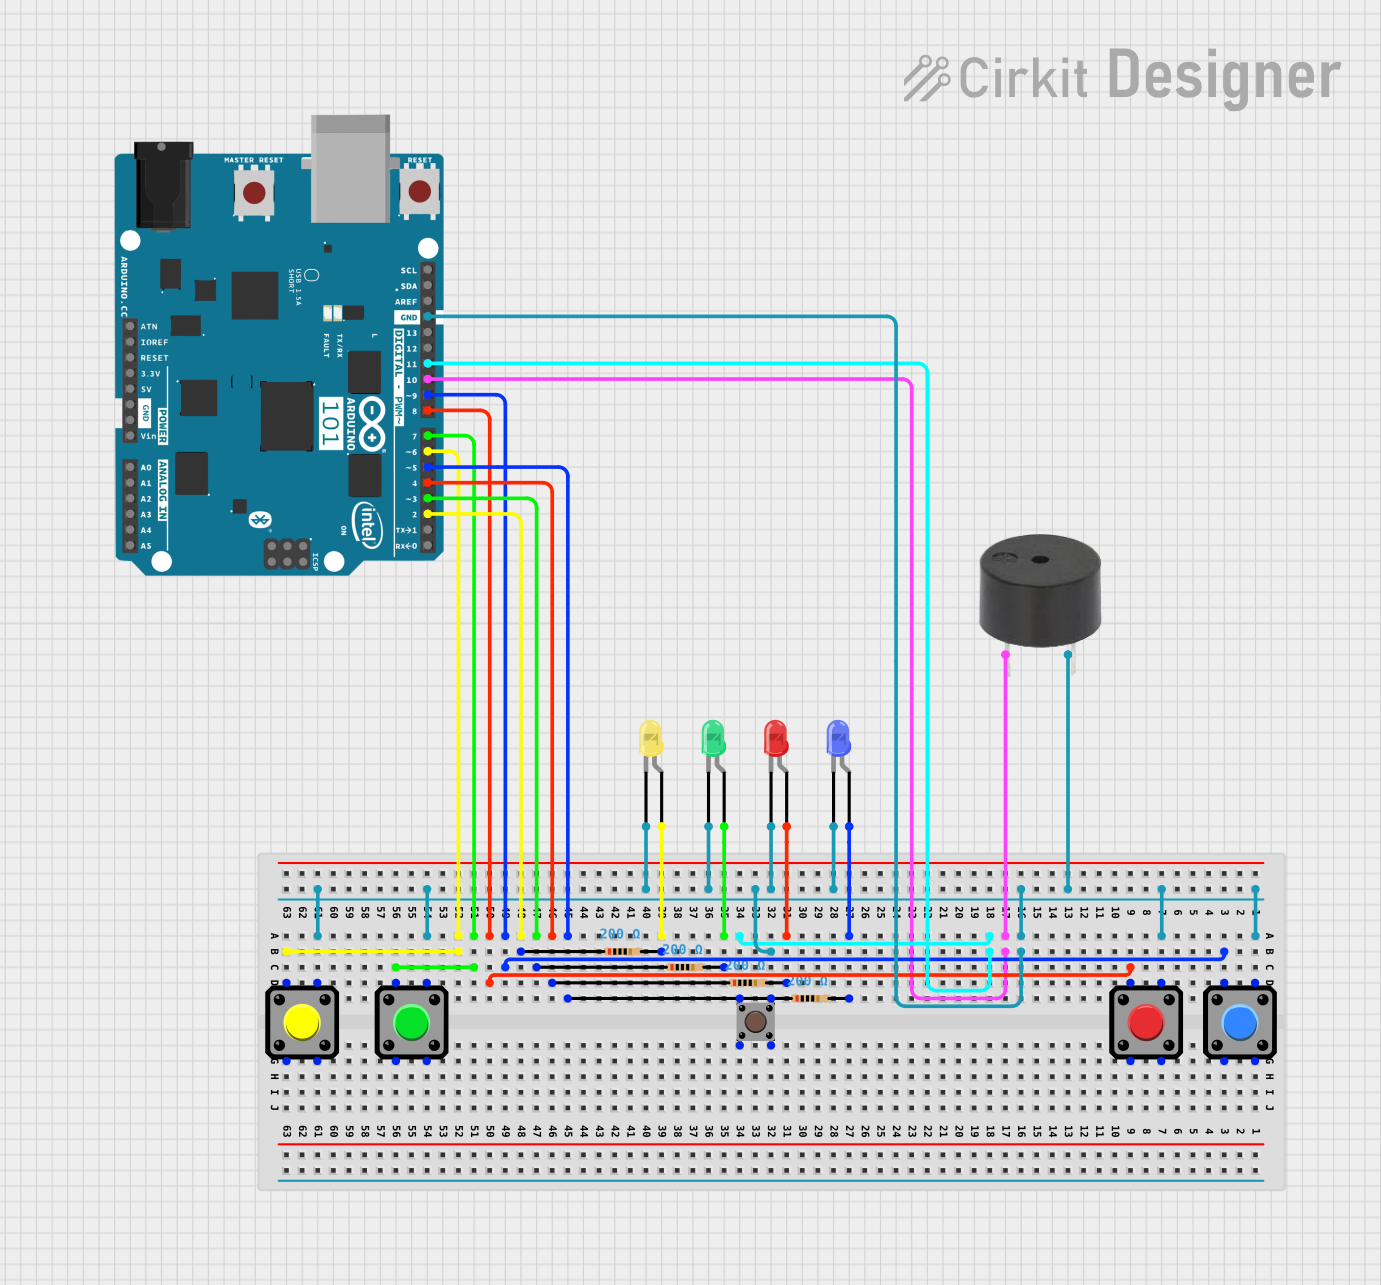
Circuit Documentation
Summary
This circuit is designed to create an interactive game using an Arduino 101 microcontroller. The game involves LEDs that light up in a random sequence, which the player must replicate using pushbuttons. A buzzer provides audio feedback for correct or incorrect sequences, as well as signaling game events. The circuit includes multiple LEDs of different colors, pushbuttons, resistors to limit current to the LEDs, and a buzzer for audio output.
Component List
LEDs
- LED (Green): A two-pin green LED used to provide visual feedback.
- LED (Blue): A two-pin blue LED used to provide visual feedback.
- LED (Yellow): A two-pin yellow LED used to provide visual feedback.
- LED (Red): A two-pin red LED used to provide visual feedback.
Pushbuttons
- Pushbutton: A standard pushbutton used for user input.
Resistors
- Resistor (200 Ohms): Used to limit the current flowing through the LEDs to prevent damage.
Buzzer
- Buzzer: An electronic buzzer used for audio feedback.
Microcontroller
- Arduino 101: The central processing unit of the circuit, which controls the game logic and interfaces with the LEDs, pushbuttons, and buzzer.
Wiring Details
LEDs
- LED (Green): Cathode connected to GND through a 200 Ohm resistor, anode connected to a digital pin on the Arduino.
- LED (Blue): Cathode connected to GND through a 200 Ohm resistor, anode connected to a digital pin on the Arduino.
- LED (Yellow): Cathode connected to GND through a 200 Ohm resistor, anode connected to a digital pin on the Arduino.
- LED (Red): Cathode connected to GND through a 200 Ohm resistor, anode connected to a digital pin on the Arduino.
Pushbuttons
- Pushbutton: One side connected to GND, the other side connected to a digital pin on the Arduino. Configured with internal pull-up resistors.
Resistors
- Resistor (200 Ohms): Connected in series with each LED between the LED anode and the Arduino digital pin.
Buzzer
- Buzzer: One pin connected to GND, the other pin connected to a digital pin on the Arduino.
Microcontroller
- Arduino 101: All components interface with the Arduino through various digital pins as specified in the code.
Documented Code
#include <Arduino.h>

// Pin definitions
const int ledPins[] = {2, 3, 4, 5};
const int buttonPins[] = {6, 7, 8, 9};
const int buzzerPin = 10;
const int startButtonPin = 11;

// Game variables
String led[] = {"a", "b", "c", "d"};
String sequence[10];  // Maximum level is 10, so sequence size is 10
int level = 1;
bool correct;

void setup() {
  // Initialize serial communication
  Serial.begin(9600);

  // Set pins mode
  for (int i = 0; i < 4; ++i) {
    pinMode(ledPins[i], OUTPUT);
    pinMode(buttonPins[i], INPUT_PULLUP);
  }
  pinMode(buzzerPin, OUTPUT);
  pinMode(startButtonPin, INPUT_PULLUP);

  // Seed the random number generator
  randomSeed(analogRead(0));

  // Print initial message
  Serial.println("Press the start button to begin.");
}

void loop() {
  // Wait for the start button press
  if (digitalRead(startButtonPin) == LOW) {
    debounce(); // Debounce function

    correct = true;

    while (correct && level <= 10) {
      // Generate a random sequence for the current level
      generateSequence();

      // Display the sequence to the player
      displaySequence();

      // Ask the player to input the sequence
      if (!waitForInput()) {
        correct = false;
        break; // Break out of the loop if input is incorrect
      }

      // Player wins, increase level
      level++;
      if (level > 10) {
        break; // Limit level to 10
      }
      playWinningSound();
    }

    // Play Nokia ringtone sound when game ends
    playNokiaRingtone();

    // Blink LEDs and keep them on
    blinkLeds();

    // Reset level
    level = 1;

    // Prompt to start again
    Serial.println("Press the start button to begin again.");
    waitForStartButtonRelease(); // Wait for start button release

    // Turn off LEDs after the game restarts
    turnOffLeds();
  }
}

// Additional functions such as debounce(), generateSequence(), displaySequence(),
// waitForInput(), waitForButtonPress(), playBuzzerSound(), playWinningSound(),
// playLosingSound(), playNokiaRingtone(), waitForStartButtonRelease(),
// blinkLeds(), keepLedsOn(), and turnOffLeds() are defined here.
This code is responsible for controlling the game logic, including initializing the game, generating and displaying the LED sequence, reading user input, and providing audio and visual feedback. The Arduino 101 microcontroller is programmed to interact with the connected components according to the game rules.