Arduino UNO Alcohol Detection System with MQ-3 Sensor and Relay Control
Alcohol Detection Circuit Documentation
Summary
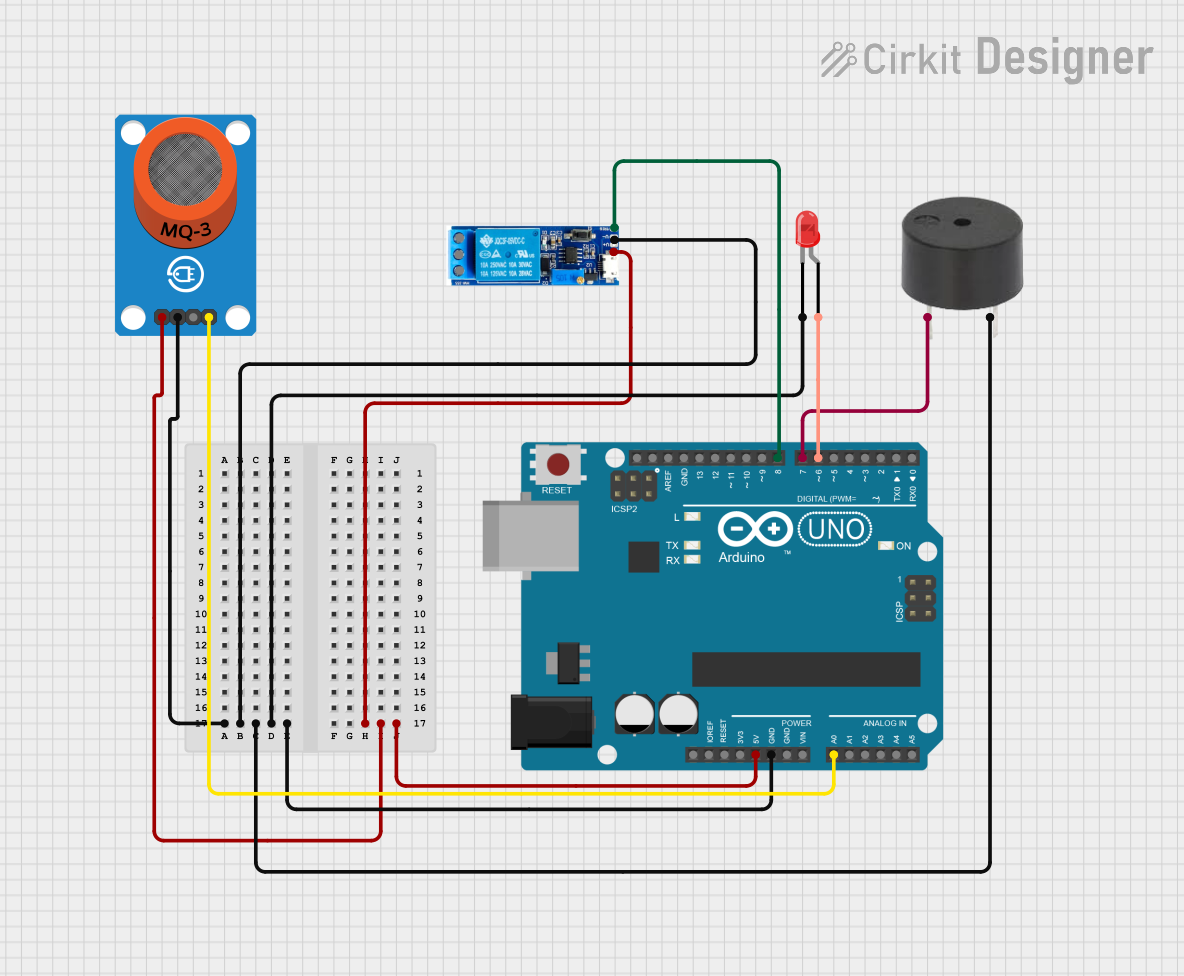
This document provides a detailed overview of an alcohol detection circuit. The circuit uses an MQ-3 alcohol sensor to detect alcohol levels. If the detected alcohol level exceeds a predefined threshold, the circuit triggers a relay, lights up an LED, and sounds a buzzer. The circuit is controlled by an Arduino UNO microcontroller.
Component List
Arduino UNO
- Description: A microcontroller board based on the ATmega328P.
- Pins: UNUSED, IOREF, Reset, 3.3V, 5V, GND, Vin, A0, A1, A2, A3, A4, A5, SCL, SDA, AREF, D13, D12, D11, D10, D9, D8, D7, D6, D5, D4, D3, D2, D1, D0
MQ-3 Breakout
- Description: An alcohol sensor module that provides both digital and analog outputs.
- Pins: VCC, GND, DO, AO
Relay module 5v-30v
- Description: A relay module that can be triggered by a low voltage signal to switch higher voltage loads.
- Pins: common contact, normally open, normally closed, trigger, V-, V+
Buzzer
- Description: A simple piezoelectric buzzer.
- Pins: PIN, GND
LED: Two Pin (red)
- Description: A standard red LED.
- Pins: cathode, anode
Wiring Details
Arduino UNO
GND connected to:
- MQ-3 Breakout (GND)
- Relay module 5v-30v (V-)
- LED: Two Pin (red) (cathode)
- Buzzer (GND)
5V connected to:
- MQ-3 Breakout (VCC)
- Relay module 5v-30v (V+)
A0 connected to:
- MQ-3 Breakout (AO)
D8 connected to:
- Relay module 5v-30v (trigger)
D7 connected to:
- Buzzer (PIN)
D6 connected to:
- LED: Two Pin (red) (anode)
MQ-3 Breakout
GND connected to:
- Arduino UNO (GND)
VCC connected to:
- Arduino UNO (5V)
AO connected to:
- Arduino UNO (A0)
Relay module 5v-30v
V- connected to:
- Arduino UNO (GND)
V+ connected to:
- Arduino UNO (5V)
trigger connected to:
- Arduino UNO (D8)
Buzzer
GND connected to:
- Arduino UNO (GND)
PIN connected to:
- Arduino UNO (D7)
LED: Two Pin (red)
cathode connected to:
- Arduino UNO (GND)
anode connected to:
- Arduino UNO (D6)
Documented Code
Arduino UNO Code
/*
 * Arduino Sketch for Alcohol Detection Circuit
 * This code reads the analog output from an MQ-3 alcohol sensor. If the alcohol
 * level exceeds a certain threshold, it triggers a relay, lights up an LED, and
 * sounds a buzzer.
 */

const int mq3Pin = A0; // MQ-3 sensor analog output connected to A0
const int relayPin = 8; // Relay module trigger pin connected to D8
const int buzzerPin = 7; // Buzzer pin connected to D7
const int ledPin = 6; // LED anode connected to D6
const int threshold = 300; // Threshold for alcohol level detection

void setup() {
  pinMode(relayPin, OUTPUT); // Set relay pin as output
  pinMode(buzzerPin, OUTPUT); // Set buzzer pin as output
  pinMode(ledPin, OUTPUT); // Set LED pin as output
  Serial.begin(9600); // Initialize serial communication
}

void loop() {
  int sensorValue = analogRead(mq3Pin); // Read the analog value from MQ-3
  Serial.println(sensorValue); // Print the sensor value to the serial monitor

  if (sensorValue > threshold) { // If alcohol level exceeds threshold
    digitalWrite(relayPin, HIGH); // Activate relay
    digitalWrite(buzzerPin, HIGH); // Sound buzzer
    digitalWrite(ledPin, HIGH); // Light up LED
  } else {
    digitalWrite(relayPin, LOW); // Deactivate relay
    digitalWrite(buzzerPin, LOW); // Turn off buzzer
    digitalWrite(ledPin, LOW); // Turn off LED
  }

  delay(500); // Wait for 500 milliseconds before next reading
}
MQ-3 Breakout Code
void setup() {
  // put your setup code here, to run once:
}

void loop() {
  // put your main code here, to run repeatedly:
}
Relay module 5v-30v Code
void setup() {
  // put your setup code here, to run once:
}

void loop() {
  // put your main code here, to run repeatedly:
}
Buzzer Code
void setup() {
  // put your setup code here, to run once:
}

void loop() {
  // put your main code here, to run repeatedly:
}
This documentation provides a comprehensive overview of the alcohol detection circuit, including component descriptions, wiring details, and the code used to control the circuit.