Arduino Nano Controlled NeoPixel Ring and Servo Interaction
Circuit Documentation
Summary of the Circuit
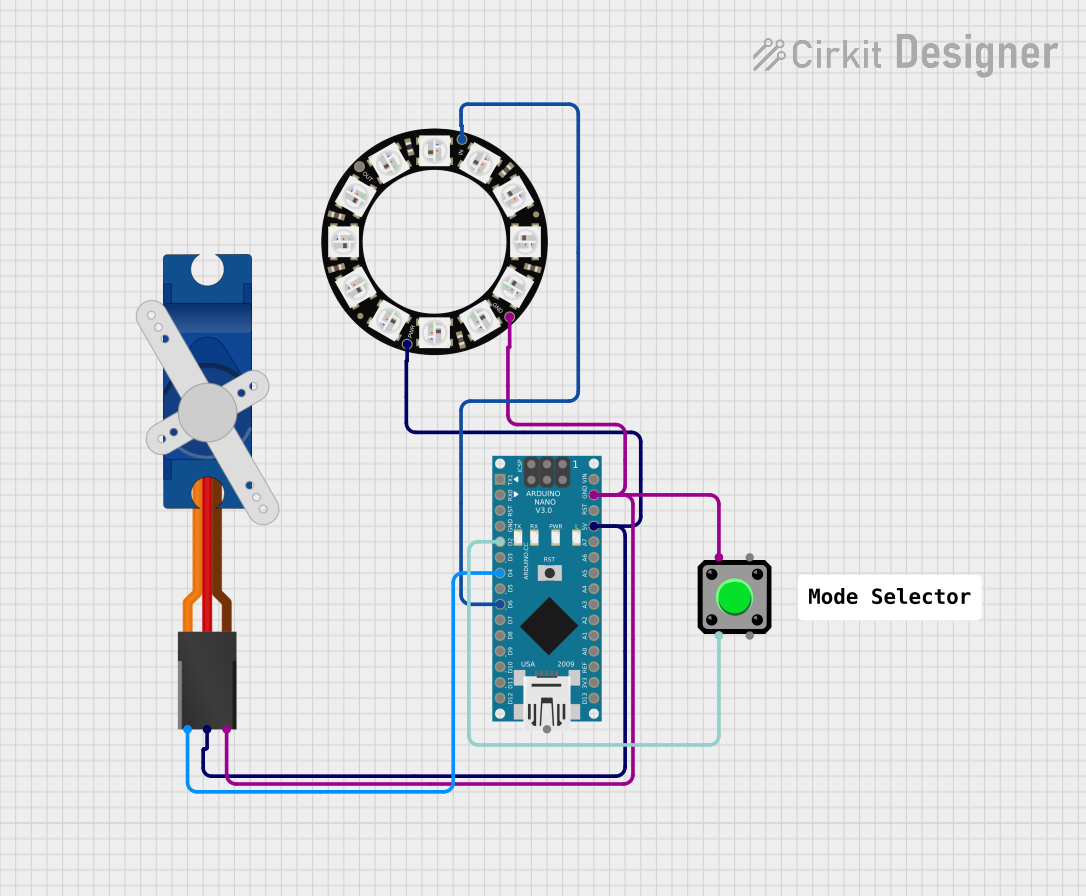
This circuit comprises an Arduino Nano microcontroller, an Adafruit 12 NeoPixel Ring, a Tower Pro SG90 servo motor, a pushbutton, and common ground and power connections. The Arduino Nano serves as the central processing unit, controlling the NeoPixel Ring and the servo motor. The pushbutton is used to provide input to the Arduino Nano, which can then execute specific actions based on the button press. The NeoPixel Ring is an individually addressable LED ring, and the SG90 is a small servo motor capable of precise position control.
Component List
Arduino Nano
- Description: A compact microcontroller board based on the ATmega328P.
- Pins: D1/TX, D0/RX, RESET, GND, D2, D3, D4, D5, D6, D7, D8, D9, D10, D11/MOSI, D12/MISO, VIN, 5V, A7, A6, A5, A4, A3, A2, A1, A0, AREF, 3V3, D13/SCK.
Adafruit 12 NeoPixel Ring
- Description: A circular arrangement of 12 individually addressable RGB LEDs.
- Pins: OUT, VDD, IN, GND.
Tower Pro SG90 Servo
- Description: A small and lightweight servo motor for RC vehicles and other hobbyist projects.
- Pins: Signal, +5V, GND.
Pushbutton
- Description: A simple pushbutton switch for user input.
- Pins: Pin 2, Pin 1, Pin 3, Pin 4.
Wiring Details
Arduino Nano
- D2: Connected to Pushbutton (Pin 2).
- D4: Connected to Tower Pro SG90 servo (Signal).
- D6: Connected to Adafruit 12 NeoPixel Ring (IN).
- GND: Common ground connected to Pushbutton (Pin 1), Tower Pro SG90 servo (GND), and Adafruit 12 NeoPixel Ring (GND).
- 5V: Power supply connected to Tower Pro SG90 servo (+5V) and Adafruit 12 NeoPixel Ring (VDD).
Adafruit 12 NeoPixel Ring
- IN: Connected to Arduino Nano (D6).
- VDD: Connected to Arduino Nano (5V).
- GND: Common ground connected to Arduino Nano (GND).
Tower Pro SG90 Servo
- Signal: Connected to Arduino Nano (D4).
- +5V: Connected to Arduino Nano (5V).
- GND: Common ground connected to Arduino Nano (GND).
Pushbutton
- Pin 2: Connected to Arduino Nano (D2).
- Pin 1: Common ground connected to Arduino Nano (GND).
Documented Code
Arduino Nano Code (sketch.ino)
void setup() {
  // put your setup code here, to run once:

}

void loop() {
  // put your main code here, to run repeatedly:

}
Note: The provided code is a template and does not contain any functional code to control the connected components. The user should implement the setup and loop functions to initialize the components and define the circuit behavior.