
Arduino UNO Based Rain Detection System with I2C LCD Display and Servo Control
View and Edit Project In Cirkit Designer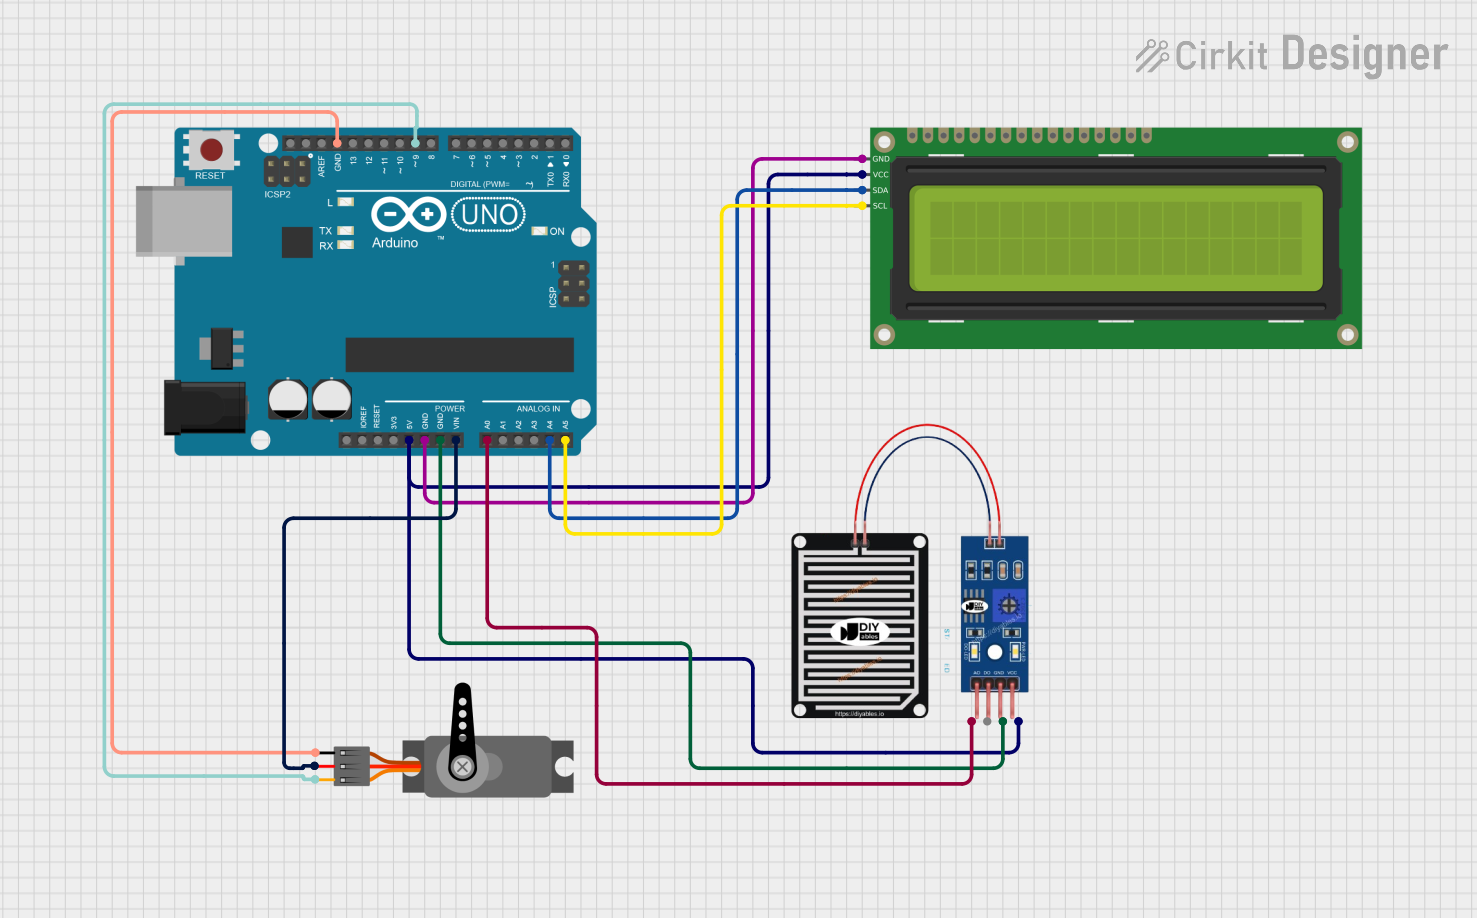
Circuit Documentation
Summary of the Circuit
This circuit integrates an Arduino UNO microcontroller with a 16x2 I2C LCD, a rain sensor, and a servo motor. The Arduino UNO serves as the central processing unit, controlling the LCD for data display, reading analog signals from the rain sensor, and driving the servo motor based on sensor inputs. The LCD communicates with the Arduino via the I2C protocol, while the rain sensor provides analog data to one of the Arduino's analog pins. The servo motor is controlled through a PWM signal from the Arduino.
Component List
Arduino UNO
- Description: A microcontroller board based on the ATmega328P.
- Pins: UNUSED, IOREF, Reset, 3.3V, 5V, GND, Vin, A0-A5, SCL, SDA, AREF, D0-D13.
16x2 I2C LCD
- Description: A liquid crystal display with 16 characters by 2 lines, interfaced via I2C.
- Pins: GND, VCC, SDA, SCL.
RAIN SENSOR
- Description: A sensor that detects rainwater through analog and digital outputs.
- Pins: AO, DO, GRD, VCC.
Servo
- Description: An actuator that can be precisely controlled for angular rotation.
- Pins: GND, VCC, PWM.
Wiring Details
Arduino UNO
- 5V connected to RAIN SENSOR VCC and 16x2 I2C LCD VCC.
- GND connected to 16x2 I2C LCD GND, RAIN SENSOR GRD, and Servo GND.
- Vin connected to Servo VCC.
- A0 connected to RAIN SENSOR AO.
- A4 (SDA) connected to 16x2 I2C LCD SDA.
- A5 (SCL) connected to 16x2 I2C LCD SCL.
- D9 connected to Servo PWM.
16x2 I2C LCD
- GND connected to Arduino UNO GND.
- VCC connected to Arduino UNO 5V.
- SDA connected to Arduino UNO A4 (SDA).
- SCL connected to Arduino UNO A5 (SCL).
RAIN SENSOR
- AO connected to Arduino UNO A0.
- DO (Not connected in this circuit).
- GRD connected to Arduino UNO GND.
- VCC connected to Arduino UNO 5V.
Servo
- GND connected to Arduino UNO GND.
- VCC connected to Arduino UNO Vin.
- PWM connected to Arduino UNO D9.
Documented Code
Arduino UNO Code (sketch.ino)
void setup() {
  // put your setup code here, to run once:

}

void loop() {
  // put your main code here, to run repeatedly:

}
Additional Notes (documentation.txt)
No additional code documentation was provided for the Arduino UNO.