
Arduino Nano-Based Automated Petrol Pump with RFID and Keypad Security
View and Edit Project In Cirkit Designer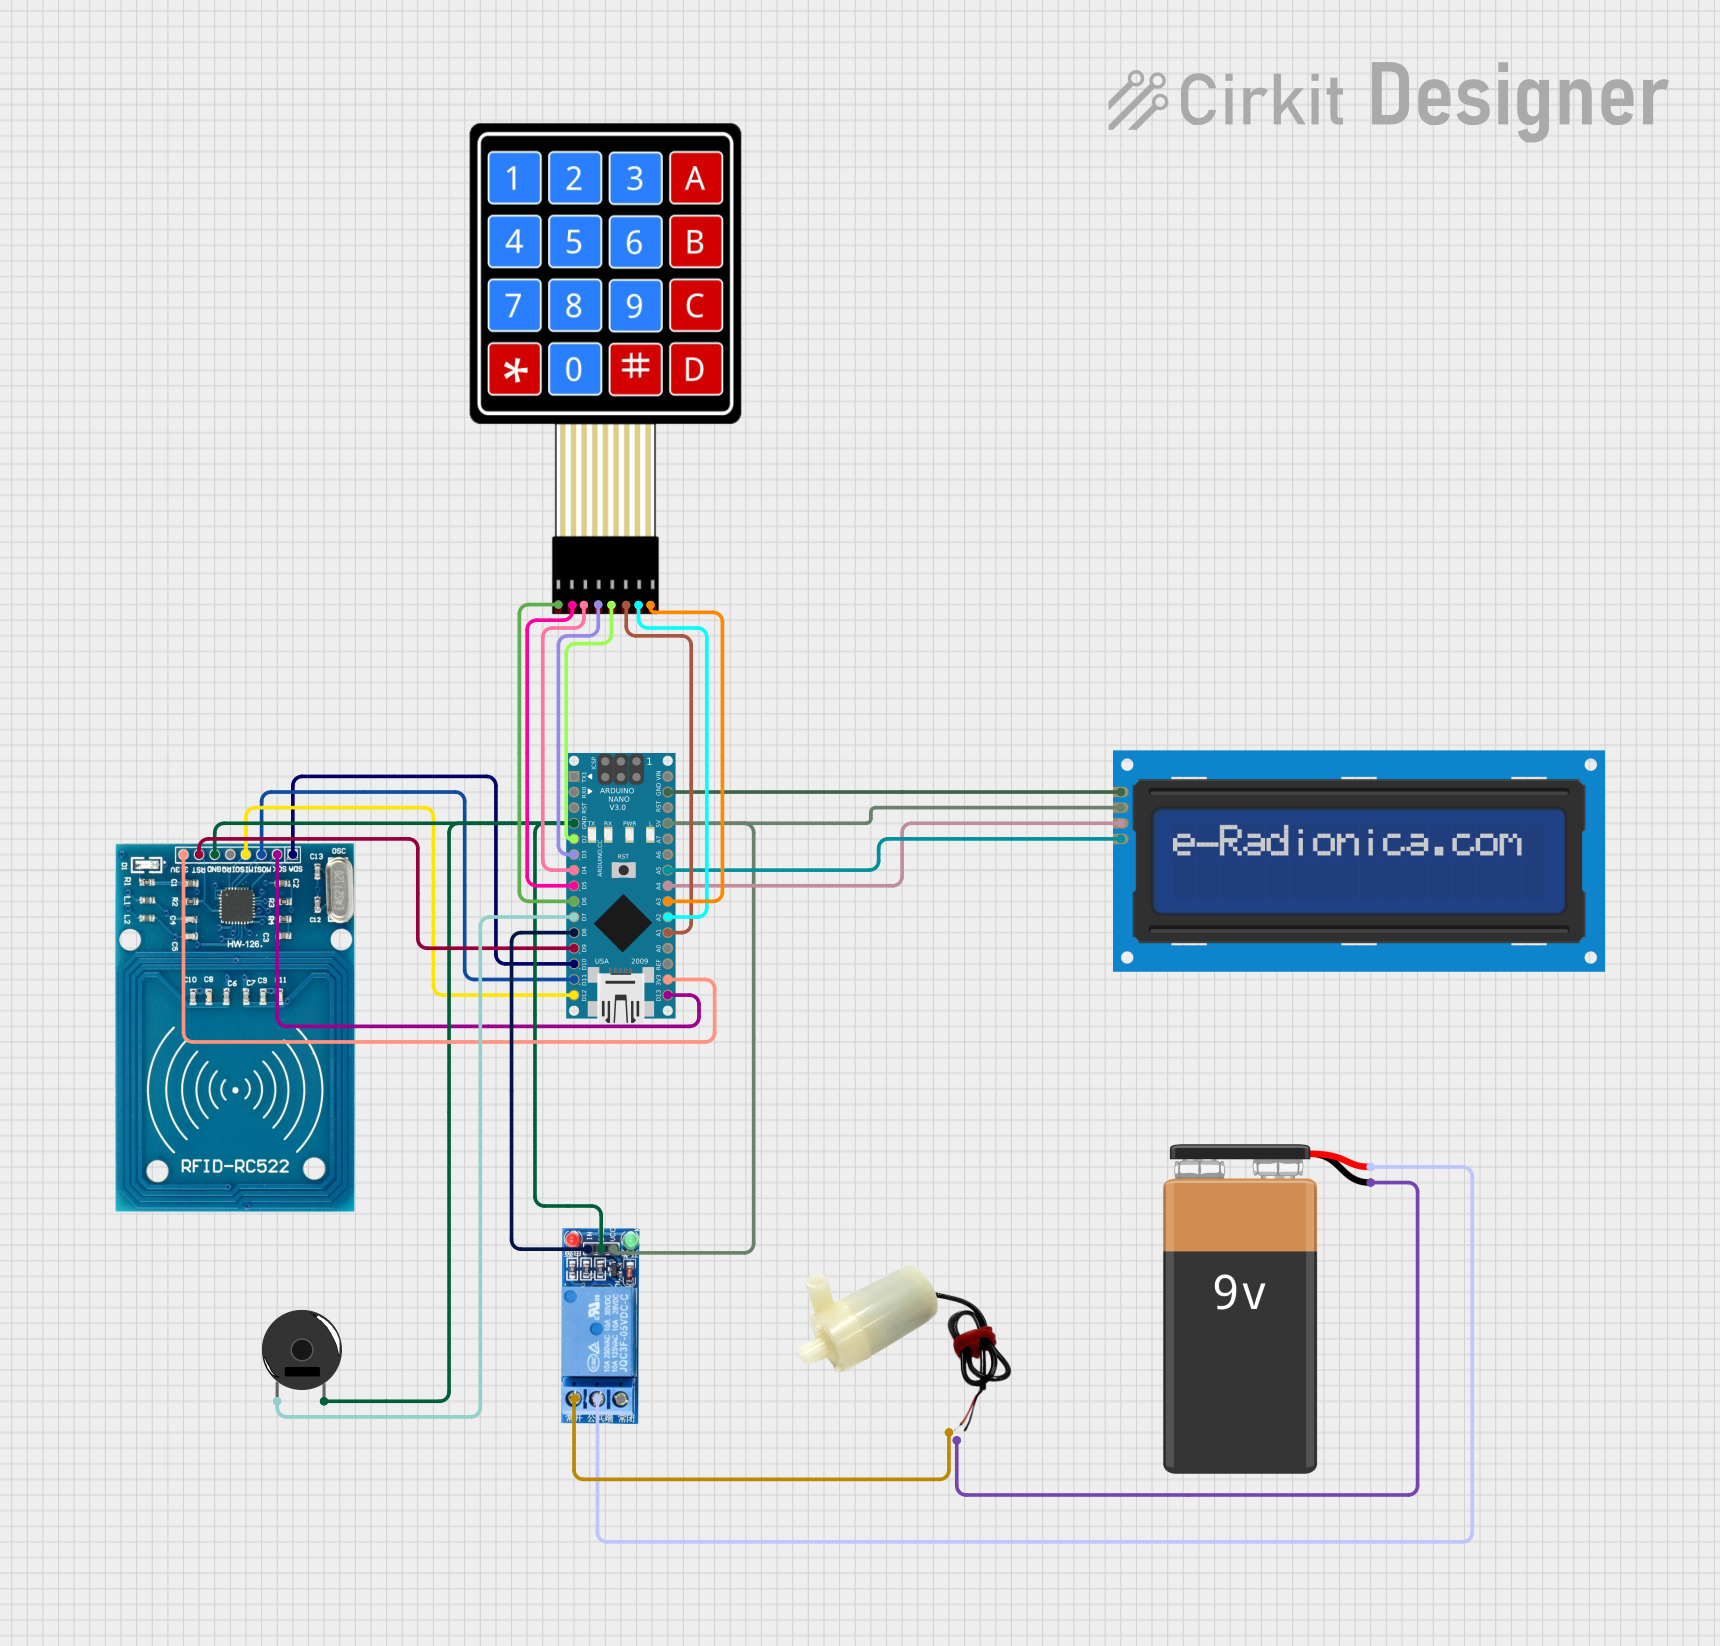
Circuit Documentation
Summary
This circuit is designed to automate a petrol pump system using an Arduino Nano microcontroller. The system includes an RFID reader for user authentication, a keypad for password and cost input, an LCD screen for user interface, a relay to control a water pump (simulating the petrol pump), and a buzzer for alerts. The system ensures secure transactions by verifying the user's RFID card and password before dispensing fuel.
Component List
Arduino Nano
- Description: A small, complete, and breadboard-friendly board based on the ATmega328P.
- Pins: D1/TX, D0/RX, RESET, GND, D2, D3, D4, D5, D6, D7, D8, D9, D10, D11/MOSI, D12/MISO, VIN, 5V, A7, A6, A5, A4, A3, A2, A1, A0, AREF, 3V3, D13/SCK
LCD screen 16x2 I2C
- Description: A 16x2 character LCD display with I2C interface.
- Pins: SCL, SDA, VCC, GND
5V Mini Water Pump
- Description: A small water pump operating at 5V.
- Pins: Positive pin, Negative pin
RFID-RC522
- Description: An RFID reader module operating at 3.3V.
- Pins: VCC (3.3V), RST, GND, IRQ, MISO, MOSI, SCK, SDA
Piezo Buzzer
- Description: A small piezoelectric buzzer for sound alerts.
- Pins: Pin 1, Pin 2
1 Channel Relay 5V
- Description: A relay module to control high voltage devices with a 5V signal.
- Pins: VCC, GND, IN, NC, COM, NO
4X4 Membrane Matrix Keypad
- Description: A 4x4 matrix keypad for user input.
- Pins: R1, R2, R3, R4, C1, C2, C3, C4
9V Battery
- Description: A standard 9V battery for power supply.
- Pins: Positive (+), Negative (-)
Wiring Details
Arduino Nano
- D6: Connected to R1 of the 4X4 Membrane Matrix Keypad
- D5: Connected to R2 of the 4X4 Membrane Matrix Keypad
- D4: Connected to R3 of the 4X4 Membrane Matrix Keypad
- D3: Connected to R4 of the 4X4 Membrane Matrix Keypad
- D2: Connected to C1 of the 4X4 Membrane Matrix Keypad
- A1: Connected to C2 of the 4X4 Membrane Matrix Keypad
- A2: Connected to C3 of the 4X4 Membrane Matrix Keypad
- A3: Connected to C4 of the 4X4 Membrane Matrix Keypad
- A5: Connected to SCL of the LCD screen 16x2 I2C
- A4: Connected to SDA of the LCD screen 16x2 I2C
- 5V: Connected to VCC of the LCD screen 16x2 I2C and VCC of the 1 Channel Relay 5V
- GND: Connected to GND of the LCD screen 16x2 I2C, GND of the 1 Channel Relay 5V, GND of the RFID-RC522, and Pin 2 of the Piezo Buzzer
- 3V3: Connected to VCC (3.3V) of the RFID-RC522
- D9: Connected to RST of the RFID-RC522
- D12/MISO: Connected to MISO of the RFID-RC522
- D11/MOSI: Connected to MOSI of the RFID-RC522
- D13/SCK: Connected to SCK of the RFID-RC522
- D10: Connected to SDA of the RFID-RC522
- D8: Connected to IN of the 1 Channel Relay 5V
- D7: Connected to Pin 1 of the Piezo Buzzer
LCD screen 16x2 I2C
- SCL: Connected to A5 of the Arduino Nano
- SDA: Connected to A4 of the Arduino Nano
- VCC: Connected to 5V of the Arduino Nano
- GND: Connected to GND of the Arduino Nano
5V Mini Water Pump
- Positive pin: Connected to NC of the 1 Channel Relay 5V
- Negative pin: Connected to Negative (-) of the 9V Battery
RFID-RC522
- VCC (3.3V): Connected to 3V3 of the Arduino Nano
- RST: Connected to D9 of the Arduino Nano
- GND: Connected to GND of the Arduino Nano
- MISO: Connected to D12/MISO of the Arduino Nano
- MOSI: Connected to D11/MOSI of the Arduino Nano
- SCK: Connected to D13/SCK of the Arduino Nano
- SDA: Connected to D10 of the Arduino Nano
Piezo Buzzer
- Pin 1: Connected to D7 of the Arduino Nano
- Pin 2: Connected to GND of the Arduino Nano
1 Channel Relay 5V
- VCC: Connected to 5V of the Arduino Nano
- GND: Connected to GND of the Arduino Nano
- IN: Connected to D8 of the Arduino Nano
- NC: Connected to Positive pin of the 5V Mini Water Pump
- COM: Connected to Positive (+) of the 9V Battery
4X4 Membrane Matrix Keypad
- R1: Connected to D6 of the Arduino Nano
- R2: Connected to D5 of the Arduino Nano
- R3: Connected to D4 of the Arduino Nano
- R4: Connected to D3 of the Arduino Nano
- C1: Connected to D2 of the Arduino Nano
- C2: Connected to A1 of the Arduino Nano
- C3: Connected to A2 of the Arduino Nano
- C4: Connected to A3 of the Arduino Nano
9V Battery
- Positive (+): Connected to COM of the 1 Channel Relay 5V
- Negative (-): Connected to Negative pin of the 5V Mini Water Pump
Code Documentation
#include <SPI.h>
#include <MFRC522.h>
#include <Wire.h>
#include <LiquidCrystal_I2C.h>
#include <Keypad.h>

// Pin configuration for Arduino Nano
#define RST_PIN 9    // Reset pin for MFRC522
#define SS_PIN 10    // Slave select pin for MFRC522
#define RELAY_PIN 8  // Relay to control pump
#define BUZZER_PIN 7 // Buzzer for alerts

MFRC522 mfrc522(SS_PIN, RST_PIN); // Create MFRC522 instance
LiquidCrystal_I2C lcd(0x27, 16, 2); // Create I2C LCD instance (I2C address: 0x27)

// Keypad configuration
const byte ROWS = 4; // Rows of the keypad
const byte COLS = 4; // Columns of the keypad
char keys[ROWS][COLS] = {
    {'1', '2', '3', 'A'},
    {'4', '5', '6', 'B'},
    {'7', '8', '9', 'C'},
    {'*', '0', '#', 'D'}
};
byte rowPins[ROWS] = {6, 5, 4, 3}; // Connect to row pins of the keypad
byte colPins[COLS] = {2, A1, A2, A3}; // Connect to column pins of the keypad
Keypad keypad = Keypad(makeKeymap(keys), rowPins, colPins, ROWS, COLS);

// User data (Simulated RFID card data, password, and balance)
String validRFID = "d3:1e:34:27";
String validPassword = "