
Arduino UNO Fingerprint-Activated Solenoid with LDR-Controlled LED System
View and Edit Project In Cirkit Designer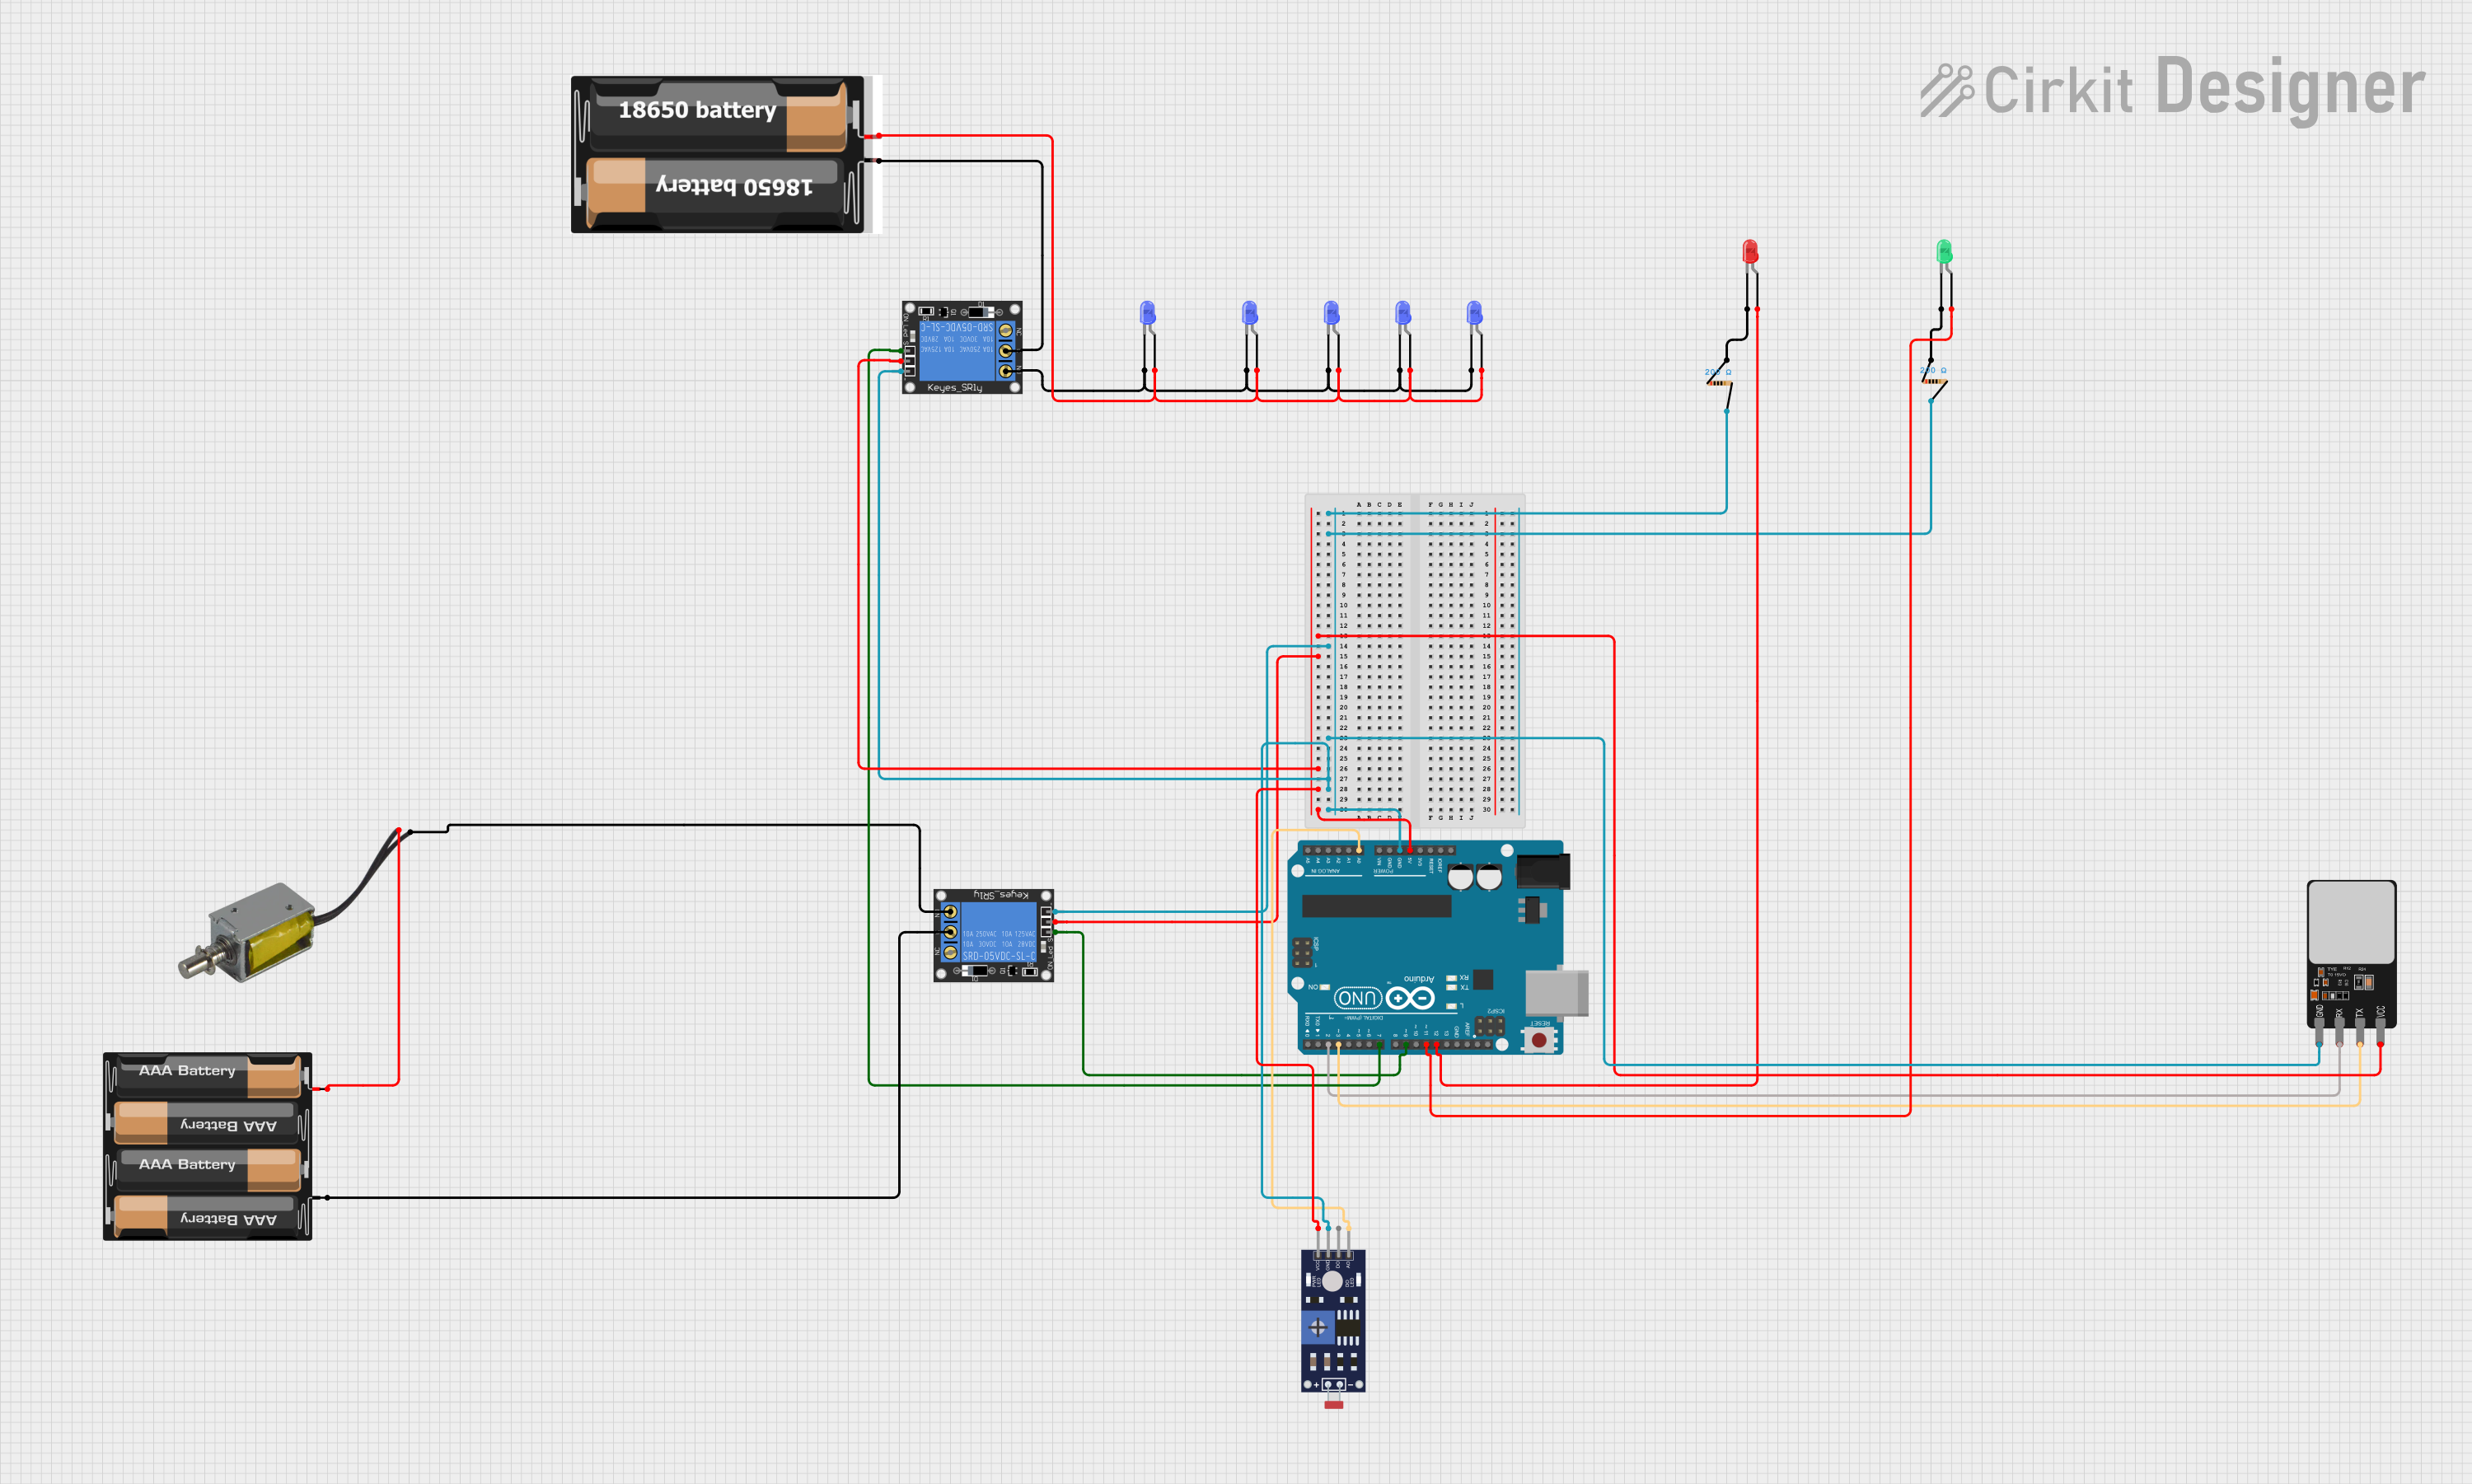
Circuit Documentation
Summary
This circuit is designed to control a push-pull solenoid and multiple LEDs using an Arduino UNO. The circuit includes a fingerprint scanner for authentication, a photoresistor (LDR) sensor for light detection, and relays to control the solenoid and LEDs. The Arduino UNO is programmed to read inputs from the fingerprint scanner and LDR sensor and control the outputs accordingly.
Component List
1-Channel Relay (5V 10A)
- Pins: NC, signal, C, power, NO, ground
- Description: Used to control high-power devices like the solenoid and LEDs.
Push Pull Solenoid
- Pins: +ve, -ve
- Description: An electromechanical device used to push or pull when activated.
Resistor (200 Ohms)
- Pins: pin1, pin2
- Description: Used to limit current to the LEDs.
4 x AAA Battery Mount
- Pins: -, +
- Description: Provides power to the solenoid.
LED: Two Pin (blue)
- Pins: cathode, anode
- Description: Blue LEDs used for visual indication.
Fingerprint Scanner
- Pins: VCC, TX, RX, GND
- Description: Used for fingerprint authentication.
LED: Two Pin (red)
- Pins: cathode, anode
- Description: Red LED used for visual indication.
LED: Two Pin (green)
- Pins: cathode, anode
- Description: Green LED used for visual indication.
2x 18650 Battery
- Pins: vcc, gnd
- Description: Provides power to the blue LEDs.
Photoresistor (LDR) Sensor (Wokwi Compatible)
- Pins: VCC, GND, DO, AO
- Description: Used to detect ambient light levels.
Arduino UNO
- Pins: UNUSED, IOREF, Reset, 3.3V, 5V, GND, Vin, A0, A1, A2, A3, A4, A5, SCL, SDA, AREF, D13, D12, D11, D10, D9, D8, D7, D6, D5, D4, D3, D2, D1, D0
- Description: Microcontroller used to control the circuit.
Wiring Details
1-Channel Relay (5V 10A)
- Ground: Connected to the ground of the Arduino UNO.
- Power: Connected to the 5V of the Arduino UNO.
- Signal: Connected to D9 of the Arduino UNO.
- C: Connected to the negative terminal of the 4 x AAA Battery Mount.
- NO: Connected to the negative terminal of the Push Pull Solenoid.
Push Pull Solenoid
- +ve: Connected to the positive terminal of the 4 x AAA Battery Mount.
- -ve: Connected to the NO pin of the 1-Channel Relay.
Resistor (200 Ohms)
- Pin1: Connected to the cathode of the red LED.
- Pin2: Connected to the ground of the Arduino UNO.
4 x AAA Battery Mount
- -: Connected to the C pin of the 1-Channel Relay.
- +: Connected to the +ve pin of the Push Pull Solenoid.
LED: Two Pin (blue)
- Cathode: Connected to the NO pin of the second 1-Channel Relay.
- Anode: Connected to the vcc of the 2x 18650 Battery.
Fingerprint Scanner
- VCC: Connected to the 5V of the Arduino UNO.
- TX: Connected to D3 of the Arduino UNO.
- RX: Connected to D2 of the Arduino UNO.
- GND: Connected to the ground of the Arduino UNO.
LED: Two Pin (red)
- Anode: Connected to D12 of the Arduino UNO.
- Cathode: Connected to pin1 of the 200 Ohms Resistor.
LED: Two Pin (green)
- Anode: Connected to D11 of the Arduino UNO.
- Cathode: Connected to pin1 of the second 200 Ohms Resistor.
2x 18650 Battery
- vcc: Connected to the anode of the blue LEDs.
- gnd: Connected to the C pin of the second 1-Channel Relay.
Photoresistor (LDR) Sensor (Wokwi Compatible)
- VCC: Connected to the 5V of the Arduino UNO.
- GND: Connected to the ground of the Arduino UNO.
- AO: Connected to A0 of the Arduino UNO.
Arduino UNO
- GND: Connected to the ground of the circuit.
- 5V: Connected to the power of the circuit.
- A0: Connected to the AO pin of the Photoresistor (LDR) Sensor.
- D2: Connected to the RX pin of the Fingerprint Scanner.
- D3: Connected to the TX pin of the Fingerprint Scanner.
- D9: Connected to the signal pin of the first 1-Channel Relay.
- D11: Connected to the anode of the green LED.
- D12: Connected to the anode of the red LED.
Code Documentation
#include <Adafruit_Fingerprint.h>

#if (defined(__AVR__) || defined(ESP8266)) && !defined(__AVR_ATmega2560__)
// Voor UNO en anderen zonder hardware serial, gebruik software serial...
// pin #2 is IN van sensor (GROENE draad)
// pin #3 is OUT van arduino  (WITTE draad)
SoftwareSerial mySerial(2, 3);

int GreenLed = 11;
int RedLed = 12;
int RelayPin = 9;  // Pin verbonden met relay voor solenoid
int RelayPin2 = 7; // Tweede relais voor witte LED's (via externe voeding)

#else
// Voor Leonardo/M0/etc, gebruik hardware serial!
#define mySerial Serial1

#endif

Adafruit_Fingerprint finger = Adafruit_Fingerprint(&mySerial);

// Pinnen toewijzen voor LDR en LED
int ldrPin = A0;  // LDR is verbonden met analoge pin A0
int threshold = 800; // Drempelwaarde voor de LDR

void setup()
{
  pinMode(GreenLed, OUTPUT);
  digitalWrite(GreenLed, HIGH);  // Zet groene LED aan bij start
  pinMode(RedLed, OUTPUT);
  digitalWrite(RedLed, LOW);     // Zet rode LED uit bij start

  pinMode(RelayPin, OUTPUT);     // Stel relay voor solenoid in als output
  digitalWrite(RelayPin, LOW);   // Zorg dat relay voor solenoid inactief begint

  pinMode(RelayPin2, OUTPUT);    // Stel tweede relay in als output voor witte LED's
  digitalWrite(RelayPin2, LOW);  // Zorg dat tweede relay inactief begint

  Serial.begin(9600);
  while (!Serial);  // Voor Yun/Leo/Micro/Zero/...
  delay(100);
  Serial.println("\n\nAdafruit finger detect test");

  // Stel de data rate voor de sensor in
  finger.begin(57600);
  delay(5);
  if (finger.verifyPassword()) {
    Serial.println("Found fingerprint sensor!");
  } else {
    Serial.println("Did not find fingerprint sensor :(");
    while (1) { delay(1); }
  }

  Serial.println(F("Reading sensor parameters"));
  finger.getParameters();
  Serial.print(F("Status: 0x")); Serial.println(finger.status_reg, HEX);
  Serial.print(F("Sys ID: 0x")); Serial.println(finger.system_id, HEX);
  Serial.print(F("Capacity: ")); Serial.println(finger.capacity);
  Serial.print(F("Security level: ")); Serial.println(finger.security_level);
  Serial.print(F("Device address: ")); Serial.println(finger.device_addr, HEX);
  Serial.print(F("Packet len: ")); Serial.println(finger.packet_len);
  Serial.print(F("Baud rate: ")); Serial.println(finger.baud_rate);

  finger.getTemplateCount();

  if (finger.templateCount == 0) {
    Serial.print("Sensor doesn't contain any fingerprint data. Please run the 'enroll' example.");
  }
  else {
    Serial.println("Waiting for valid finger...");
    Serial.print("Sensor contains "); Serial.print(finger.templateCount); Serial.println(" templates");
  }
}


void loop()
{
  // LDR lezen en tweede relais voor witte LED's aansturen
  int ldrValue = analogRead(ldrPin);
  Serial.println(ldrValue);  // Optioneel: print LDR waarde naar seriële monitor

  if (ldrValue < threshold) {
    // Als het donkerder wordt dan de drempelwaarde, schakel het tweede relais in
    digitalWrite(RelayPin2, HIGH);