
Circuit Documentation
Summary
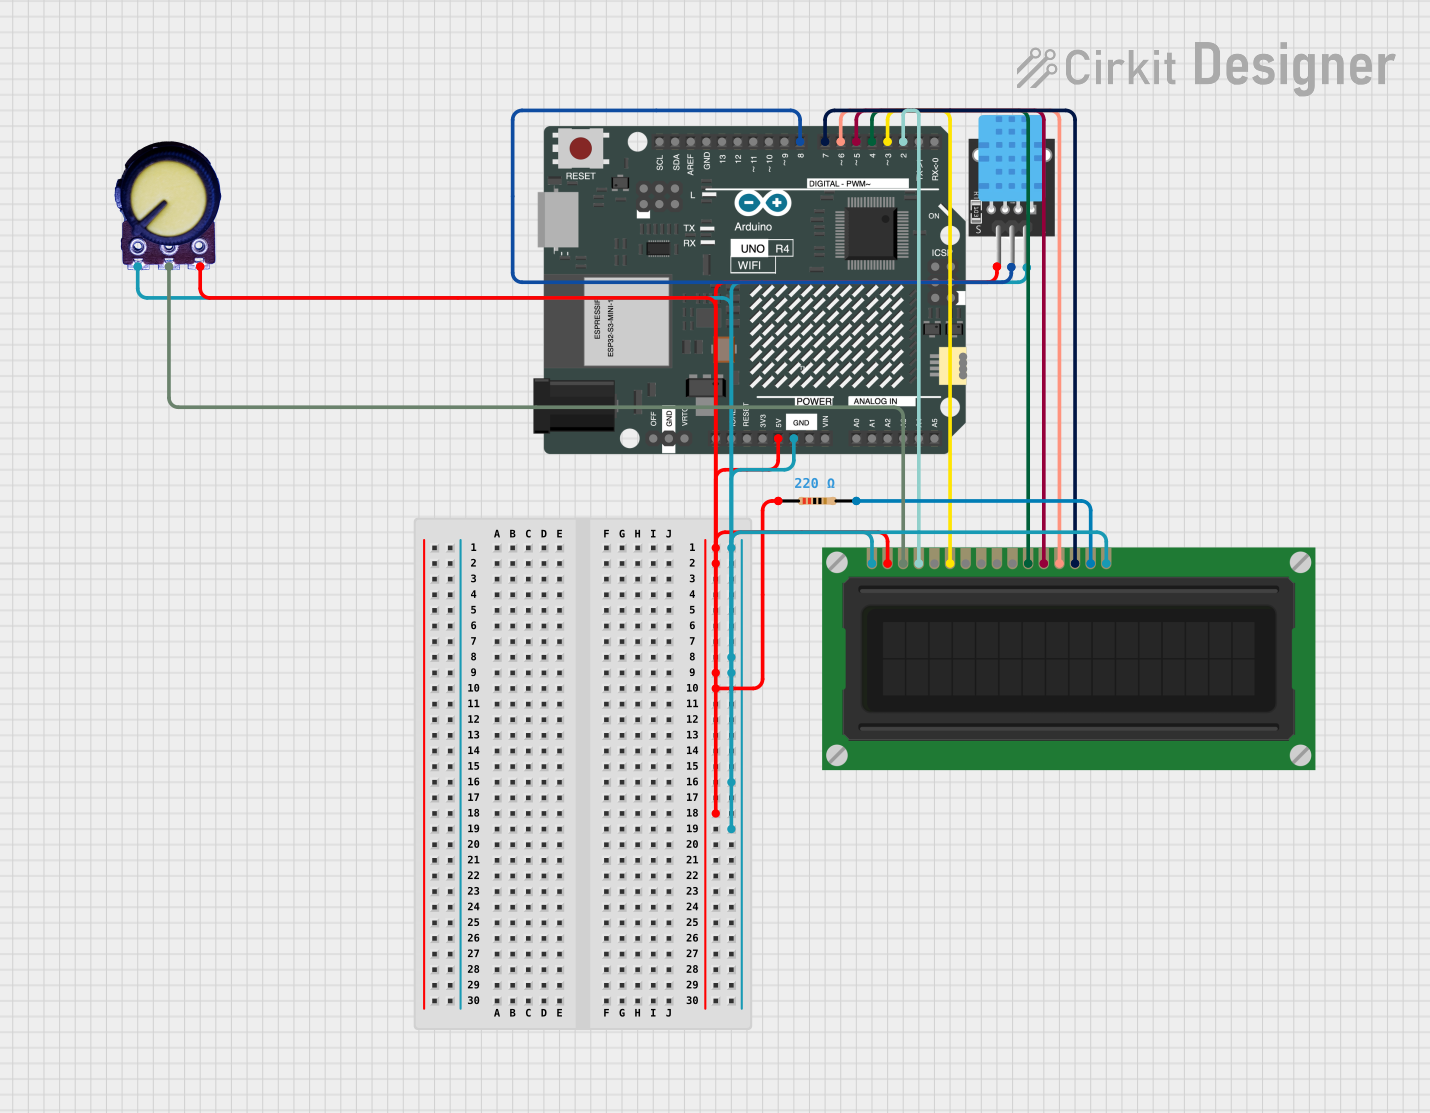
The circuit in question is designed to interface an Arduino UNO R4 WiFi with an LCD display and a DHT11 temperature and humidity sensor. The LCD display is used to show the temperature and humidity readings obtained from the DHT11 sensor. A potentiometer is included to adjust the contrast of the LCD, and a resistor is used to limit the current to the backlight of the LCD.
Component List
Arduino UNO R4 WiFi
- Description: A microcontroller board based on the ATmega328P with integrated WiFi capabilities.
- Purpose: Acts as the central processing unit of the circuit, reads sensor data, and controls the LCD display.
LCD Display (16 pin)
- Description: A 16x2 character LCD display that provides a simple interface for displaying text.
- Purpose: Displays the temperature and humidity readings from the DHT11 sensor.
DHT11
- Description: A basic, ultra low-cost digital temperature and humidity sensor.
- Purpose: Measures the ambient temperature and humidity.
Resistor
- Description: A passive two-terminal electrical component that implements electrical resistance as a circuit element.
- Purpose: Limits the current flowing to the LCD backlight.
- Value: 220 Ohms
Potentiometer
- Description: A three-terminal resistor with a continuously adjustable tapping point controlled by rotation of a shaft or knob.
- Purpose: Adjusts the contrast of the LCD display.
Wiring Details
Arduino UNO R4 WiFi
- 5V to DHT11 (5V), LCD Display (VDD), Resistor (pin1), Potentiometer (VCC)
- GND to DHT11 (GND), LCD Display (VSS, K), Potentiometer (GND)
- D2 to LCD Display (RS)
- D3 to LCD Display (E)
- D4 to LCD Display (DB4)
- D5 to LCD Display (DB5)
- D6 to LCD Display (DB6)
- D7 to LCD Display (DB7)
- D8 to DHT11 (S)
LCD Display (16 pin)
- VSS to Arduino UNO R4 WiFi (GND)
- VDD to Arduino UNO R4 WiFi (5V)
- VO to Potentiometer (Output)
- RS to Arduino UNO R4 WiFi (D2)
- R_W to GND (typically grounded in write-only mode)
- E to Arduino UNO R4 WiFi (D3)
- DB4 to Arduino UNO R4 WiFi (D4)
- DB5 to Arduino UNO R4 WiFi (D5)
- DB6 to Arduino UNO R4 WiFi (D6)
- DB7 to Arduino UNO R4 WiFi (D7)
- A to Resistor (pin2)
- K to Arduino UNO R4 WiFi (GND)
DHT11
- 5V to Arduino UNO R4 WiFi (5V)
- S to Arduino UNO R4 WiFi (D8)
- GND to Arduino UNO R4 WiFi (GND)
Resistor
- pin1 to Arduino UNO R4 WiFi (5V)
- pin2 to LCD Display (A)
Potentiometer
- VCC to Arduino UNO R4 WiFi (5V)
- Output to LCD Display (VO)
- GND to Arduino UNO R4 WiFi (GND)
Documented Code
#include <LiquidCrystal.h>
#include <DHT.h>

// Initialize the LCD library with the numbers of the interface pins
LiquidCrystal lcd(2, 3, 4, 5, 6, 7);

// Define DHT11 sensor pin and type
#define DHTPIN 8
#define DHTTYPE DHT11

DHT dht(DHTPIN, DHTTYPE);

void setup() {
  // Set up the LCD's number of columns and rows
  lcd.begin(16, 2);
  // Initialize the DHT sensor
  dht.begin();
}

void loop() {
  // Read temperature and humidity
  float h = dht.readHumidity();
  float t = dht.readTemperature();

  // Check if any reads failed and exit early (to try again)
  if (isnan(h) || isnan(t)) {
    lcd.setCursor(0, 0);
    lcd.print("Error reading");
    lcd.setCursor(0, 1);
    lcd.print("sensor data");
    return;
  }

  // Print temperature and humidity to the LCD
  lcd.clear();
  lcd.setCursor(0, 0);
  lcd.print("Temp: ");
  lcd.print(t);
  lcd.print(" C");
  lcd.setCursor(0, 1);
  lcd.print("Humidity: ");
  lcd.print(h);
  lcd.print(" %");

  // Wait a few seconds between measurements
  delay(2000);
}
This code initializes the LCD and DHT11 sensor, reads temperature and humidity from the DHT11, and displays the readings on the LCD. If the sensor fails to provide valid readings, an error message is displayed. The temperature is displayed in degrees Celsius, and the humidity is displayed as a percentage. Measurements are updated every 2 seconds.