
Arduino Mega 2560-Based Smart Home Automation System with LCD Display and Sensor Integration
View and Edit Project In Cirkit Designer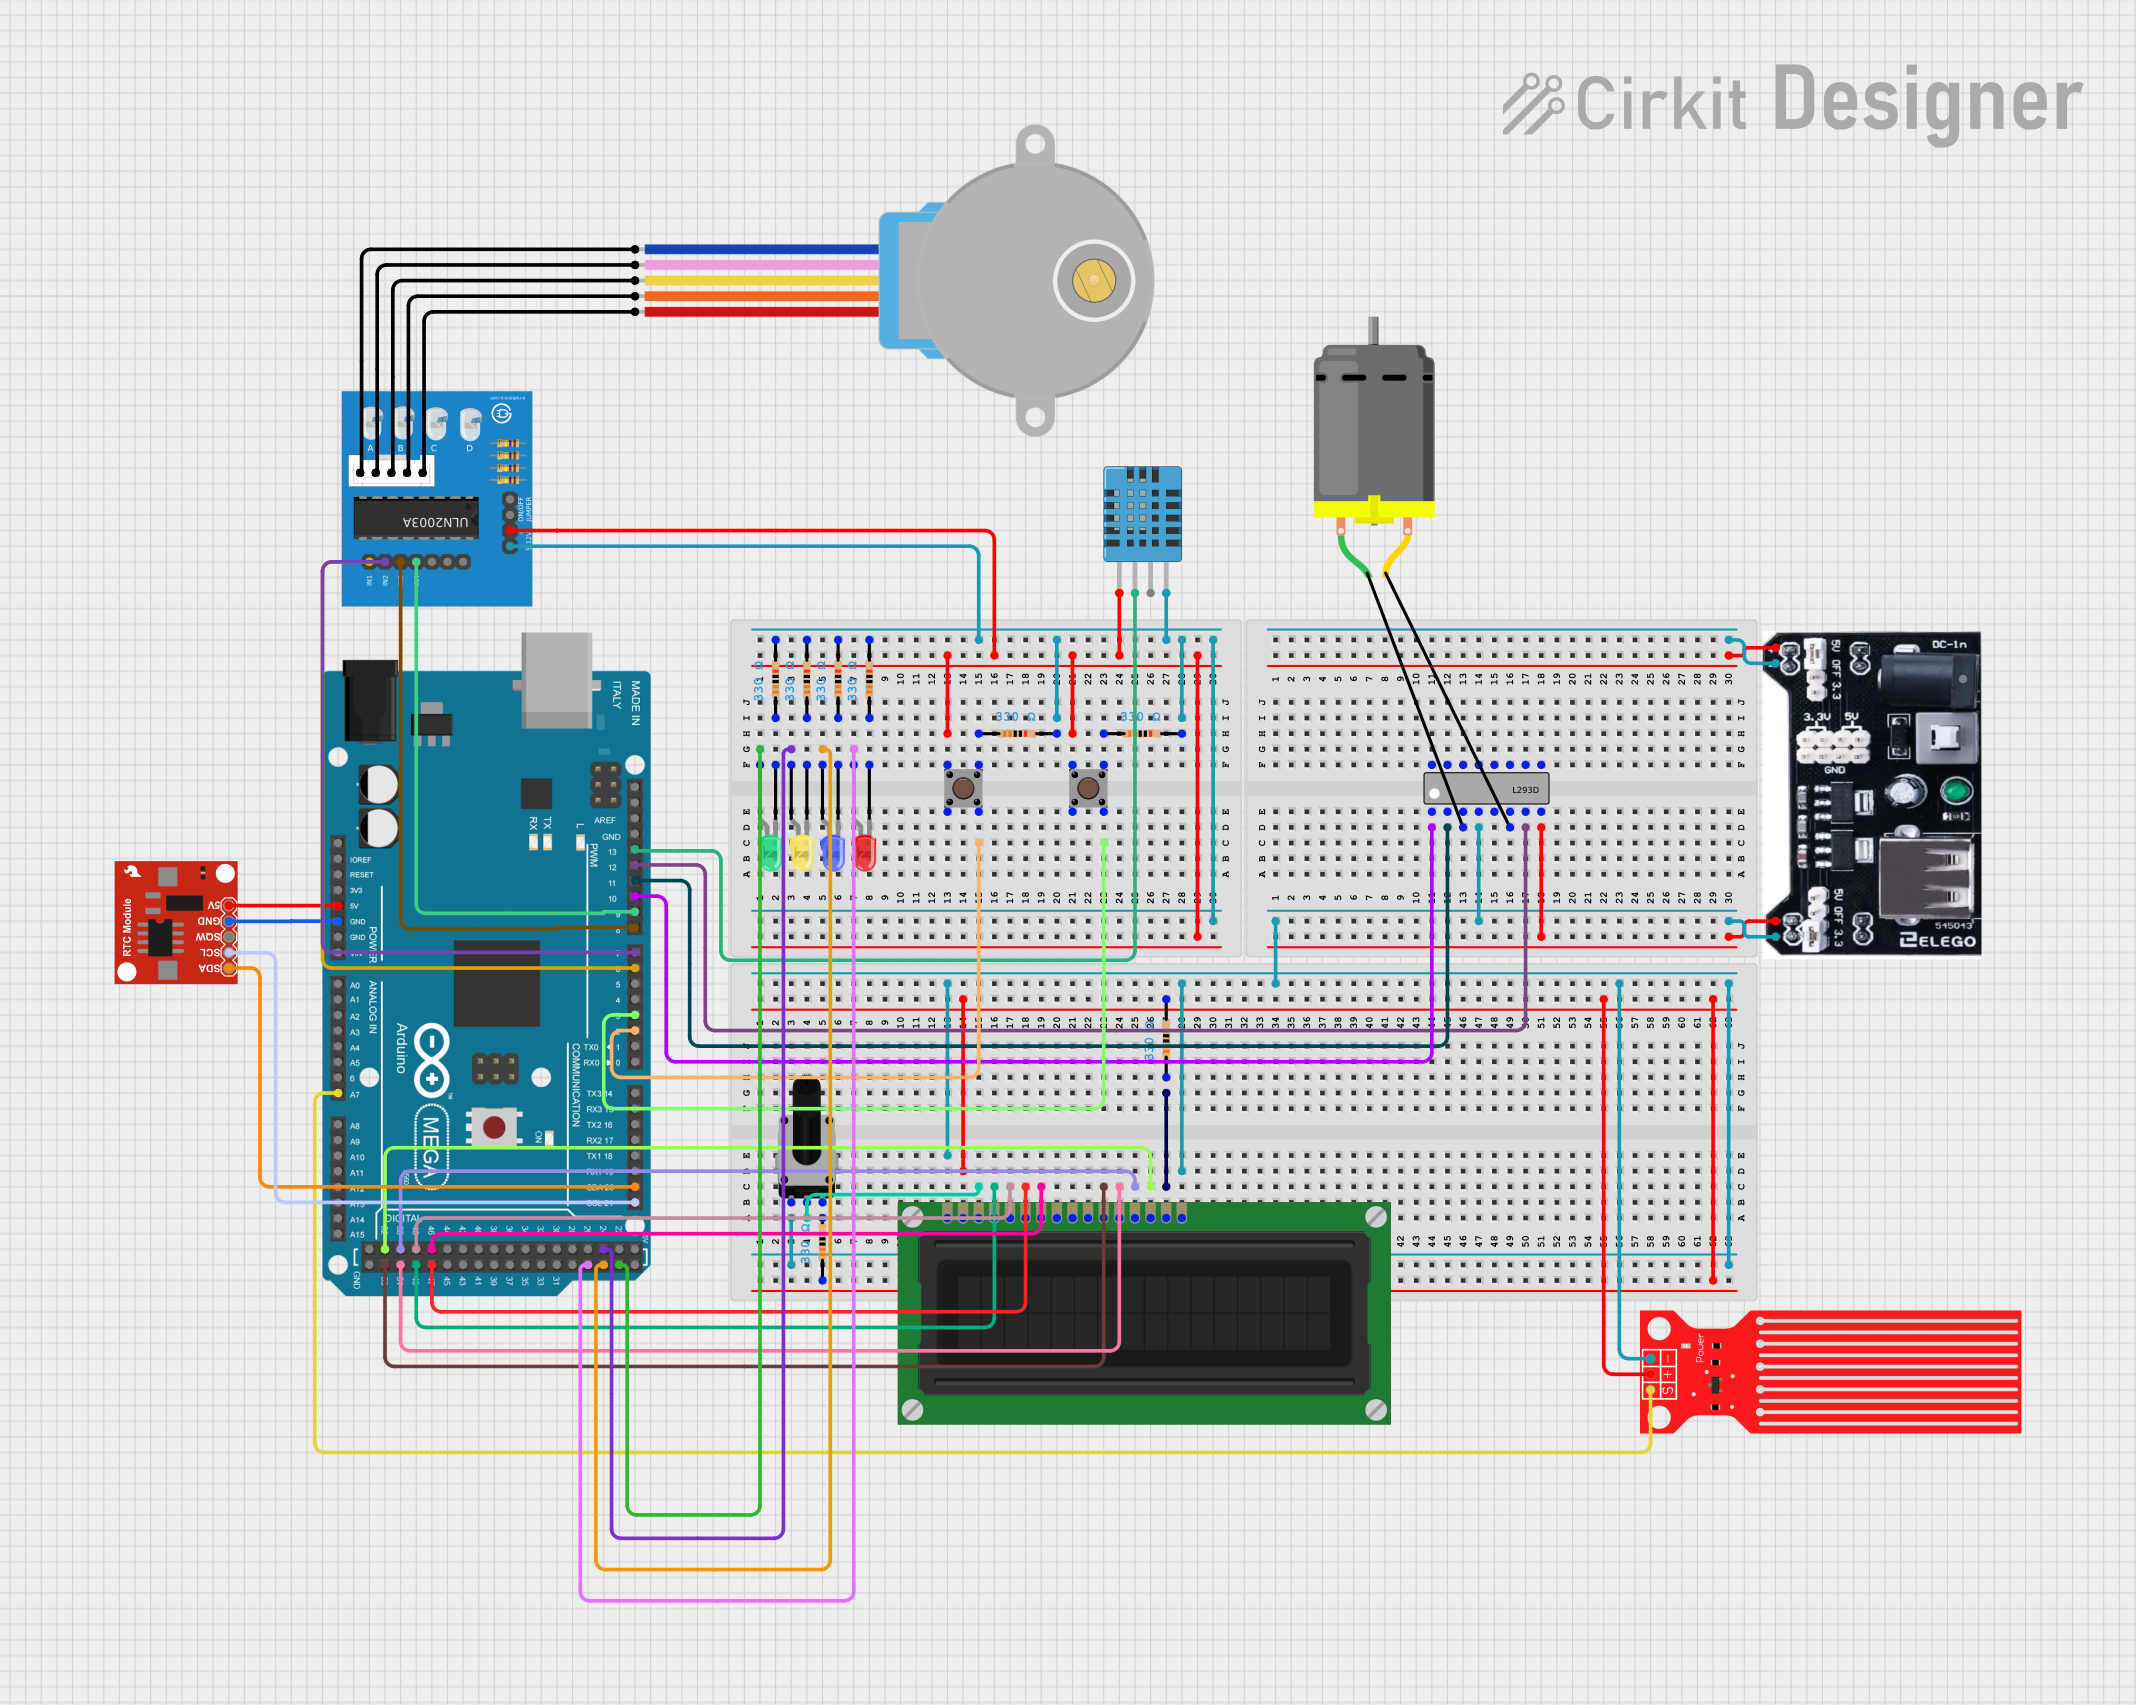
Circuit Documentation
Summary
This circuit involves an Arduino Mega 2560 microcontroller interfacing with various components including LEDs, pushbuttons, a rotary potentiometer, an LCD display, a DC motor, a stepper motor, a water level sensor, a DHT11 humidity and temperature sensor, a real-time clock module, and a motor driver. The circuit is designed to demonstrate basic input/output operations, motor control, and sensor data acquisition.
Component List
Arduino Mega 2560
- Description: A microcontroller board based on the ATmega2560.
- Pins: IOREF, RESET, 3V3, 5V, GND, VIN, A0-A15, D0-D53, AREF, SDA, SCL
Pushbutton
- Description: A simple pushbutton switch.
- Pins: Pin 1 (in), Pin 2 (in), Pin 3 (out), Pin 4 (out)
Resistor
- Description: A 330 Ohm resistor.
- Pins: pin1, pin2
- Properties: Resistance: 330 Ohms
LED: Two Pin (red)
- Description: A red LED.
- Pins: cathode, anode
LED: Two Pin (yellow)
- Description: A yellow LED.
- Pins: cathode, anode
LED: Two Pin (blue)
- Description: A blue LED.
- Pins: cathode, anode
LED: Two Pin (green)
- Description: A green LED.
- Pins: cathode, anode
L293D
- Description: A motor driver IC.
- Pins: Enable 1,2, Input 1, Output 1, GND, Output 2, Input 2, VCC2, VCC1, Input 4, Output 4, Output 3, Input 3, Enable 3,4
DC Motor
- Description: A simple DC motor.
- Pins: pin 1, pin 2
Power mb V2
- Description: A power module.
- Pins: -, +, DC-ln
ULN2003A breakout board
- Description: A Darlington transistor array.
- Pins: In 1, In 2, In 3, In 4, In 5, In 6, In 7, 0V, +5V, ON/OFF jumper switch, BLUE wire, PINK wire, YELLOW wire, ORANGE wire, RED wire
28BYJ-48 Stepper Motor
- Description: A stepper motor.
- Pins: BLUE, PINK, YELLOW, ORANGE, RED
Water Level Sensor
- Description: A sensor to measure water level.
- Pins: SIG, VCC, GND
DHT11 Humidity and Temperature Sensor
- Description: A sensor to measure humidity and temperature.
- Pins: VDD, DATA, NULL, GND
Real Time Clock Module - DS1307 RTC Breakout Board
- Description: A real-time clock module.
- Pins: 5V, GND, SQW, SCL, SDA
LCD Display (16 pin)
- Description: A 16-pin LCD display.
- Pins: VSS, VDD, VO, RS, R_W, E, DB0-DB7, A, K
Rotary Potentiometer
- Description: A 10k Ohm rotary potentiometer.
- Pins: leg1, wiper, leg2
- Properties: Resistance: 10k Ohms
Wiring Details
Arduino Mega 2560
- 5V: Connected to the 5V pin of the Real Time Clock Module.
- GND: Connected to the GND pin of the Real Time Clock Module.
- D2 PWM: Connected to Pin 4 (out) of the first pushbutton.
- D3 PWM: Connected to Pin 4 (out) of the second pushbutton.
- D6 PWM: Connected to In 1 of the ULN2003A breakout board.
- D7 PWM: Connected to In 2 of the ULN2003A breakout board.
- D8 PWM: Connected to In 3 of the ULN2003A breakout board.
- D9 PWM: Connected to In 4 of the ULN2003A breakout board.
- D10 PWM: Connected to Enable 1,2 of the L293D.
- D11 PWM: Connected to Input 1 of the L293D.
- D12 PWM: Connected to Input 2 of the L293D.
- D13 PWM: Connected to DATA pin of the DHT11 Humidity and Temperature Sensor.
- D20/SDA: Connected to SDA pin of the Real Time Clock Module.
- D21/SCL: Connected to SCL pin of the Real Time Clock Module.
- D23: Connected to the anode of the green LED.
- D24: Connected to the anode of the yellow LED.
- D25: Connected to the anode of the blue LED.
- D27: Connected to the anode of the red LED.
- D46: Connected to DB0 pin of the LCD Display.
- D47: Connected to E pin of the LCD Display.
- D48: Connected to R_W pin of the LCD Display.
- D49: Connected to RS pin of the LCD Display.
- D50: Connected to DB6 pin of the LCD Display.
- D51: Connected to DB5 pin of the LCD Display.
- D52: Connected to DB7 pin of the LCD Display.
- D53: Connected to DB4 pin of the LCD Display.
- A7: Connected to SIG pin of the Water Level Sensor.
Pushbutton
- Pin 1 (in): Connected to Pin 1 (in) of the other pushbutton, +5V pin of the ULN2003A breakout board, and VDD pin of the DHT11 Humidity and Temperature Sensor.
- Pin 4 (out): Connected to D2 PWM pin of the Arduino Mega 2560.
- Pin 4 (out): Connected to D3 PWM pin of the Arduino Mega 2560.
Resistor
- pin1: Connected to Pin 3 (out) of the first pushbutton.
- pin1: Connected to Pin 3 (out) of the second pushbutton.
- pin1: Connected to the cathode of the red LED.
- pin1: Connected to the cathode of the blue LED.
- pin1: Connected to the cathode of the yellow LED.
- pin1: Connected to the cathode of the green LED.
- pin2: Connected to VDD pin of the LCD Display.
- pin2: Connected to VCC pin of the Water Level Sensor.
- pin2: Connected to leg2 of the Rotary Potentiometer.
LED: Two Pin (red)
- anode: Connected to D27 pin of the Arduino Mega 2560.
- cathode: Connected to pin1 of a resistor.
LED: Two Pin (yellow)
- anode: Connected to D24 pin of the Arduino Mega 2560.
- cathode: Connected to pin1 of a resistor.
LED: Two Pin (blue)
- anode: Connected to D25 pin of the Arduino Mega 2560.
- cathode: Connected to pin1 of a resistor.
LED: Two Pin (green)
- anode: Connected to D23 pin of the Arduino Mega 2560.
- cathode: Connected to pin1 of a resistor.
L293D
- Enable 1,2: Connected to D10 PWM pin of the Arduino Mega 2560.
- Input 1: Connected to D11 PWM pin of the Arduino Mega 2560.
- Input 2: Connected to D12 PWM pin of the Arduino Mega 2560.
- Output 1: Connected to pin 1 of the DC Motor.
- Output 2: Connected to pin 2 of the DC Motor.
- GND: Connected to GND pin of the Power mb V2.
- VCC2: Connected to + pin of the Power mb V2.
DC Motor
- pin 1: Connected to Output 1 of the L293D.
- pin 2: Connected to Output 2 of the L293D.
Power mb V2
- -: Connected to GND pin of the L293D.
- +: Connected to VCC2 pin of the L293D.
ULN2003A breakout board
- In 1: Connected to D6 PWM pin of the Arduino Mega 2560