Arduino Bluetooth-Controlled Car with L298N Motor Driver and Four Motors
Circuit Documentation
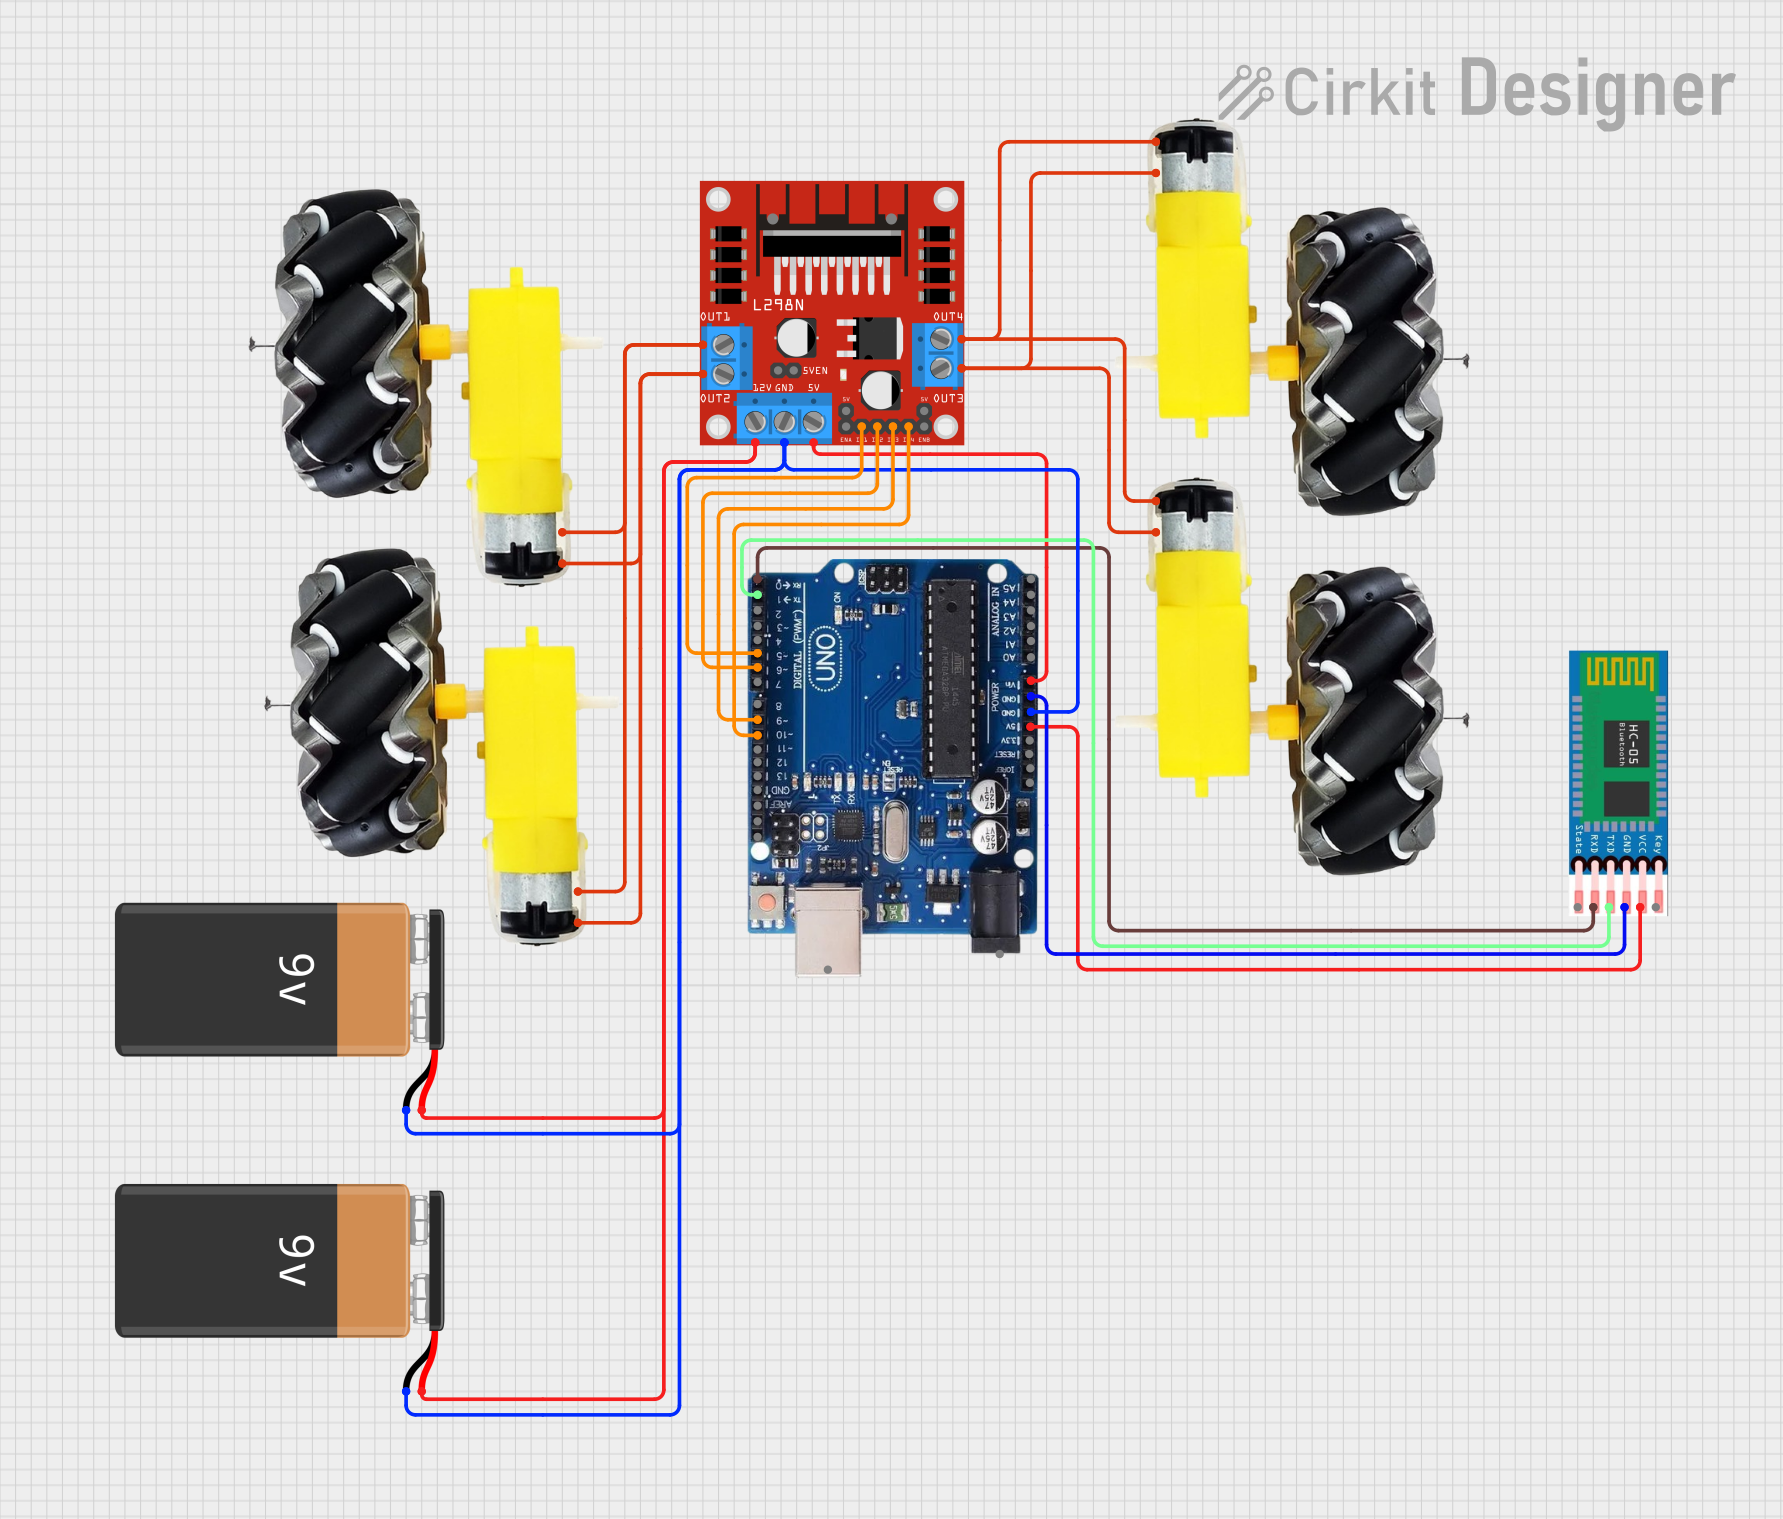
Summary
This document provides a detailed overview of a Bluetooth-controlled car circuit using an Arduino Uno R3, an L298N motor driver, four motors with wheels, an HC-05 Bluetooth module, and two 9V batteries. The car can move forward, backward, turn left, turn right, and stop based on commands received via Bluetooth.
Component List
9V Battery
- Description: Provides power to the circuit.
- Pins: -, +
Motor and Wheels
- Description: Drives the car's movement.
- Pins: vcc, GND
Arduino Uno R3
- Description: Microcontroller that controls the car's movement based on Bluetooth commands.
- Pins: USB Port, Power Jack, Not Connected, IOREF, RESET, 3.3V, 5V, GND, VIN, A0, A1, A2, A3, A4/SDA, A5/SCL, SCL, SDA, AREF, 13, 12, 11, 10, 9, 8, 7, 6, 5, 4, 3, 2, 1, 0
HC-05 Bluetooth Module
- Description: Receives Bluetooth commands to control the car.
- Pins: EN, VCC, GND, TXD, RXD, STATE
L298N DC Motor Driver
- Description: Drives the motors based on signals from the Arduino.
- Pins: OUT1, OUT2, 12V, GND, 5V, OUT3, OUT4, 5V-ENA-JMP-I, 5V-ENA-JMP-O, +5V-J1, +5V-J2, ENA, IN1, IN2, IN3, IN4, ENB
Wiring Details
9V Battery
Pin - connected to:
- 9V Battery (-)
- L298N DC Motor Driver (GND)
- Arduino Uno R3 (GND)
Pin + connected to:
- 9V Battery (+)
- L298N DC Motor Driver (12V)
Motor and Wheels
Instance 1:
Pin GND connected to:
- Motor and Wheels (GND)
- L298N DC Motor Driver (OUT1)
Pin vcc connected to:
- Motor and Wheels (vcc)
- L298N DC Motor Driver (OUT2)
Instance 2:
Pin GND connected to:
- Motor and Wheels (GND)
- L298N DC Motor Driver (OUT3)
Pin vcc connected to:
- Motor and Wheels (vcc)
- L298N DC Motor Driver (OUT4)
Arduino Uno R3
Pin 5V connected to:
- HC-05 Bluetooth Module (VCC)
Pin GND connected to:
- HC-05 Bluetooth Module (GND)
- 9V Battery (-)
- L298N DC Motor Driver (GND)
Pin VIN connected to:
- L298N DC Motor Driver (5V)
Pin 5 connected to:
- L298N DC Motor Driver (IN1)
Pin 6 connected to:
- L298N DC Motor Driver (IN2)
Pin 9 connected to:
- L298N DC Motor Driver (IN3)
Pin 10 connected to:
- L298N DC Motor Driver (IN4)
Pin 1 connected to:
- HC-05 Bluetooth Module (TXD)
Pin 0 connected to:
- HC-05 Bluetooth Module (RXD)
HC-05 Bluetooth Module
Pin VCC connected to:
- Arduino Uno R3 (5V)
Pin GND connected to:
- Arduino Uno R3 (GND)
Pin TXD connected to:
- Arduino Uno R3 (1)
Pin RXD connected to:
- Arduino Uno R3 (0)
L298N DC Motor Driver
Pin GND connected to:
- 9V Battery (-)
- Arduino Uno R3 (GND)
Pin 5V connected to:
- Arduino Uno R3 (VIN)
Pin 12V connected to:
- 9V Battery (+)
Pin IN1 connected to:
- Arduino Uno R3 (5)
Pin IN2 connected to:
- Arduino Uno R3 (6)
Pin IN3 connected to:
- Arduino Uno R3 (9)
Pin IN4 connected to:
- Arduino Uno R3 (10)
Pin OUT1 connected to:
- Motor and Wheels (GND)
Pin OUT2 connected to:
- Motor and Wheels (vcc)
Pin OUT3 connected to:
- Motor and Wheels (GND)
Pin OUT4 connected to:
- Motor and Wheels (vcc)
Code Documentation
Arduino Sketch for Bluetooth-Controlled Car
/*
 * Arduino Sketch for a Bluetooth-controlled car using an L298N motor driver
 * and four motors. The car can move forward, backward, turn left, turn right,
 * and stop based on commands received via Bluetooth.
 */

char t;

void setup() {
  pinMode(5, OUTPUT);   // IN1
  pinMode(6, OUTPUT);   // IN2
  pinMode(9, OUTPUT);   // IN3
  pinMode(10, OUTPUT);  // IN4
  pinMode(13, OUTPUT);  // LED
  Serial.begin(9600);
}

void loop() {
  if (Serial.available()) {
    t = Serial.read();
    Serial.println(t);
  }

  if (t == 'F') {            // Move forward
    digitalWrite(5, HIGH);
    digitalWrite(6, LOW);
    digitalWrite(9, HIGH);
    digitalWrite(10, LOW);
  } else if (t == 'B') {     // Move backward
    digitalWrite(5, LOW);
    digitalWrite(6, HIGH);
    digitalWrite(9, LOW);
    digitalWrite(10, HIGH);
  } else if (t == 'L') {     // Turn left
    digitalWrite(5, LOW);
    digitalWrite(6, HIGH);
    digitalWrite(9, HIGH);
    digitalWrite(10, LOW);
  } else if (t == 'R') {     // Turn right
    digitalWrite(5, HIGH);
    digitalWrite(6, LOW);
    digitalWrite(9, LOW);
    digitalWrite(10, HIGH);
  } else if (t == 'S') {     // Stop
    digitalWrite(5, LOW);
    digitalWrite(6, LOW);
    digitalWrite(9, LOW);
    digitalWrite(10, LOW);
  } else if (t == 'W') {     // Turn LED on
    digitalWrite(13, HIGH);
  } else if (t == 'w') {     // Turn LED off
    digitalWrite(13, LOW);
  }

  delay(100);
}
This code initializes the pins connected to the L298N motor driver and the LED. It reads commands from the Bluetooth module and controls the motors to move the car forward, backward, turn left, turn right, or stop. It also controls an LED based on the received commands.