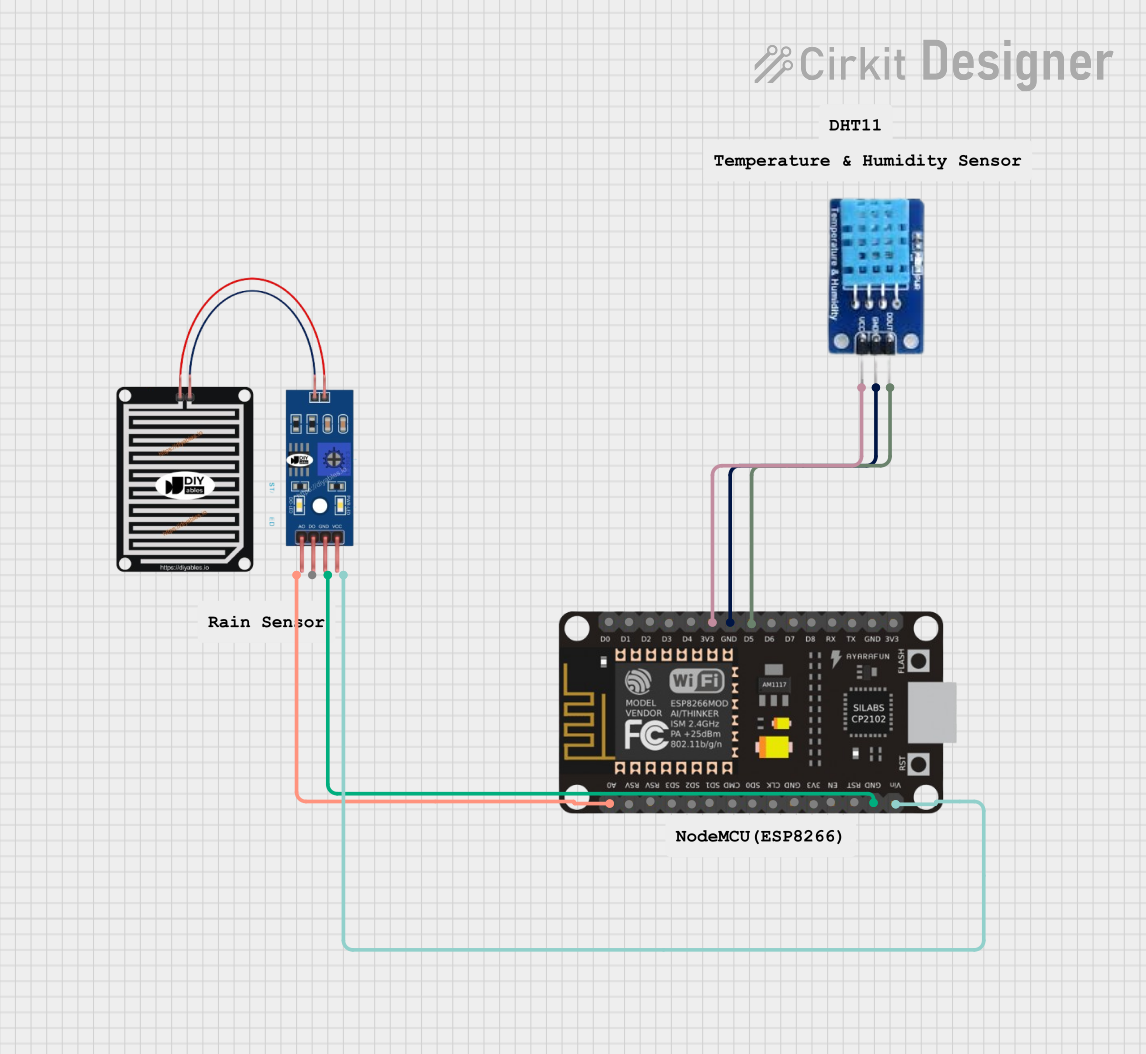
ESP8266 NodeMCU with Rain Sensor and DHT11 Weather Station

Circuit Documentation
Summary of the Circuit
This circuit is designed to interface a RAIN SENSOR and a DHT11 temperature and humidity sensor with an ESP8266 NodeMCU microcontroller. The RAIN SENSOR is used to detect rain by measuring the analog voltage level that changes with the amount of water on the sensor's surface. The DHT11 sensor provides ambient temperature and humidity readings. The ESP8266 NodeMCU serves as the central processing unit, reading data from both sensors and executing user-defined tasks based on these inputs.
Component List
RAIN SENSOR
- Pins: AO (Analog Output), DO (Digital Output), GRD (Ground), VCC (Power Supply)
- Description: A sensor that detects water presence by measuring the analog voltage level on its surface.
DHT11
- Pins: DATA, GND (Ground), VCC (Power Supply)
- Description: A sensor that measures ambient temperature and humidity.
ESP8266 NodeMCU
- Pins: D0-D8, RX, TX, A0, RSV, SD3, SD2, SD1, CMD, SD0, CLK, EN, RST, VIN, 3V3, GND
- Description: A Wi-Fi capable microcontroller with digital and analog I/O pins.
Wiring Details
RAIN SENSOR
- AO (Analog Output): Connected to A0 on the ESP8266 NodeMCU.
- GRD (Ground): Connected to GND on the ESP8266 NodeMCU.
- VCC (Power Supply): Connected to VIN on the ESP8266 NodeMCU.
DHT11
- DATA: Connected to D5 on the ESP8266 NodeMCU.
- GND (Ground): Connected to GND on the ESP8266 NodeMCU.
- VCC (Power Supply): Connected to 3V3 on the ESP8266 NodeMCU.
Documented Code
The code provided is for the ESP8266 NodeMCU microcontroller. It is written in Arduino-style C++ and is intended to be compiled and uploaded using the Arduino IDE or a similar development environment.
sketch.ino
void setup() {
  // put your setup code here, to run once:

}

void loop() {
  // put your main code here, to run repeatedly:

}
This code template provides two main functions: setup() and loop(). The setup() function is called once when the microcontroller is powered on or reset. It is used to initialize the pins and set up the sensors. The loop() function is called repeatedly and contains the main logic of the program. It is here that the microcontroller will read from the sensors and perform actions based on those readings.
documentation.txt
The documentation.txt file is empty and does not contain any additional information or code.
Note: The provided code is a template and does not contain any specific logic for reading sensor data or performing actions based on the sensor readings. The user will need to add the necessary code to read from the RAIN SENSOR and DHT11 and to implement the desired functionality.