
Circuit Documentation
Summary of the Circuit
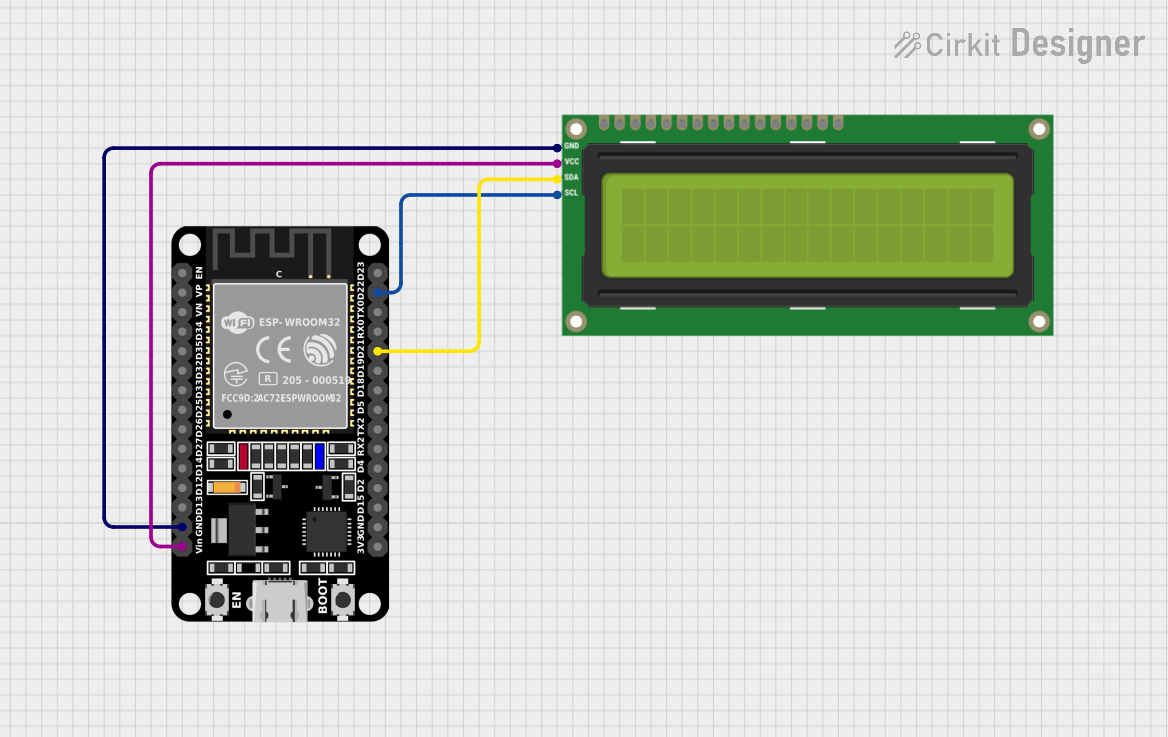
This circuit integrates an ESP32 microcontroller with a 16x2 I2C LCD screen. The ESP32 is responsible for controlling the display on the LCD, showing messages in a loop with specified delays. The communication between the ESP32 and the LCD is established via the I2C protocol, utilizing two data lines: SCL (Serial Clock Line) and SDA (Serial Data Line).
Component List
ESP32 (30 pin)
- Description: A microcontroller with Wi-Fi and Bluetooth capabilities, featuring a wide range of GPIO pins.
- Pins: EN, VP, VN, D34, D35, D32, D33, D25, D26, D27, D14, D12, D13, GND, Vin, D23, D22, TX0, RX0, D21, D19, D18, D5, TX2, RX2, D4, D2, D15, 3V3
- Purpose: Acts as the main controller for the circuit, interfacing with the I2C LCD screen to display messages.
I2C LCD 16x2 Screen
- Description: A liquid crystal display capable of showing 16 characters per line across 2 lines.
- Pins: SCL, SDA, VCC (5V), GND, VDD, VO, RS, RW, E, D0, D1, D2, D3, D4, D5, D6, D7, BLA, BLK
- Purpose: Displays the information sent from the ESP32 microcontroller.
Wiring Details
ESP32 (30 pin)
- GND connected to I2C LCD 16x2 Screen GND
- Vin connected to I2C LCD 16x2 Screen VCC (5V)
- D22 connected to I2C LCD 16x2 Screen SCL
- D21 connected to I2C LCD 16x2 Screen SDA
I2C LCD 16x2 Screen
- GND connected to ESP32 GND
- VCC (5V) connected to ESP32 Vin
- SCL connected to ESP32 D22
- SDA connected to ESP32 D21
Documented Code
/*
 * This Arduino Sketch interfaces an ESP32 with an I2C LCD 16x2 screen.
 * The ESP32 displays two messages on the LCD screen in a loop with delays.
 * Connections:
 * - ESP32 GND to LCD GND
 * - ESP32 Vin to LCD VCC (5V)
 * - ESP32 D22 to LCD SCL
 * - ESP32 D21 to LCD SDA
 */

#include <Wire.h>
#include <LiquidCrystal_I2C.h>

LiquidCrystal_I2C lcd(0x27, 16, 2);

void setup() {
  Serial.begin(115200);
  lcd.init();
  lcd.backlight();
  lcd.print("Welcome");
  delay(2000);
  lcd.init();
  lcd.backlight();
  lcd.print("EV CHRG");
  delay(2000);
}

void loop() {
  delay(1000);
  lcd.clear();
  lcd.setCursor(0, 0);
  lcd.print("SLOT1");
  delay(2000);
}
Filename: sketch.ino
Description: The code initializes the I2C LCD screen and prints the messages "Welcome" and "EV CHRG" on the display, followed by "SLOT1" in a continuous loop. The ESP32 communicates with the LCD using the I2C protocol, with the SCL and SDA pins connected to the corresponding pins on the LCD.