
Arduino UNO Controlled Battery-Powered Motor and Servo System with Pushbutton Interface
View and Edit Project In Cirkit Designer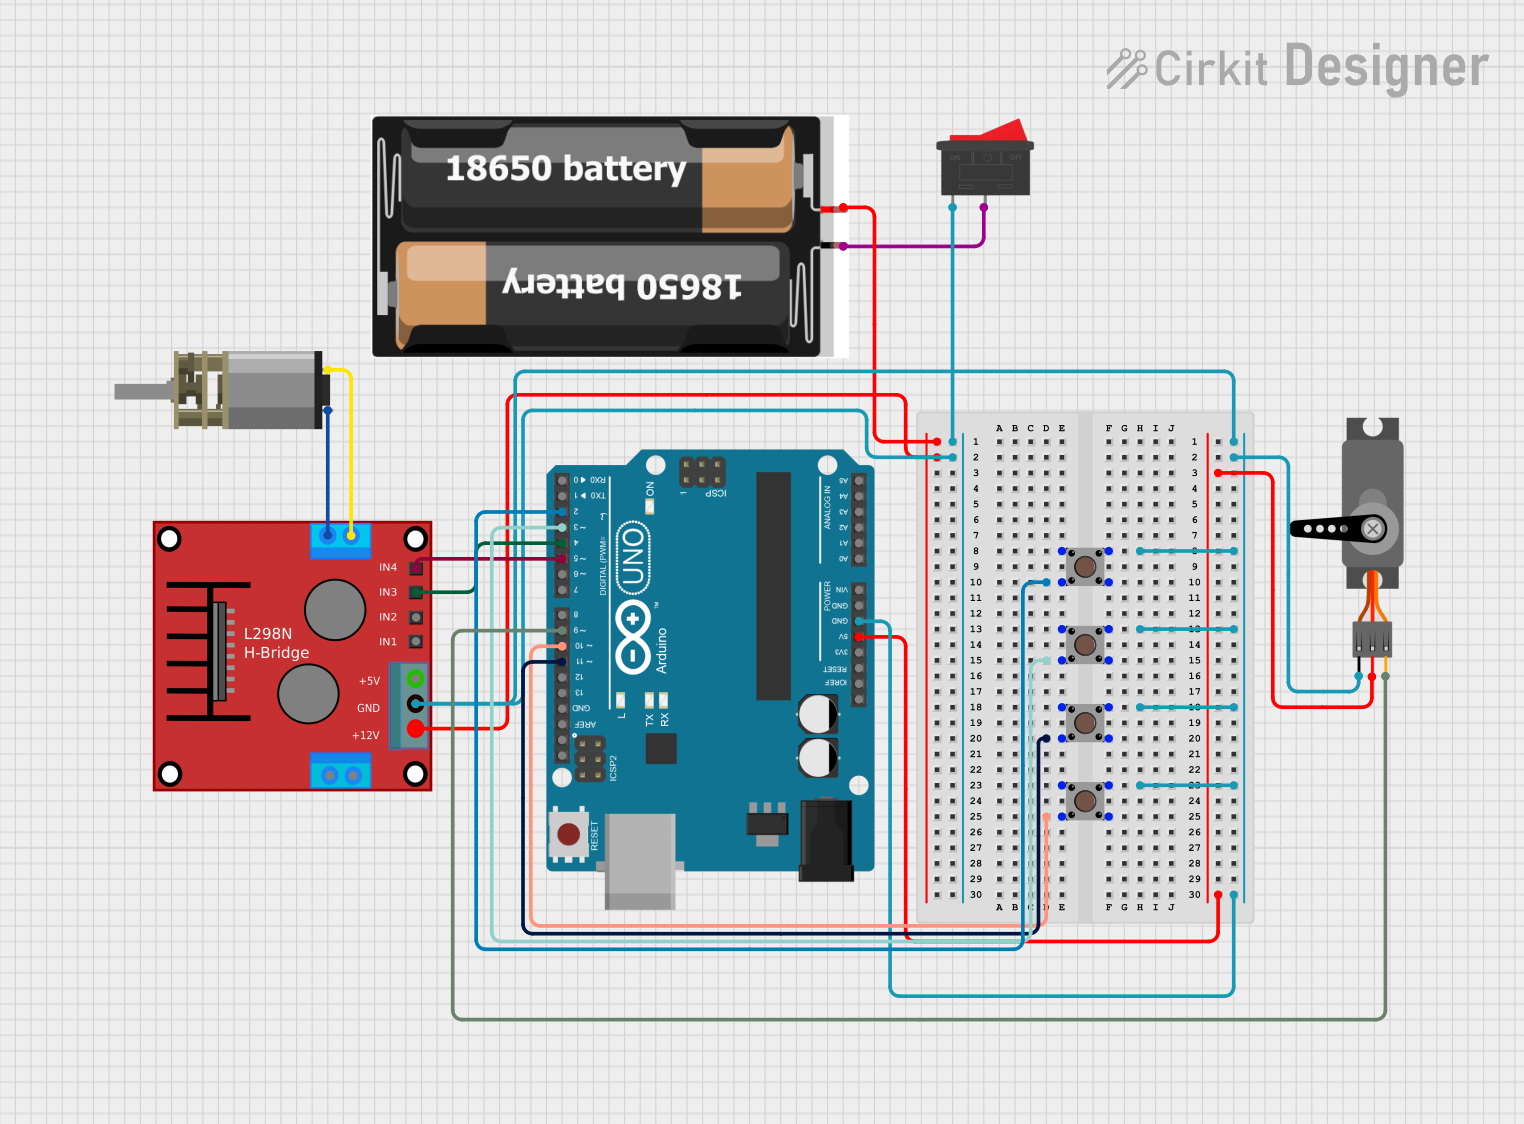
Circuit Documentation
Summary
This document provides a detailed overview of a circuit that includes various components such as an H-bridge motor driver, pushbuttons, a servo motor, a DC motor, a battery pack, a rocker switch, and an Arduino UNO microcontroller. The circuit is designed to control the DC motor and servo motor using the Arduino UNO, with inputs from multiple pushbuttons.
Component List
H-Bridge Motor Driver (ponte h)
- Pins: OUT4-Motor2, OUT3-Motor2, OUT2-Motor1, OUT1-Motor1, 5V, GND, 12V, IN3, IN1, IN2, IN4
- Description: Used to control the direction and speed of the DC motor.
Pushbutton
- Pins: Pin 3 (out), Pin 4 (out), Pin 1 (in), Pin 2 (in)
- Description: Used as input devices to control the motors.
Servo Motor
- Pins: GND, VCC, PWM
- Description: Used for precise control of angular position.
DC Mini Metal Gear Motor
- Pins: IN1, IN2
- Description: Used for driving mechanical components.
2x 18650 Battery Pack
- Pins: vcc, gnd
- Description: Provides power to the circuit.
Rocker Switch
- Pins: 1, 2
- Description: Used to turn the circuit on and off.
Arduino UNO
- Pins: UNUSED, IOREF, Reset, 3.3V, 5V, GND, Vin, A0, A1, A2, A3, A4, A5, SCL, SDA, AREF, D13, D12, D11, D10, D9, D8, D7, D6, D5, D4, D3, D2, D1, D0
- Description: Microcontroller used to control the entire circuit.
Wiring Details
H-Bridge Motor Driver (ponte h)
- OUT4-Motor2: Connected to IN1 of the DC Mini Metal Gear Motor
- OUT3-Motor2: Connected to IN2 of the DC Mini Metal Gear Motor
- GND: Connected to pin 1 of the Rocker Switch, GND of the Servo, Pin 1 (in) of all Pushbuttons, and GND of the Arduino UNO
- 12V: Connected to vcc of the 2x 18650 Battery Pack
- IN3: Connected to D4 of the Arduino UNO
- IN4: Connected to D5 of the Arduino UNO
Pushbutton
- Pin 1 (in): Connected to GND (common ground)
- Pin 4 (out):
- Pushbutton 1: Connected to D2 of the Arduino UNO
- Pushbutton 2: Connected to D3 of the Arduino UNO
- Pushbutton 3: Connected to D11 of the Arduino UNO
- Pushbutton 4: Connected to D10 of the Arduino UNO
Servo Motor
- GND: Connected to GND (common ground)
- VCC: Connected to 5V of the Arduino UNO
- PWM: Connected to D9 of the Arduino UNO
DC Mini Metal Gear Motor
- IN1: Connected to OUT4-Motor2 of the H-Bridge Motor Driver
- IN2: Connected to OUT3-Motor2 of the H-Bridge Motor Driver
2x 18650 Battery Pack
- vcc: Connected to 12V of the H-Bridge Motor Driver
- gnd: Connected to pin 2 of the Rocker Switch
Rocker Switch
- Pin 1: Connected to GND (common ground)
- Pin 2: Connected to gnd of the 2x 18650 Battery Pack
Arduino UNO
- GND: Connected to GND (common ground)
- 5V: Connected to VCC of the Servo Motor
- D2: Connected to Pin 4 (out) of Pushbutton 1
- D3: Connected to Pin 4 (out) of Pushbutton 2
- D4: Connected to IN3 of the H-Bridge Motor Driver
- D5: Connected to IN4 of the H-Bridge Motor Driver
- D9: Connected to PWM of the Servo Motor
- D10: Connected to Pin 4 (out) of Pushbutton 4
- D11: Connected to Pin 4 (out) of Pushbutton 3
Documented Code
Arduino UNO Code (sketch.ino)
void setup() {
  // put your setup code here, to run once:

}

void loop() {
  // put your main code here, to run repeatedly:

}
Additional Documentation (documentation.txt)
This document provides a comprehensive overview of the circuit, including the components used, their wiring details, and the code for the Arduino UNO microcontroller.