
Arduino UNO I2C Environmental Monitoring System with OLED Display and Buzzer Alert
View and Edit Project In Cirkit Designer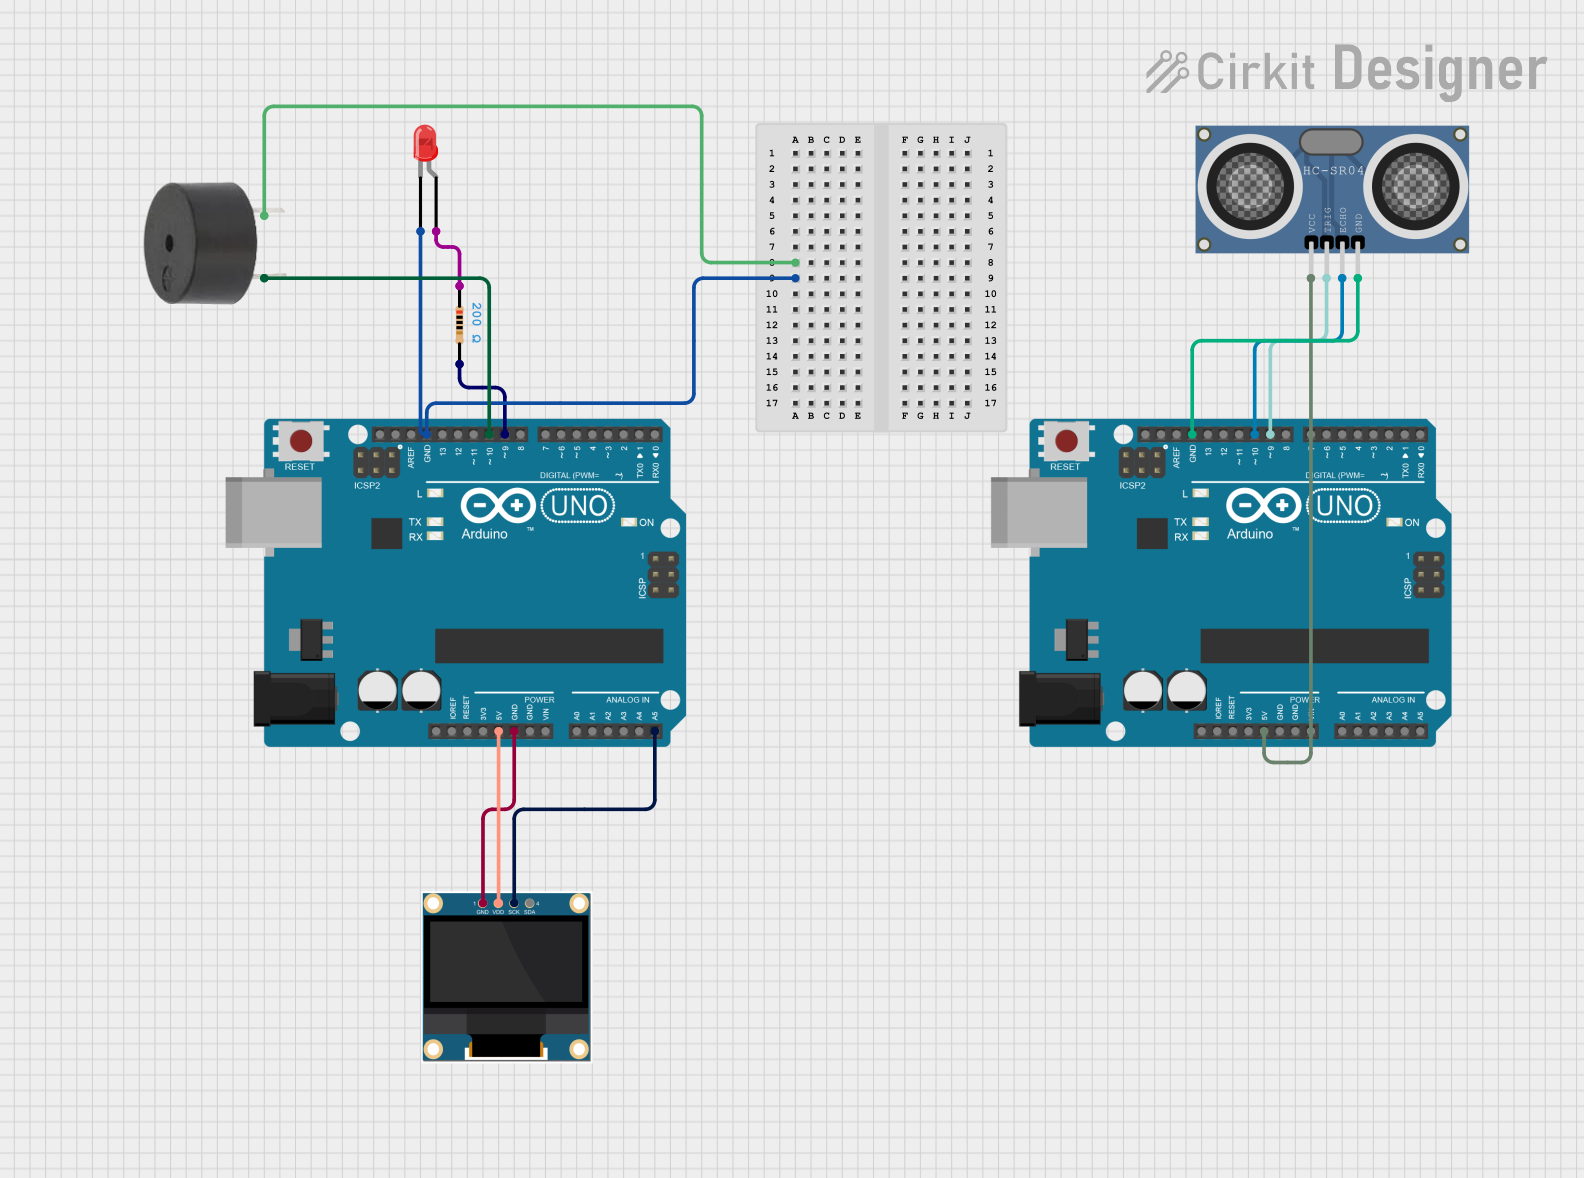
Circuit Documentation
Summary
This circuit integrates two Arduino UNO microcontrollers, a 0.96" OLED display, an HC-SR04 Ultrasonic Distance Sensor, a red LED with a resistor, and a buzzer. One Arduino acts as a master, interfacing with the OLED to display temperature and humidity data. The other Arduino functions as a slave, equipped with a DHT sensor to measure temperature and humidity, and communicates this data to the master via I2C. The circuit also includes a buzzer controlled by the master Arduino and an LED indicator with a current-limiting resistor.
Component List
Microcontrollers
- Arduino UNO (Master): The primary controller that manages the OLED display and communicates with the slave Arduino to receive sensor data.
- Arduino UNO (Slave): The secondary controller that interfaces with the HC-SR04 Ultrasonic Distance Sensor and sends data to the master Arduino.
Display
- 0.96" OLED: A small display used to show temperature and humidity data received from the slave Arduino.
Sensors
- HC-SR04 Ultrasonic Distance Sensor: Measures distances by emitting ultrasonic waves and timing their echo.
Indicators
- LED (Red): Acts as a visual indicator.
- Buzzer: Provides audible alerts or indications.
Passive Components
- Resistor (200 Ohms): Limits current to the LED to prevent damage.
Wiring Details
Arduino UNO (Master)
- 5V to OLED VDD
- GND to OLED GND, LED cathode, and buzzer GND
- A5 (SCL) to OLED SCK
- D10 to buzzer PIN
Arduino UNO (Slave)
- 5V to HC-SR04 VCC
- GND to HC-SR04 GND
- D10 to HC-SR04 ECHO
- D9 to HC-SR04 TRIG
0.96" OLED
- GND to Arduino UNO (Master) GND
- VDD to Arduino UNO (Master) 5V
- SCK to Arduino UNO (Master) A5
HC-SR04 Ultrasonic Distance Sensor
- VCC to Arduino UNO (Slave) 5V
- TRIG to Arduino UNO (Slave) D9
- ECHO to Arduino UNO (Slave) D10
- GND to Arduino UNO (Slave) GND
LED (Red)
- Cathode to Arduino UNO (Master) GND
- Anode to Resistor pin1
Resistor (200 Ohms)
- Pin1 to LED anode
- Pin2 to Arduino UNO (Master) D9
Buzzer
- PIN to Arduino UNO (Master) D10
- GND to Arduino UNO (Master) GND
Documented Code
MASTER.ino (Arduino UNO Master)
#include <Wire.h>
#include <Adafruit_SSD1306.h>
#include <Adafruit_GFX.h>

#define SCREEN_WIDTH 128
#define SCREEN_HEIGHT 64
#define OLED_RESET    -1
Adafruit_SSD1306 display(SCREEN_WIDTH, SCREEN_HEIGHT, &Wire, OLED_RESET);

void setup() {
  Wire.begin(); // Join I2C bus as master
  display.begin(SSD1306_SWITCHCAPVCC, 0x3C); // Initialize OLED display with I2C address 0x3C
  display.clearDisplay();
  display.setTextSize(1);
  display.setTextColor(SSD1306_WHITE);
  display.setCursor(0, 0);
  display.print("Initializing...");
  display.display();
  delay(2000);
}

void loop() {
  Wire.requestFrom(8, 4); // Request 4 bytes from slave device #8

  if (Wire.available() == 4) {
    int temperature = Wire.read(); // Read temperature
    int humidity = Wire.read();    // Read humidity
    int tempDecimal = Wire.read(); // Read temperature decimal part
    int humDecimal = Wire.read();  // Read humidity decimal part

    display.clearDisplay();
    display.setCursor(0, 0);
    display.print("Temp: ");
    display.print(temperature);
    display.print(".");
    display.print(tempDecimal);
    display.println(" C");
    display.print("Humidity: ");
    display.print(humidity);
    display.print(".");
    display.print(humDecimal);
    display.println(" %");
    display.display();
  }

  delay(2000); // Wait for 2 seconds before next request
}
SLAVE.ino (Arduino UNO Slave)
#include <Wire.h>
#include <DHT.h>

#define DHTPIN 2     // Pin where the DHT11 is connected
#define DHTTYPE DHT11
DHT dht(DHTPIN, DHTTYPE);

void setup() {
  Wire.begin(8); // Join I2C bus with address #8
  Wire.onRequest(requestEvent); // Register event
  dht.begin();
}

void loop() {
  // Nothing to do here, everything is handled in the requestEvent function
}

void requestEvent() {
  float temperature = dht.readTemperature();
  float humidity = dht.readHumidity();

  int tempInt = (int)temperature;
  int humInt = (int)humidity;
  int tempDecimal = (int)((temperature - tempInt) * 100);
  int humDecimal = (int)((humidity - humInt) * 100);

  Wire.write(tempInt);
  Wire.write(humInt);
  Wire.write(tempDecimal);
  Wire.write(humDecimal);
}
This concludes the documentation for the described circuit. The code provided for the master and slave Arduinos facilitates the communication and display of sensor data, while the wiring details outline the connections necessary for the circuit's functionality.