
Arduino UNO-Based Keypad-Controlled Solenoid Lock with Buzzer Feedback
View and Edit Project In Cirkit Designer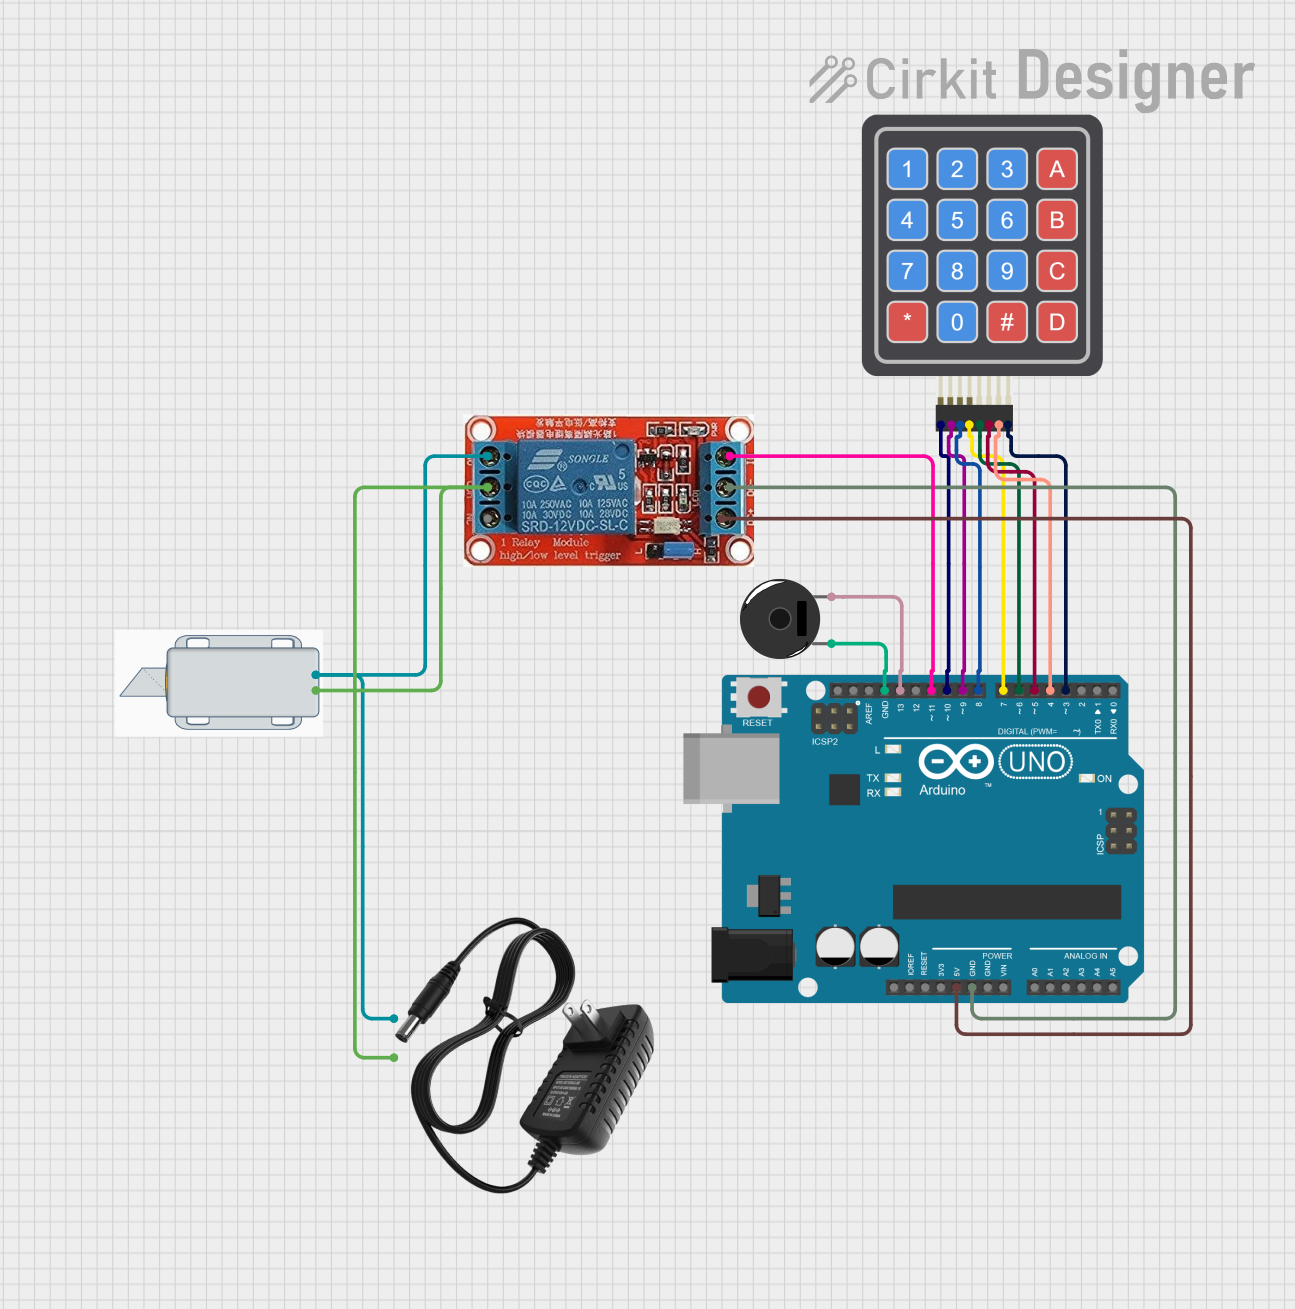
Circuit Documentation
Summary
This circuit is designed to control a 12V solenoid lock using an Arduino UNO, a 4x4 Keypad, a 12V Relay, and a Piezo Buzzer. The user can input a password via the keypad, and if the correct password is entered, the solenoid lock will unlock for a specified duration. The Piezo Buzzer provides audio feedback for key presses and incorrect password attempts.
Component List
4x4 Keypad (Simulator)
- Description: A 4x4 matrix keypad used for user input.
- Pins: R1, C4, R2, C2, R3, R4, C1, C3
Arduino UNO
- Description: A microcontroller board based on the ATmega328P.
- Pins: UNUSED, IOREF, Reset, 3.3V, 5V, GND, Vin, A0, A1, A2, A3, A4, A5, SCL, SDA, AREF, D13, D12, D11, D10, D9, D8, D7, D6, D5, D4, D3, D2, D1, D0
12V Solenoid Lock
- Description: An electromechanical lock that operates on 12V.
- Pins: -, +
12V Power Supply
- Description: A power supply providing 12V DC.
- Pins: +, -
12V Relay
- Description: A relay module that can be controlled by the Arduino to switch the solenoid lock.
- Pins: NO, COM, NC, IN, DC-, DC+
Piezo Buzzer
- Description: A buzzer used for audio feedback.
- Pins: pin 1, pin 2
Wiring Details
4x4 Keypad (Simulator)
- R1 to Arduino UNO D10
- R2 to Arduino UNO D9
- R3 to Arduino UNO D8
- R4 to Arduino UNO D7
- C1 to Arduino UNO D6
- C2 to Arduino UNO D5
- C3 to Arduino UNO D4
- C4 to Arduino UNO D3
Arduino UNO
- 5V to 12V Relay DC+
- GND to 12V Relay DC-
- GND to Piezo Buzzer pin 1
- D13 to Piezo Buzzer pin 2
- D11 to 12V Relay IN
- D10 to 4x4 Keypad R1
- D9 to 4x4 Keypad R2
- D8 to 4x4 Keypad R3
- D7 to 4x4 Keypad R4
- D6 to 4x4 Keypad C1
- D5 to 4x4 Keypad C2
- D4 to 4x4 Keypad C3
- D3 to 4x4 Keypad C4
12V Solenoid Lock
- - to 12V Power Supply -
- + to 12V Power Supply +
- - to 12V Relay COM
- + to 12V Relay NO
12V Power Supply
- - to 12V Solenoid Lock -
- + to 12V Solenoid Lock +
- - to 12V Relay COM
- + to 12V Relay NO
12V Relay
- DC+ to Arduino UNO 5V
- DC- to Arduino UNO GND
- IN to Arduino UNO D11
- COM to 12V Solenoid Lock -
- NO to 12V Solenoid Lock +
Piezo Buzzer
- pin 1 to Arduino UNO GND
- pin 2 to Arduino UNO D13
Code Documentation
#include <Keypad.h>

const byte numRows = 4; // number of rows on the keypad
const byte numCols = 4; // number of columns on the keypad

// Keymap defines the key pressed according to the row and columns as appears on the keypad
char keymap[numRows][numCols] =
{
  {'1', '2', '3', 'A'},
  {'4', '5', '6', 'B'},
  {'7', '8', '9', 'C'},
  {'*', '0', '#', 'D'}
};

// Code that shows the keypad connections to the Arduino terminals
byte rowPins[numRows] = {10, 9, 8, 7}; // Rows 0 to 3
byte colPins[numCols] = {6, 5, 4, 3}; // Columns 0 to 3

// Initializes an instance of the Keypad class
Keypad myKeypad = Keypad(makeKeymap(keymap), rowPins, colPins, numRows, numCols);

String password = "0911"; // Example password (you can change it)

const int buzzerPin = 13;
const int relayPin = 2;

unsigned long lastButtonPress = 0; // Timestamp for last button press
const unsigned long debounceDelay = 50; // Debounce delay in milliseconds

void setup()
{
  pinMode(buzzerPin, OUTPUT);
  pinMode(relayPin, OUTPUT);
  Serial.begin(9600);

  // Set the initial state of the relay (locked)
  digitalWrite(relayPin, HIGH); // Set relay to "locked" state initially
  Serial.println("Set your 4-digit password (it can include letters A-D):");
}

void loop()
{
  // Handle password entry
  String enteredPassword = "";
  int passTries = 0;

  // Loop for entering password with max 3 attempts
  while (passTries < 3) {
    enteredPassword = "";

    // Capture the password input
    while (enteredPassword.length() < 4) {
      char keypressed = myKeypad.getKey();
      if (keypressed != NO_KEY) {
        Serial.print("Key Pressed: ");
        Serial.println(keypressed);  // Print key pressed to serial monitor
        tone(buzzerPin, 1500, 100); // Short beep for key press
        enteredPassword += keypressed;
      }
    }

    Serial.println();

    // Check if the entered password is correct
    if (enteredPassword == password) {
      Serial.println("Correct Password");
      openSolenoid(); // Trigger solenoid to open for 5 seconds
      return; // Exit the loop once the password is correct
    } else {
      passTries++;
      Serial.println("Incorrect Password. Try again.");
      tone(buzzerPin, 1000, 500); // Long beep for incorrect password
    }
  }

  // If there are 3 incorrect attempts, sound the buzzer for 10 seconds
  if (passTries >= 3) {
    tone(buzzerPin, 800, 10000); // Buzzer sound for 10 seconds
    delay(10000);
    noTone(buzzerPin); // Stop buzzer sound
    Serial.println("Too many incorrect attempts. Locking system.");
  }

  // After a password attempt, the system will continue asking for the password
  Serial.println("Try entering the password again.");
}

// Function to trigger solenoid and open for 5 seconds
void openSolenoid() {
  digitalWrite(relayPin, LOW); // Unlock solenoid (set relay to LOW)
  Serial.println("Solenoid Opened");
  delay(5000); // Solenoid stays open for 5 seconds
  digitalWrite(relayPin, HIGH); // Lock solenoid (set relay to HIGH)
  Serial.println("Solenoid Locked");
}
This code initializes the keypad and sets up the Arduino to read input from the keypad. It checks the entered password against a predefined password and controls the relay and buzzer accordingly. If the correct password is entered, the relay is activated to unlock the solenoid lock for 5 seconds. If the password is incorrect, the buzzer sounds an alert. After three incorrect attempts, the system locks and sounds the buzzer for 10 seconds.