
Arduino-Based Coffee Bean Sorting System with Color Sensor and Servo Motors
View and Edit Project In Cirkit Designer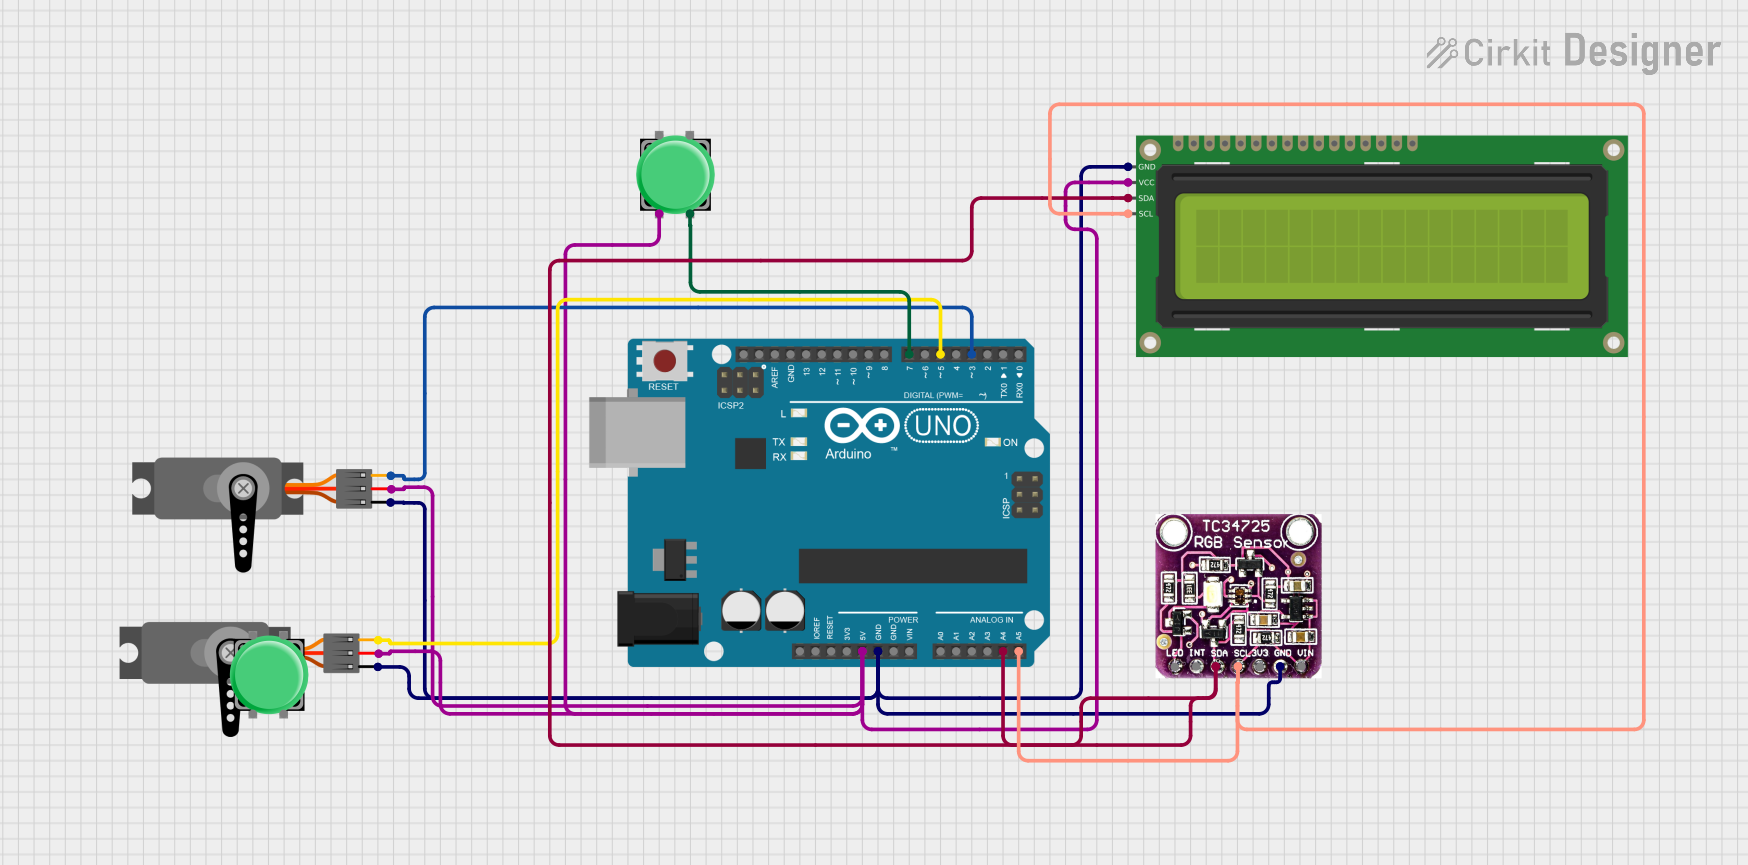
Circuit Documentation
Summary
This circuit is designed to sort coffee beans based on their color using a TCS3472 color sensor, two servo motors, a pushbutton, and a 16x2 I2C LCD display. The system is controlled by an Arduino UNO microcontroller. The color sensor detects the color of the coffee beans, and based on the detected color, the servo motors sort the beans into defect and non-defect categories. The pushbutton is used to reset the counting of defect and non-defect beans, and the LCD display shows the count of each category.
Component List
Arduino UNO
- Description: A microcontroller board based on the ATmega328P.
- Pins: UNUSED, IOREF, Reset, 3.3V, 5V, GND, Vin, A0, A1, A2, A3, A4, A5, SCL, SDA, AREF, D13, D12, D11, D10, D9, D8, D7, D6, D5, D4, D3, D2, D1, D0
Servo Motor (2 units)
- Description: A motor that can be controlled to move to a specific position.
- Pins: GND, VCC, PWM
Pushbutton (2 units)
- Description: A simple pushbutton switch.
- Pins: Pin 2, Pin 1, Pin 3, Pin 4
TCS3472 Color Light-to-Digital Converter with IR Filter
- Description: A color sensor that converts light to digital values.
- Pins: LED, INT, SDA, SCL, 3V3, GND, VIN
16x2 I2C LCD
- Description: A 16x2 character LCD display with I2C interface.
- Pins: GND, VCC, SDA, SCL
Wiring Details
Arduino UNO
- 5V: Connected to VCC of both Servo Motors, VCC of 16x2 I2C LCD, and Pin 2 of Pushbutton.
- GND: Connected to GND of both Servo Motors, GND of TCS3472 Color Sensor, and GND of 16x2 I2C LCD.
- A4: Connected to SDA of TCS3472 Color Sensor and SDA of 16x2 I2C LCD.
- A5: Connected to SCL of TCS3472 Color Sensor and SCL of 16x2 I2C LCD.
- D7: Connected to Pin 4 of Pushbutton.
- D5: Connected to PWM of one Servo Motor.
- D3: Connected to PWM of the other Servo Motor.
Servo Motor 1
- GND: Connected to GND of Arduino UNO.
- VCC: Connected to 5V of Arduino UNO.
- PWM: Connected to D3 of Arduino UNO.
Servo Motor 2
- GND: Connected to GND of Arduino UNO.
- VCC: Connected to 5V of Arduino UNO.
- PWM: Connected to D5 of Arduino UNO.
Pushbutton 1
- Pin 2: Connected to 5V of Arduino UNO.
- Pin 4: Connected to D7 of Arduino UNO.
Pushbutton 2
- Pin 2: Connected to 5V of Arduino UNO.
TCS3472 Color Light-to-Digital Converter with IR Filter
- GND: Connected to GND of Arduino UNO.
- SDA: Connected to A4 of Arduino UNO.
- SCL: Connected to A5 of Arduino UNO.
16x2 I2C LCD
- GND: Connected to GND of Arduino UNO.
- VCC: Connected to 5V of Arduino UNO.
- SDA: Connected to A4 of Arduino UNO.
- SCL: Connected to A5 of Arduino UNO.
Documented Code
#include <Wire.h>
#include <Adafruit_TCS34725.h>
#include <Servo.h>
#include <LiquidCrystal_I2C.h>

// Inisialisasi sensor warna
Adafruit_TCS34725 tcs = Adafruit_TCS34725(TCS34725_INTEGRATIONTIME_700MS, TCS34725_GAIN_1X);

// Inisialisasi servo motor
Servo servoSort, servoGate;
int servoSortPin = 3;    // Pin servo untuk sortir
int servoGatePin = 5;   // Pin servo untuk gate
int posDefect = 30;      // Posisi servo sortir untuk defect
int posNonDefect = 150;  // Posisi servo sortir untuk non-defect
int gateOpen = 0;        // Posisi servo gate terbuka
int gateClose = 180;     // Posisi servo gate tertutup

// Inisialisasi LCD
LiquidCrystal_I2C lcd(0x27, 16, 2); // Alamat I2C untuk LCD 16x2

// Pin untuk push button reset
const int buttonPin = 7;
int buttonState = 0;

// Variabel counting
int countDefect = 0;
int countNonDefect = 0;

void setup() {
  Serial.begin(9600);

  // Setup sensor warna
  if (tcs.begin()) {
    Serial.println("TCS34725 ditemukan");
  } else {
    Serial.println("TCS34725 tidak ditemukan");
    while (1); // Berhenti jika sensor tidak terdeteksi
  }

  // Setup servo
  servoSort.attach(servoSortPin);
  servoGate.attach(servoGatePin);
  servoSort.write(posNonDefect); // Posisi awal servo sortir
  servoGate.write(gateClose);   // Posisi awal servo gate

  // Setup LCD
  lcd.begin();
  lcd.backlight();
  lcd.setCursor(0, 0);
  lcd.print("Defect: 0");
  lcd.setCursor(0, 1);
  lcd.print("Non-Def: 0");

  // Setup push button
  pinMode(buttonPin, INPUT_PULLUP); // Gunakan pull-up internal
}

void loop() {
  // Operasikan servo gate untuk membuka dan menutup pintu awal
  operateGate();

  // Membaca dan memproses warna biji kopi
  processBean();

  // Cek tombol reset
  checkResetButton();
}

// Fungsi untuk mengoperasikan servo gate
void operateGate() {
  static unsigned long lastGateTime = 0;
  static bool isGateOpen = false;

  if (millis() - lastGateTime >= 4000) { // Delay selama 4 detik
    if (isGateOpen) {
      servoGate.write(gateClose); // Tutup pintu
    } else {
      servoGate.write(gateOpen);  // Buka pintu
    }
    isGateOpen = !isGateOpen;
    lastGateTime = millis(); // Reset waktu
  }
}

// Fungsi untuk membaca dan memproses warna biji kopi
void processBean() {
  uint16_t r, g, b, c;
  float redRatio, greenRatio, blueRatio;

  // Membaca data RGB
  tcs.getRawData(&r, &g, &b, &c);

  // Normalisasi nilai RGB untuk proporsi
  redRatio = (float)r / (r + g + b);
  greenRatio = (float)g / (r + g + b);
  blueRatio = (float)b / (r + g + b);

  // Analisis warna
  if (isRed(redRatio, greenRatio, blueRatio)) {
    Serial.println("Biji tidak defect (merah)");
    servoSort.write(posNonDefect); // Gerakkan ke jalur non-defect
    countNonDefect++; // Tambah counting non-defect
  } else {
    Serial.println("Biji defect (selain merah)");
    servoSort.write(posDefect); // Gerakkan ke jalur defect
    countDefect++; // Tambah counting defect
  }

  // Update LCD
  updateLCD();

  delay(1000); // Tunggu sebelum membaca biji berikutnya
}

// Fungsi untuk mendeteksi warna merah
bool isRed(float redRatio, float greenRatio, float blueRatio) {
  // Threshold untuk menentukan warna merah
  if (redRatio > 0.5 && greenRatio < 0.3 && blueRatio < 0.3) {
    return true; // Warna merah
  }
  return false; // Selain merah
}

// Fungsi untuk mengupdate tampilan pada LCD
void updateLCD() {
  lcd.setCursor(8, 0);
  lcd.print(countDefect);
  lcd.setCursor(9, 1);
  lcd.print(countNonDefect);
}

// Fungsi untuk mengecek tombol reset
void checkResetButton() {
  buttonState = digitalRead(buttonPin);
  if (buttonState == LOW) { // Tombol ditekan
    countDefect = 0;
    countNonDefect = 0;
    updateLCD(); // Reset tampilan LCD
    Serial.println("Counting direset");
    delay(500); // Debounce tombol
  }
}
This documentation provides a comprehensive overview of the circuit, including a summary, component list, wiring details, and the embedded