
Circuit Documentation
Summary
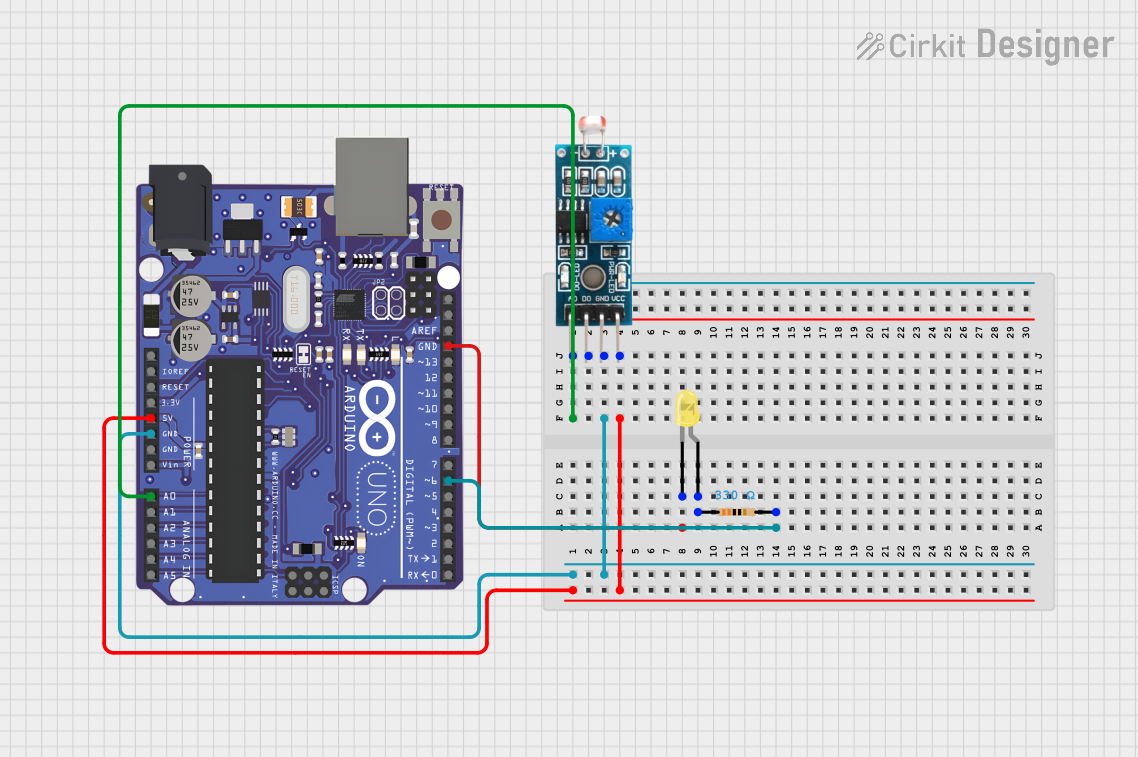
This circuit is designed to control an LED based on the ambient light level detected by an LDR (Light Dependent Resistor) module. The circuit uses an Arduino UNO to read the LDR values and control the LED accordingly. When the ambient light level is below a certain threshold, the LED will turn on, and it will turn off when the light level is above the threshold.
Component List
LED: Two Pin (yellow)
- Description: A yellow LED with two pins: anode and cathode.
- Purpose: Indicates the light level by turning on or off.
Arduino UNO
- Description: A microcontroller board based on the ATmega328P.
- Purpose: Reads the LDR values and controls the LED.
Module LDR
- Description: A Light Dependent Resistor module with four pins: VCC, GND, DO, and AO.
- Purpose: Measures the ambient light level.
Resistor
- Description: A resistor with a resistance of 330 Ohms.
- Purpose: Limits the current flowing through the LED to prevent damage.
Wiring Details
LED: Two Pin (yellow)
- Anode: Connected to one end of the resistor.
- Cathode: Connected to the GND pin of the Arduino UNO.
Arduino UNO
- A0: Connected to the AO pin of the LDR module.
- GND: Connected to the GND pin of the LDR module and the cathode of the LED.
- 5V: Connected to the VCC pin of the LDR module.
- D6 PWM: Connected to the other end of the resistor.
Module LDR
- AO: Connected to the A0 pin of the Arduino UNO.
- GND: Connected to the GND pin of the Arduino UNO.
- VCC: Connected to the 5V pin of the Arduino UNO.
Resistor
- Pin1: Connected to the anode of the LED.
- Pin2: Connected to the D6 PWM pin of the Arduino UNO.
Code Documentation
const int LDRPin = A0; // Analog pin for LDR
const int LEDPin = 9;  // Digital pin for LED

void setup() {
  pinMode(LEDPin, OUTPUT); // Set LED pin as output
  Serial.begin(9600);      // Begin Serial Communication
}

void loop() {
  int lightValue = analogRead(LDRPin); // Read LDR value
  Serial.println(lightValue);          // Print LDR value for calibration

  if (lightValue < 600) {
    digitalWrite(LEDPin, HIGH); // Turn ON LED in darkness
  } else {
    digitalWrite(LEDPin, LOW);  // Turn OFF LED in light
  }
  delay(500); // Small delay for stability
}
Code Explanation
- LDRPin: Defines the analog pin (A0) connected to the LDR module.
- LEDPin: Defines the digital pin (9) connected to the LED.
- setup(): Initializes the LED pin as an output and begins serial communication at 9600 baud.
- loop(): Continuously reads the LDR value, prints it for calibration, and controls the LED based on the light level. If the light level is below 600, the LED turns on; otherwise, it turns off. A delay of 500 milliseconds is added for stability.