Cirkit Designer
Your all-in-one circuit design IDE
Home /
Project Documentation
Arduino Nano and L298N Motor Driver Controlled Robotic Car with NRF24L01 Wireless Communication
Circuit Documentation
Summary
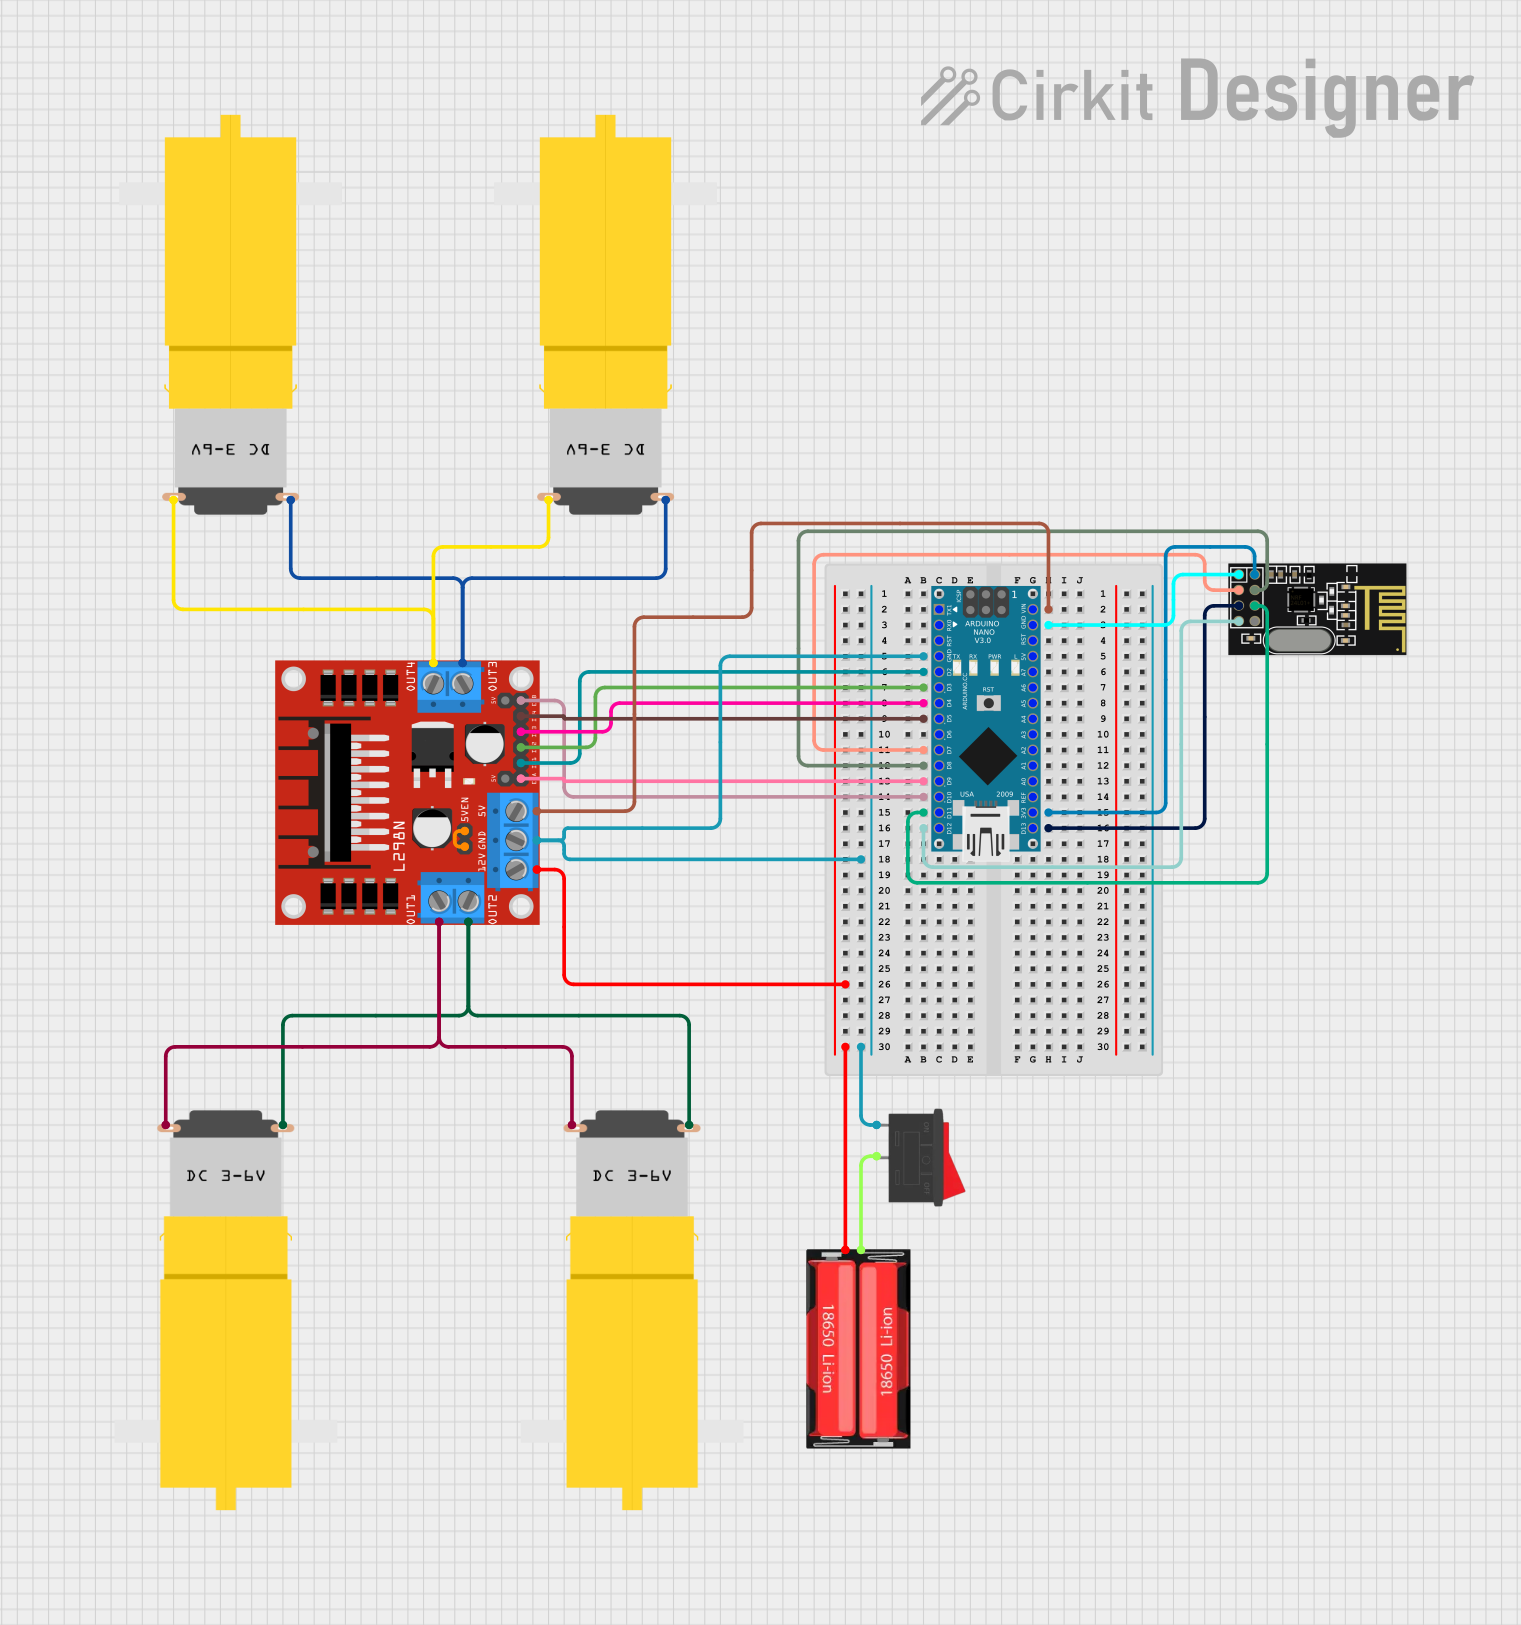
This circuit involves an Arduino Nano microcontroller, an L298N DC motor driver, four hobby motors, an NRF24L01 wireless module, a rocker switch, and a 18650 Li-Ion battery. The Arduino Nano controls the motor driver to operate the motors, and the NRF24L01 module provides wireless communication capabilities. The rocker switch is used to control the power from the battery.
Component List
Arduino Nano
- Description: A small, complete, and breadboard-friendly board based on the ATmega328P.
- Pins: D1/TX, D0/RX, RESET, GND, D2, D3, D4, D5, D6, D7, D8, D9, D10, D11/MOSI, D12/MISO, VIN, 5V, A7, A6, A5, A4, A3, A2, A1, A0, AREF, 3V3, D13/SCK
L298N DC Motor Driver
- Description: A dual H-Bridge motor driver that allows speed and direction control of two DC motors.
- Pins: OUT1, OUT2, 12V, GND, 5V, OUT3, OUT4, 5V-ENA-JMP-I, 5V-ENA-JMP-O, +5V-J1, +5V-J2, ENA, IN1, IN2, IN3, IN4, ENB
Motor amarillo motorreductor hobby
- Description: A small DC motor with a gearbox, commonly used in hobby projects.
- Pins: vcc, GND
NRF24L01
- Description: A wireless transceiver module for short-range communication.
- Pins: IRQ (not used), MOSI, CSN, VCC (3V), GND, CE, SCK, MISO
Rocker Switch
- Description: A simple on/off switch.
- Pins: 1, 2
18650 Li-Ion
- Description: A rechargeable lithium-ion battery.
- Pins: Positive, Negative
Wiring Details
Arduino Nano
- GND connected to L298N DC motor driver GND
- VIN connected to L298N DC motor driver 5V
- D9 connected to L298N DC motor driver ENA
- D2 connected to L298N DC motor driver IN1
- D3 connected to L298N DC motor driver IN2
- D4 connected to L298N DC motor driver IN3
- D5 connected to L298N DC motor driver IN4
- D10 connected to L298N DC motor driver ENB
- GND connected to NRF24L01 GND
- D7 connected to NRF24L01 CE
- D8 connected to NRF24L01 CSN
- D11/MOSI connected to NRF24L01 MOSI
- 3V3 connected to NRF24L01 VCC (3V)
- D12/MISO connected to NRF24L01 MISO
- D13/SCK connected to NRF24L01 SCK
L298N DC Motor Driver
- OUT1 connected to Motor amarillo motorreductor hobby GND
- OUT2 connected to Motor amarillo motorreductor hobby vcc
- 12V connected to 18650 Li-Ion Positive
- GND connected to Arduino Nano GND
- 5V connected to Arduino Nano VIN
- OUT3 connected to Motor amarillo motorreductor hobby GND
- OUT4 connected to Motor amarillo motorreductor hobby vcc
- 5V-ENA-JMP-I connected to 5V-ENA-JMP-O
- ENA connected to Arduino Nano D9
- IN1 connected to Arduino Nano D2
- IN2 connected to Arduino Nano D3
- IN3 connected to Arduino Nano D4
- IN4 connected to Arduino Nano D5
- ENB connected to Arduino Nano D10
Motor amarillo motorreductor hobby
- GND connected to L298N DC motor driver OUT1
- vcc connected to L298N DC motor driver OUT2
Motor amarillo motorreductor hobby
- GND connected to L298N DC motor driver OUT3
- vcc connected to L298N DC motor driver OUT4
Motor amarillo motorreductor hobby
- GND connected to L298N DC motor driver OUT1
- vcc connected to L298N DC motor driver OUT2
Motor amarillo motorreductor hobby
- GND connected to L298N DC motor driver OUT3
- vcc connected to L298N DC motor driver OUT4
NRF24L01
- GND connected to Arduino Nano GND
- CE connected to Arduino Nano D7
- CSN connected to Arduino Nano D8
- MOSI connected to Arduino Nano D11/MOSI
- VCC (3V) connected to Arduino Nano 3V3
- MISO connected to Arduino Nano D12/MISO
- SCK connected to Arduino Nano D13/SCK
Rocker Switch
- Pin 1 connected to Arduino Nano GND
- Pin 2 connected to 18650 Li-Ion Negative
18650 Li-Ion
- Positive connected to L298N DC motor driver 12V
- Negative connected to Rocker Switch Pin 2
Documented Code
Arduino Nano Code (sketch.ino)
void setup() {
  // put your setup code here, to run once:

}

void loop() {
  // put your main code here, to run repeatedly:

}
Additional Documentation (documentation.txt)
This documentation provides a comprehensive overview of the circuit, including a summary, detailed component list, wiring details, and the code used in the Arduino Nano.