
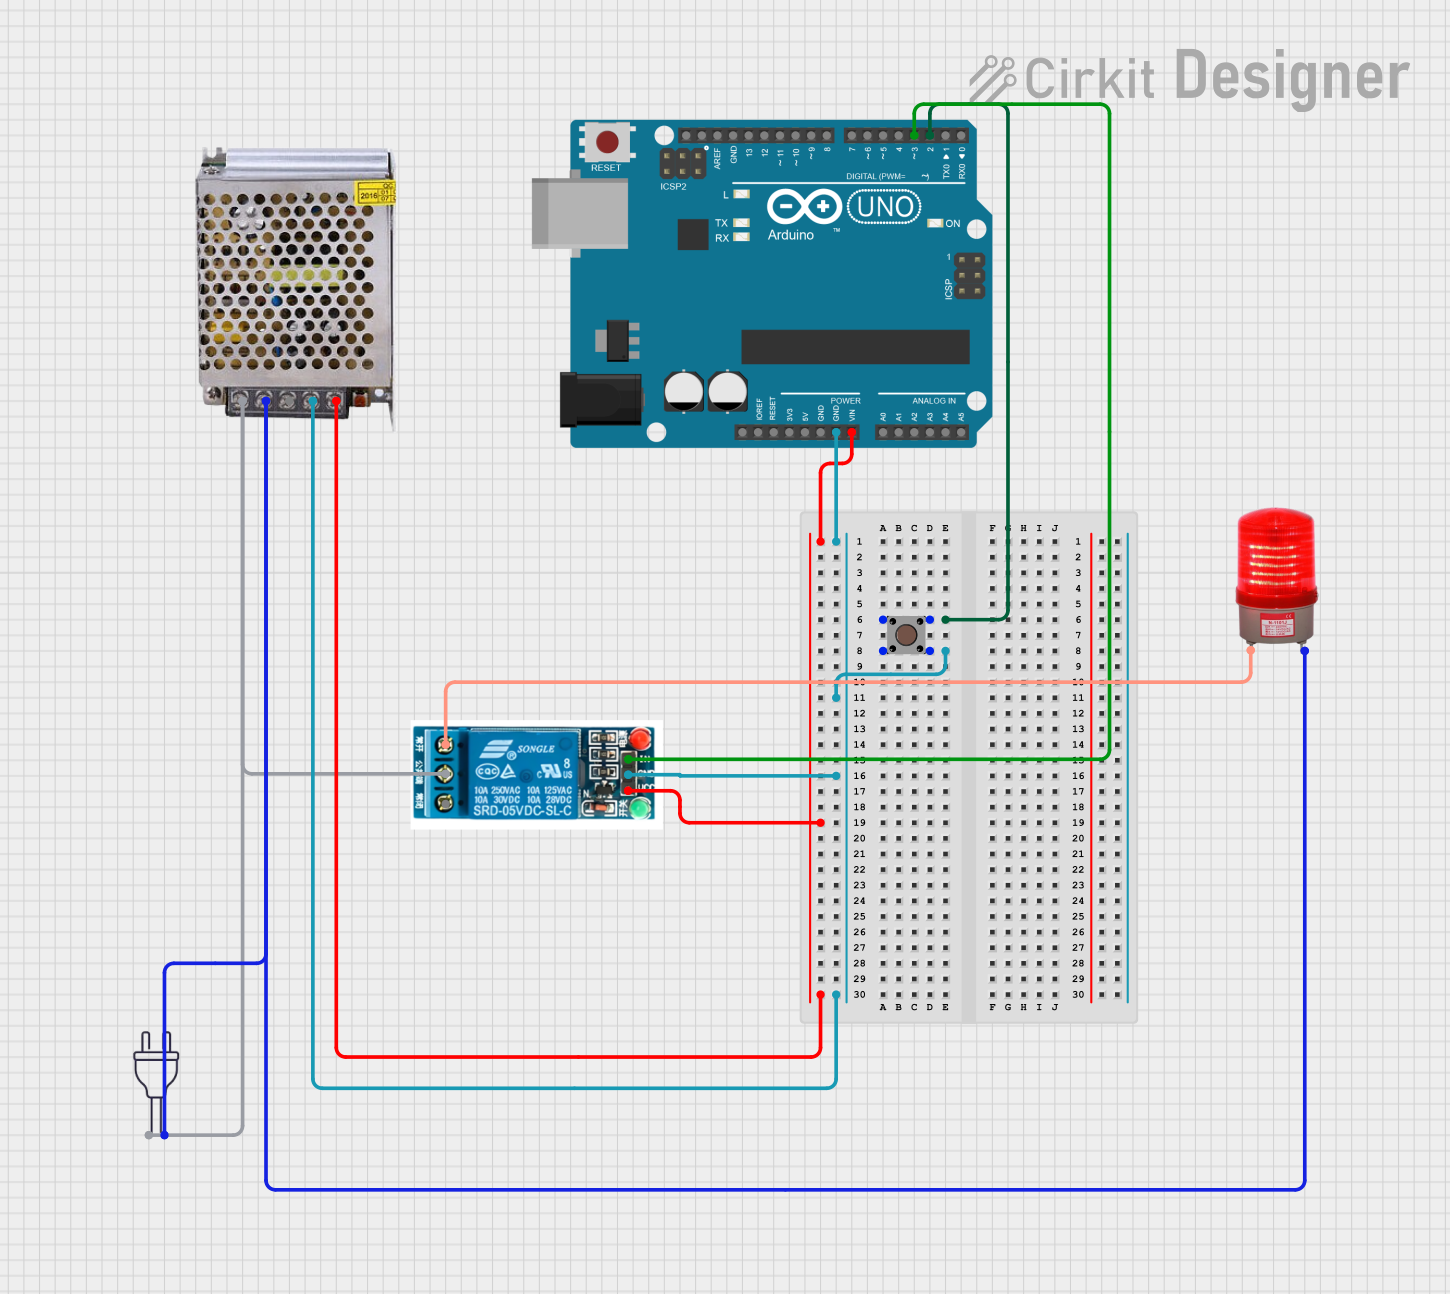
Circuit Documentation
Summary of the Circuit
This circuit is designed to control a 220VAC red light using an Arduino UNO as the main controller. The Arduino UNO reads the state of a pushbutton and controls a 5V relay accordingly. The relay, in turn, switches the red light on or off. The power supply provides 5V to the Arduino and the relay, and also supplies 220VAC to the relay for controlling the red light.
Component List
Arduino UNO
- Description: A microcontroller board based on the ATmega328P.
- Purpose: Acts as the central controller for the circuit, reading input from the pushbutton and controlling the relay.
Pushbutton
- Description: A simple switch mechanism for controlling some aspect of a machine or a process.
- Purpose: Provides a user interface to control the relay.
5V Relay
- Description: An electromechanical switch that allows a low-power circuit to switch a relatively high current and/or voltage on and off.
- Purpose: Controls the power to the red light, allowing it to be turned on and off by the Arduino.
POWER SUPPLY 5V 5AMP
- Description: A power supply that converts 220VAC to 5VDC.
- Purpose: Provides power to the Arduino and the relay.
Power 220V
- Description: The main AC power source.
- Purpose: Supplies the 220VAC required for the red light and the power supply.
Red Light 220VAC
- Description: An indicator light that operates on 220VAC.
- Purpose: Serves as the load controlled by the relay, indicating the on/off state.
Wiring Details
Arduino UNO
- Vin: Connected to the 12V-24V Output (DC) of the POWER SUPPLY 5V 5AMP.
- GND: Common ground with Pushbutton, 5V Relay, and POWER SUPPLY 5V 5AMP.
- D2: Connected to the Pushbutton (acts as input).
- D3: Connected to the 5V Relay "In" pin (acts as output).
Pushbutton
- Pin 1 (in) and Pin 2 (in): Connected to the common ground.
- Pin 3 (out) and Pin 4 (out): Connected to the Arduino UNO D2 pin.
5V Relay
- VCC: Connected to the Vin of the Arduino UNO.
- GND: Common ground with Arduino UNO, Pushbutton, and POWER SUPPLY 5V 5AMP.
- In: Controlled by the Arduino UNO D3 pin.
- Normally Open: Connected to the "+" pin of the Red Light 220VAC.
- Common terminal: Connected to the 220V Positive Pole (AC) of the POWER SUPPLY 5V 5AMP and the hot wire of the Power 220V.
POWER SUPPLY 5V 5AMP
- 220V Positive Pole (AC): Connected to the Common terminal of the 5V Relay and the hot wire of the Power 220V.
- 220V Negative Pole (AC): Connected to the neutral wire of the Power 220V and the "-" pin of the Red Light 220VAC.
- GND (DC): Common ground with Arduino UNO, Pushbutton, and 5V Relay.
- 12V-24V Output (DC): Provides 5V to the Arduino UNO Vin pin.
Power 220V
- Hot wire: Connected to the Common terminal of the 5V Relay and the 220V Positive Pole (AC) of the POWER SUPPLY 5V 5AMP.
- Neutral wire: Connected to the 220V Negative Pole (AC) of the POWER SUPPLY 5V 5AMP and the "-" pin of the Red Light 220VAC.
Red Light 220VAC
- +: Connected to the Normally Open pin of the 5V Relay.
- -: Connected to the 220V Negative Pole (AC) of the POWER SUPPLY 5V 5AMP and the neutral wire of the Power 220V.
Documented Code
// Filename: sketch.ino

const int buttonPin = 2;    // Pin connected to the push button
const int relayPin = 3;     // Pin connected to the relay module
bool relayState = false;    // Current state of the relay
int lastButtonState = LOW;  // Previous state of the button
int currentButtonState;     // Current state of the button
unsigned long lastDebounceTime = 0; // The last time the output pin was toggled
unsigned long debounceDelay = 50;   // The debounce time; increase if the output flickers

void setup() {
  pinMode(buttonPin, INPUT_PULLUP); // Set button pin as input with internal pull-up resistor
  pinMode(relayPin, OUTPUT);        // Set relay pin as output
  digitalWrite(relayPin, LOW);      // Initialize relay as off
  currentButtonState = digitalRead(buttonPin); // Initialize currentButtonState
}

void loop() {
  int reading = digitalRead(buttonPin); // Read the state of the button

  // Check if the button state has changed
  if (reading != lastButtonState) {
    lastDebounceTime = millis(); // Reset the debouncing timer
  }

  if ((millis() - lastDebounceTime) > debounceDelay) {
    // If the button state has been stable for longer than the debounce delay
    if (reading != currentButtonState) {
      currentButtonState = reading;

      // Only toggle the relay if the new button state is LOW
      if (currentButtonState == LOW) {
        relayState = !relayState;
        digitalWrite(relayPin, relayState ? HIGH : LOW);
      }
    }
  }

  lastButtonState = reading; // Update the last button state
}
This code is responsible for reading the state of a pushbutton and toggling the state of a relay. The relay is controlled by the Arduino UNO, which uses a simple debounce mechanism to ensure stable button readings. When the button is pressed, the relay is toggled, which in turn controls the red light connected to the relay's Normally Open contact.